CAUTION:
The power-control button on the device and the power switch on the power supply do not turn off the
electrical current supplied to the device. The device also might have more than one power cord. To
remove all electrical current from the device, ensure that all power cords are disconnected from the
power source.
Before removing the CMOS battery:
1. Remove the top cover. See “Remove the top cover” on page 89.
2. Remove any parts and disconnect any cables that might impede your access to the CMOS battery.
To remove the CMOS battery, complete the following steps:
Watch the procedure
. A video of the installation and removal process is available:
• YouTube:
https://www.youtube.com/playlist?list=PLYV5R7hVcs-DTDY1lmpIPpJVOzo7dKq14
• Youku:
http://list.youku.com/albumlist/show/id_52222446.html
Step 1. Locate the CMOS battery. See “System board components” on page 21.
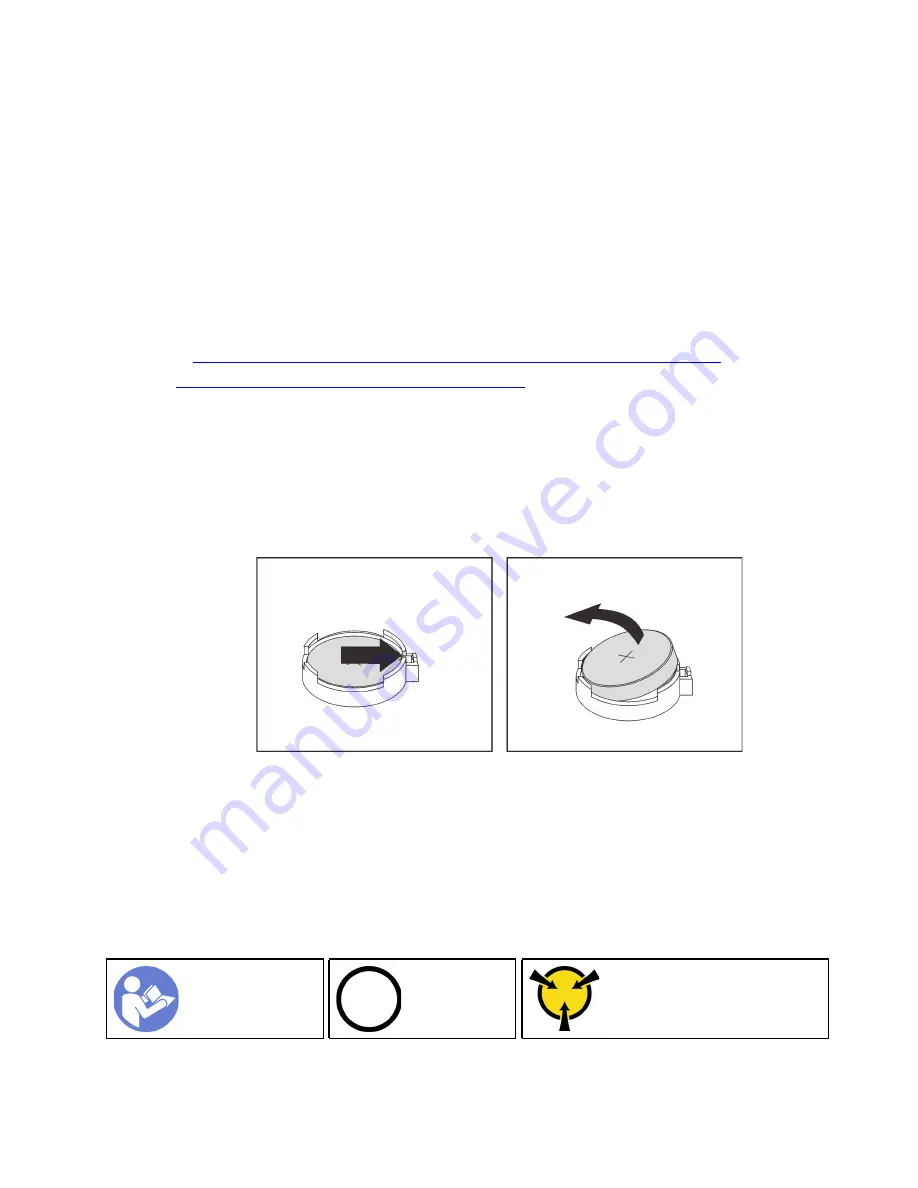
Step 2. Press the battery clip as shown and carefully lift CMOS battery out of the socket.
Attention:
• Failing to remove the CMOS battery properly might damage the socket on the system board.
Any damage to the socket might require replacing the system board.
• Do not tilt or push the CMOS battery by using excessive force.
Figure 122. CMOS battery removal
After removing the CMOS battery:
1. Install a new one. See “Install the CMOS battery” on page 143.
2. Dispose of the CMOS battery as required by local ordinances or regulations.
Install the CMOS battery
Use this information to install the CMOS battery.
Ground package before opening”
The following tips describe information that you must consider when installing the CMOS battery.
.
Hardware replacement procedures
143
Summary of Contents for ThinkSystem SR635
Page 1: ...ThinkSystem SR635 Maintenance Manual Machine Types 7Y98 and 7Y99 ...
Page 5: ...Index 231 Copyright Lenovo 2019 2021 iii ...
Page 6: ...iv ThinkSystem SR635 Maintenance Manual ...
Page 10: ...viii ThinkSystem SR635 Maintenance Manual ...
Page 12: ...Figure 2 QR code 2 ThinkSystem SR635 Maintenance Manual ...
Page 22: ...12 ThinkSystem SR635 Maintenance Manual ...
Page 88: ...78 ThinkSystem SR635 Maintenance Manual ...
Page 133: ...Figure 102 Riser 1 assembly LP FHFL removal Chapter 3 Hardware replacement procedures 123 ...
Page 136: ...Figure 105 Riser 1 assembly LP FHFL installation 126 ThinkSystem SR635 Maintenance Manual ...
Page 214: ...204 ThinkSystem SR635 Maintenance Manual ...
Page 232: ...222 ThinkSystem SR635 Maintenance Manual ...
Page 240: ...230 ThinkSystem SR635 Maintenance Manual ...
Page 245: ......
Page 246: ......


