

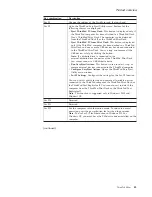


Key
combination
Description
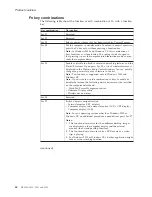
Fn+F8
Change
the
settings
of
the
TrackPoint
and
the
touch
pad.
Fn+F9
Open
the
ThinkPad
EasyEject
Utility
screen.
Buttons
for
the
following
choices
are
displayed:
v
Eject
ThinkPad
PC
from
Dock
:
This
button
is
displayed
only
if
the
ThinkPad
computer
has
been
attached
to
a
ThinkPad
Dock
II
or
a
ThinkPad
Mini
Dock.
The
computer
can
be
detached
from
the
ThinkPad
Dock
II
or
the
ThinkPad
Mini
Dock.
v
Eject
ThinkPad
PC
from
Mini
Dock
:
This
button
is
displayed
only
if
the
ThinkPad
computer
has
been
docked
in
a
ThinkPad
Mini
Dock
and
one
or
more
USB
devices
have
been
connected
to
the
ThinkPad
Mini
Dock.
You
can
stop
and
remove
all
the
USB
devices
safely
by
clicking
the
button.
Note:
If
a
diskette
drive
is
connected
to
the
external-diskette-drive
connector
of
the
ThinkPad
Mini
Dock,
you
cannot
connect
a
USB
diskette
drive.
v
Run
EasyEject
Actions
:
This
button
is
used
to
select,
stop,
or
remove
external
devices
connected
to
the
ThinkPad
computer.
v
Configure
EasyEject
Actions
:
Opens
the
ThinkPad
EasyEject
Utility
main
window.
v
Fn+F9
Settings
:
Configures
the
settings
for
the
Fn+F9
function.
You
can
use
this
utility
to
stop
and
remove
all
ejectable
devices
connected
to
the
ThinkPad
computer,
the
ThinkPad
Mini
Dock,
or
the
ThinkPad
Port
Replicator
II.
You
cannot
use
it
to
detach
the
computer
from
the
ThinkPad
Mini
Dock
or
the
ThinkPad
Port
Replicator
II.
Note:
This
function
is
supported
only
in
Windows
2000
and
Windows
XP.
Fn+F10
Reserved.
Fn+F11
Reserved.
Fn+F12
Put
the
computer
into
hibernation
mode.
To
return
to
normal
operation,
press
the
power
button
for
less
than
four
seconds.
Note:
To
use
Fn+F12
for
hibernation
in
Windows
2000
or
Windows
XP,
you
must
have
the
PM
device
driver
installed
on
the
computer.
(continued)
Product
overview
ThinkPad
Z60m
43
Summary of Contents for 2529E8U
Page 2: ......
Page 3: ...ThinkPad Z60m Hardware Maintenance Manual ...
Page 6: ...iv MT 2529 2530 2531 and 2532 ...
Page 8: ...2 MT 2529 2530 2531 and 2532 ...
Page 86: ...2 3 Removing and replacing a FRU 80 MT 2529 2530 2531 and 2532 ...
Page 92: ...7 7 Removing and replacing a FRU 86 MT 2529 2530 2531 and 2532 ...
Page 118: ...3a 3b 6 5 4 continued Removing and replacing a FRU 112 MT 2529 2530 2531 and 2532 ...
Page 122: ...5 4 4 4 4 5 Removing and replacing a FRU 116 MT 2529 2530 2531 and 2532 ...
Page 149: ...LCD FRUs a b c d 1 2 3 7 8 9 10 4 5 6 e Parts list ThinkPad Z60m 143 ...