background image

Page 53

2 -  Verify that system total static pressure and airflow set

-

tings are within specific operating parameters.

3 -  Clock  gas  meter  to  ensure  that  the  unit  is  operating 

at the specified firing rate. Check the supply pressure 

and the manifold pressure. On two-stage gas furnaces 

check the manifold pressure on high fire and low fire. If 

manifold pressure adjustment is necessary, consult the 

Service Literature for unit specific information on ad

-

justing gas pressure. Not all gas valves are adjustable. 

Verify correct temperature rise.

A-Heat Exchanger and Burners

Cleaning the Heat Exchanger and Burners

NOTE - 

Use papers or protective covering in front of the 

furnace during cleaning.

1 -  Turn off both electrical and gas power supplies to fur

-

nace.

2 -  Remove flue pipe and top cap (some applications top 

cap can remain) from the unit.

3 -  Label the wires from gas valve, rollout switches, prima

-

ry limit switch and make-up box then disconnect them.

4 -  Remove the screws that secure the combustion air in

-

ducer/ pressure switch assembly to the collector box. 

Carefully remove the combustion air inducer to avoid 

damaging blower gasket. If gasket is damaged, it must 

be replaced to prevent leakage.

5 -  Remove the collector box located behind the combus

-

tion air inducer. Be careful with the collector box gas

-

ket. If the gasket is damaged, it must be replaced to 

prevent leakage.

6 -  Disconnect gas supply piping. Remove the screw se

-

curing  the  burner  box  cover  and  remove  cover.  Re

-

move  the  four  screws  securing  the  burner  manifold 

assembly  to  the  vestibule  panel  and  remove  the  as

-

sembly from the unit.

7 -  Remove screws securing burner box and remove burn

-

er box.

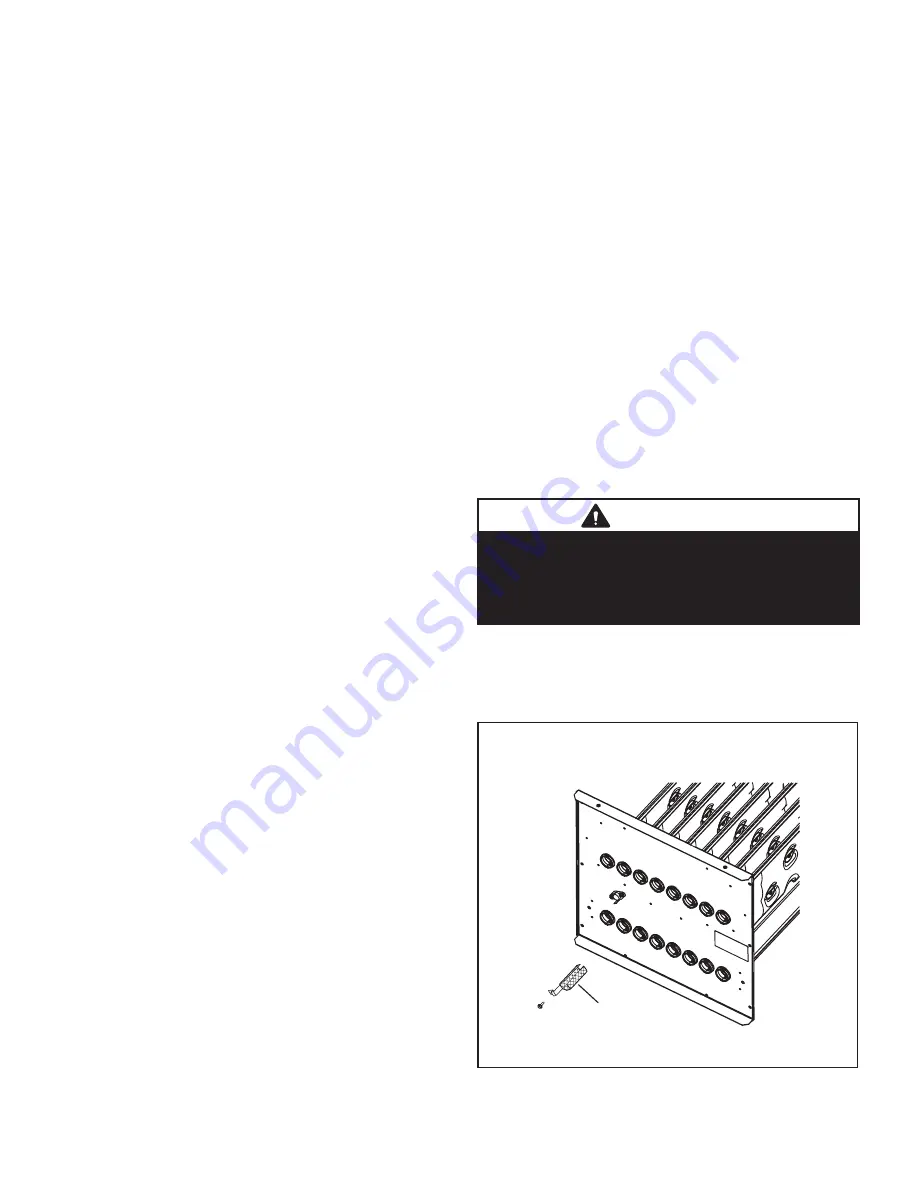
8 -

  NOX units only -

 Remove screw securing NOX insert. 

Remove NOX insert. See FIGURE 24.

9 -  Remove  screws  from  both  sides,  top  and  bottom  of 

vestibule panel.

10-  Remove  heat  exchanger.  It  may  be  necessary  to 

spread cabinet side to allow more room. If so, remove 

five screws from the left side or right side of cabinet. 

See FIGURE 26.

11-  Back wash using steam. Begin from the burner open

-

ing on each clam. Steam must not exceed 275°F.

12-  To  clean  burners,  run  a  vacuum  cleaner  with  a  soft 

brush attachment over the face of burners. Visually in

-

spect inside the burners and crossovers for any block

-

age caused by foreign matter. Remove any blockage. 

FIGURE 25 shows burner detail.

13-  To  clean  the  combustion  air  inducer  visually  inspect 

and using a wire brush clean where necessary. Use 

compressed air to clean off debris and any rust.

14-  Reinstall  heat  exchanger  in  vestibule.  (Replace  the 

five screws in the cabinet from step 10 if removed).

15-  NOX units only - replace NOX inserts.
16-  Reinstall collector box and combustion air assembly. 

Reinstall all screws to the collector box and combus

-

tion  air  inducer.  Failure  to  replace  all  screws  may 

cause leaks. Inspect gaskets for any damage and re

-

place if necessary.

17-   Reinstall  burner  box,  manifold  assembly  and  burner 

box cover.

18-  Reconnect all wires.
19-  Reconnect  top  cap  and  vent  pipe  to  combustion  air 

inducer outlet.

20- Reconnect gas supply piping.
21- Turn on power and gas supply to unit.
22- Set thermostat and check for proper operation.
23-  Check all piping connections, factory and field, for gas 

leaks. Use a leak detecting solution or other preferred 

means.

 CAUTION

Some soaps used for leak detection are corrosive 

to certain metals. Carefully rinse piping thoroughly 

after leak test has been completed. Do not use 

matches, candles, flame or other sources of ignition 

to check for gas leaks.

24-  If a leak is detected, shut gas and electricity off and 

repair leak.

25-  Repeat steps 24 and 26 until no leaks are detected.
26-  Replace access panel.

                   NOx INSERTS

NOx Insert

FIGURE 24 

Summary of Contents for iComfort SL280UH070V36A

Page 1: ...lable for conversion to LPG operation SL280UH V X model units are equipped with a communicating SureLight two stage variable speed integrated control SL280UHV X unit meets the California Nitrogen Oxid...

Page 2: ...x 5 in adaptor See Venting Tables in the Installation Instructions for detailed information SPECIFICATIONS Gas Heating Performance Model No SL280UH090V60C SL280UH110V60C SL280UH135V60D Model No Low N...

Page 3: ...stage cooling speed minimum 250 cfm Lennox iHarmony Zoning System Applications Minimum blower speed is 250 cfm SL280UH070V36A BLOWER MOTOR WATTS COOLING 1 Cooling Speed DIP Switch Settings Motor Watt...

Page 4: ...second stage cooling speed minimum 250 cfm Lennox iHarmony Zoning System Applications Minimum blower speed is 250 cfm SL28UH070V36A BLOWER MOTOR WATTS COOLING 1 Cooling Speed DIP Switch Settings Moto...

Page 5: ...selected second stage cooling speed minimum 250 cfm Lennox iHarmony Zoning System Applications Minimum blower speed is 250 cfm SL280UH090V36B BLOWER MOTOR WATTS COOLING 1 Cooling Speed DIP Switch Set...

Page 6: ...f the selected second stage cooling speed minimum 250 cfm Lennox iHarmony Zoning System Applications Minimum blower speed is 250 cfm SL280UH090V36B BLOWER MOTOR WATTS COOLING 1 Cooling Speed DIP Switc...

Page 7: ...stage cooling speed minimum 380 cfm Lennox iHarmony Zoning System Applications Minimum blower speed is 380 cfm SL280UH090V48B BLOWER MOTOR WATTS COOLING 1 Cooling Speed DIP Switch Settings Motor Watt...

Page 8: ...cond stage cooling speed minimum 380 cfm Lennox iHarmony Zoning System Applications Minimum blower speed is 380 cfm SL280UH090V48B BLOWER MOTOR WATTS COOLING 1 Cooling Speed DIP Switch Settings Motor...

Page 9: ...selected second stage cooling speed minimum 380 cfm Lennox iHarmony Zoning System Applications Minimum blower speed is 380 cfm SL280UH090V48B BLOWER MOTOR WATTS COOLING 1 Cooling Speed DIP Switch Set...

Page 10: ...of the selected second stage cooling speed minimum 450 cfm Lennox iHarmony Zoning System Applications Minimum blower speed is 450 cfm SL280UH090V60C BLOWER MOTOR WATTS COOLING 1 Cooling Speed DIP Swit...

Page 11: ...ontinuous Fan Only speed is selectable at 28 and 38 of the selected second stage cooling speed minimum 450 cfm Lennox iHarmony Zoning System Applications Minimum blower speed is 450 cfm SL280UH090V60C...

Page 12: ...of the selected second stage cooling speed minimum 450 cfm Lennox iHarmony Zoning System Applications Minimum blower speed is 450 cfm SL280UH110V60C BLOWER MOTOR WATTS COOLING 1 Cooling Speed DIP Swi...

Page 13: ...n Continuous Fan Only speed is selectable at 28 and 38 of the selected second stage cooling speed minimum 450 cfm Lennox iHarmony Zoning System Applications Minimum blower speed is 450 cfm SL280UH110V...

Page 14: ...38 of the selected second stage cooling speed minimum 450 cfm Lennox iHarmony Zoning System Applications Minimum blower speed is 450 cfm SL280UH135V60D BLOWER MOTOR WATTS COOLING 1 Cooling Speed DIP...

Page 15: ...tion Continuous Fan Only speed is selectable at 28 and 38 of the selected second stage cooling speed minimum 450 cfm Lennox iHarmony Zoning System Applications Minimum blower speed is 450 cfm SL280UH1...

Page 16: ...R INDUCER BLOWER ASSEMBLY BURNER BOX INNER BLOWER ACCESS PANEL ACCESS PANEL SIGHT GLASS COMBUSTION AIR INDUCER PRESSURE SWITCH GAS VALVE CONTROL BOX with blower drive in some units Not to scale SECOND...

Page 17: ...pressing the button on the face See FIGURE 3 CIRCUIT BREAKER CB8 PRESS TO RESET FIGURE 3 WARNING Shock hazard Disconnect power before servicing Integrated control is not field repairable If control i...

Page 18: ...ized in two modes SINGLE STAGE thermostat or TWO STAGE thermostat The thermostat selection is made using a DIP switch and must be posi tioned for the particular application DIP switch 1 labeled T STAT...

Page 19: ...DEMAND FROM 1ST STAGE T STAT R CLASS 2 VOLTAGE TO THERMOSTAT G MANUAL FAN FROM T STAT C THERMOSTAT SIGNAL GROUND CONNECTED TO TRANSFORMER GRD TR CHASIS GROUND GRD Y1 THERMOSTAT 1ST STAGE COOL SIGNAL...

Page 20: ...2ND STAGE T STAT W1 HEAT DEMAND FROM 1ST STAGE T STAT R CLASS 2 VOLTAGE TO THERMOSTAT G MANUAL FAN FROM T STAT C THERMOSTAT SIGNAL GROUND CONNECTED TO TRANSFORMER GRD TR CHASIS GROUND GRD Y1 THERMOSTA...

Page 21: ...OFF OPTION B OFF 82 100 OFF OPTION C OFF 100 100 OFF OPTION D OFF 100 OFF DEFAULT 10 10 HIGH SPEED MEDIUM HIGH SPEED MEDIUM LOW SPEED LOW SPEED 7 PROTECTIVE PLASTIC FILM ON DIP SWITCHES MAY BE REMOVED...

Page 22: ...me signal mode The integrated control will display the flame current on 7 segment LED in micro amps uA Flame signal mode is exited after any of the following Power is reset Pressing and holding push b...

Page 23: ...arm clears 5 seconds after fault recovered E111 Low line voltage Reverse line power voltage wiring System resumes normal operation 5 seconds after fault recovered E112 Ground not detected System shuts...

Page 24: ...ge appropriate feature will be set as installed and that could be seen in About screen In normal operation after control recognizes sensors alarm will be sent if valid temperature reading is lost To g...

Page 25: ...for correct operation and restriction Resumes normal operation after fault is cleared E227 Low pressure switch open during trial for ignition or run mode Check pressure inches w c of low pressure swi...

Page 26: ...ing connections 1 hour soft lockout Clears when calibration has finished successfully E290 Ignitor circuit fault Failed ignitor or triggering cir cuitry Measure resistance of hot surface ignitor Repla...

Page 27: ...Volts between R O on integrated control with non communicating outdoor unit Dual fuel module required for heat pump application Configuration link R to O needs to be restored Replace link or hard wir...

Page 28: ...pressor open run circuit Required amount of current is not passing through Run current transformer Clears the error after current is sensed in RUN sensor or 1 normal compressor run cycle or after powe...

Page 29: ...ne voltage Line Voltage Low Voltage lower than nameplate rating Check power line voltage and correct Alarm clears 5 seconds after fault recovered E111 Low line voltage Reverse line power voltage wirin...

Page 30: ...d that could be seen in About screen In normal operation after control recognizes sensors alarm will be sent if valid temperature reading is lost To get rid of setting and alarm redo configu ration an...

Page 31: ...for correct operation and restriction Resumes normal operation after fault is cleared E227 Low pressure switch open during trial for ignition or run mode Check pressure inches w c of low pressure swi...

Page 32: ...ars when heat call finishes successfully E275 Soft lockout Flame sensed out of sequence Flame signal is gone Shut off gas Check for gas valve leak 1 hour soft lockout Clears when flame has been proven...

Page 33: ...operate but might not meet efficiency and capacity pa rameters Alarm will clear when commissioning is exited Cleared after commissioning is complete E334 Relay Y1 stuck on interated control Replace in...

Page 34: ...act moment that the blower is de energized Lon ger off delay settings provide lower supply air tempera tures shorter settings provide higher supply air tempera tures TABLE 4 provides the blower off ti...

Page 35: ...itch 11 Switch 12 Switch 13 Increase 24 On On On Increase 18 On On Off Increase 12 On Off On Increase 6 On Off Off Factory Default Off Off Off Decrease 6 Off Off On Decrease 12 Off On Off Decrease 18...

Page 36: ...mal Operation 1 On On On Acceptable 24 VAC High 100 Compressor and indoor blower follow thermostat demand BASIC MODE only active on a Y1 thermostat demand Normal Operation 1 On On On Acceptable 24 VAC...

Page 37: ...y allowing the room space to maintain a cooler room thermostat setpoint ROOM THERMOSTAT CALLS FOR FIRST AND SECOND STAGE COOLING BASIC MODE only active on a Y1 thermostat demand Normal Operation 1 On...

Page 38: ...eceives all neces sary functional parameters from the integrated control and does not rely on a factory program like traditional variable speed motors Units use a three phase electronically controlled...

Page 39: ...is called soft start The motor may take as long as 10 15 seconds to reach full speed If the motor does not reach 200 rpm within 13 seconds the motor shuts down Then the motor will immediately attempt...

Page 40: ...ine Voltage Connector J49 4 Pin Control Connector J48 5 Pin J49 4 Pin FIGURE 10 BLOWER B3 HARNESS CONNECTORS MOTOR with INTEGRATED CONTROLLER SHAFT P49 4 Pin P48 5 Pin P48 5 Pin P49 4 Pin J48 Connecto...

Page 41: ...T A Measure the resistance between each of the three motor leads 3 pin plug and the unpainted part of the end shield If the winding resistance to ground is 100k ohms replace the motor and control modu...

Page 42: ...set limit connected in series with the secondary limit S21 When S47 senses rollout the circuit breaks and the ignition control immedi ately stops ignition and closes the gas valve Rollout can be cause...

Page 43: ...3 HEATING COMPONENTS Ignitor Burner Assembly Sensor Gas Valve Burner Box Front Panel Screw remove and panel will swing open and off Rollout Switch Rollout Switch alternate location Rollout Switch FIGU...

Page 44: ...then then there is a problem with the wiring between the jack plug and control If the reading is not correct the issue is the ignitor Meter set to ohms Test 3 Insert meter probes into the terminals 1...

Page 45: ...cted to the combustion air inducer housing by means of a flexible silicone hose It monitors negative air pressure in the com bustion air inducer housing The switches are a single pole single throw pro...

Page 46: ...ombustion air inducer then reinstall the mounting screws See unit Installation Instructions for more detail IMPORTANT The combustion air pressure switch must be moved for horizontal discharge air left...

Page 47: ...W under cap FIGURE 19 GAS VALVE SHOWN IN ON POSITION MANIFOLD PRESSURE TAP ON SIDE HIGH FIRE ADJUSTING SCREW under cap INLET PRESSURE TAP ON SIDE Resideo Two Stage Gs Valve FIGURE 20 9 Turn switch on...

Page 48: ...fore pressure testing to iso late furnace from gas supply MANUAL MAIN SHUT OFF VALVE WILL NOT HOLD TEST PRESSURE IN EXCESS OF 0 5 PSIG 14 W C GAS VALVE CAP GAS PIPING TEST PROCEDURE FIELD PROVIDED LIN...

Page 49: ...s incorrect check gas orifices for proper size and restriction NOTE To obtain accurate reading shut off all other gas appliances connected to meter G Proper Combustion Furnace should operate minimum 1...

Page 50: ...or these units 2 Natural gas high altitude orifice kit required 3 A natural to L P propane gas changeover kit is necessary to convert this unit Refer to the changeover kit installation instruction for...

Page 51: ...RE RISE Supply Duct Temperature ________ Return Duct Temperature _ _____ Temperature Rise ________ FIGURE 22 C External Static Pressure 1 Tap locations shown in FIGURE 23 2 Punch a 1 4 diameter hole i...

Page 52: ...e and connections for leaks 4 Check the cleanliness of filters and change if necessary monthly 5 Check the condition and cleanliness of burners and heat exchanger and clean if necessary 6 Check the cl...

Page 53: ...E 24 9 Remove screws from both sides top and bottom of vestibule panel 10 Remove heat exchanger It may be necessary to spread cabinet side to allow more room If so remove five screws from the left sid...

Page 54: ...26 VII Wiring and Sequence of Operation Integrated Control Self Check When there is a call for heat the integrated control runs a self check The control checks for S10 primary limit S21 secondary lim...

Page 55: ...Page 55 Wiring Diagram With Ignition Control 103130 XX...

Page 56: ...Page 56 Wiring Diagram With Ignition Control 103130 XX and Units With Blower Drive...

Page 57: ...Page 57 Wiring Diagram With Ignition Control 107045 XX...

Page 58: ...at demand for low fire first stage heat is satisfied the gas valve is de energized and the field selected indoor blower off delay begins The combustion air inducer begins a 5 second post purge period...

Page 59: ...GE AIR SENSOR CLIP ON BOARD LINK W915 Y1 TO Y2 FOR TWO STAGE OPERATION Communicating Integrated Control Communicating Thermostat Outdoor Unit nace air handler control and four wires between the outdoo...

Page 60: ...s 18 RSBus Rf W Gh Gs Cf HVAC EQUIP DEHUMIDIFIER CONTROL HVAC EQUIPMENT DH 24V IN JUMPER COMMUNICATING ENABLED FURNACE COMMUNICATING ENABLED FURNACE ICOMMUNICATING THERMOSTAT CONVENTIONAL NON COMMUNIC...

Page 61: ...DOOR UNIT LENNOX COMMUNICATING THERMOSTAT OR DAMPER CONTROL MODULE CONVENTIONAL TERMINALS FLOAT SWITCH LENNOX COMMUNICATING INDOOR UNIT CONVENTIONAL OUTDOOR UNIT 1 OR 2 STAGE LENNOX COMMUNICATING FURN...

Page 62: ...N 12 minutes ON DO NOT CUT ANY ON BOARD LINKS S1 T STAT FURNACE TERM STRIP OUTDOOR UNIT 1 Heat 2 Cool NOTE Use DIP switch 2 to set second stage heat ON delay OFF 7 minutes ON 12 minutes ON CUT ON BOAR...

Page 63: ...RD LINK W915 2 STAGE COMPR S1 T STAT FURNACE TERM STRIP OUTDOOR UNIT 2 Heat 2 Cool with t stat with humidity control OFF CUT ON BOARD LINK W915 2 STAGE COMPR CUT ON BOARD LINK W914 DEHUM OR HARMONY S1...

Page 64: ...ol OFF CUT ON BOARD LINK W951 HEAT PUMP T STAT FURNACE TERM STRIP HEAT PUMP 67M41 Y H L Y2 D B L Y2 T T outdoor sensor Dual Fuel Two Stage Heat Pump ComfortSense thermostat w bilities Capable of 2 sta...

Page 65: ...MP CUT ON BOARD LINK W914 DEHUM OR HARMONY T STAT FURNACE TERM STRIP HEAT PUMP 67M41 Y H L Y2 D B L Y2 T T outdoor sensor Dual Fuel Two Stage Heat Pump ComfortSense thermostat w bilities Capable of 2...

Page 66: ...FOR TWO STAGE OPERATION Communicating Integrated Control Communicating Thermostat Outdoor Unit nace air handler control and four wires between the outdoor unit and the furnace air handler control Whe...

Page 67: ...otal length of all con nections on the RSBus is limited to 1500ft Wire gauge of RSBus wire is 18 RSBus Rf W Gh Gs Cf HVAC EQUIP DEHUMIDIFIER CONTROL HVAC EQUIPMENT DH 24V IN JUMPER COMMUNICATING ENABL...

Page 68: ...IT LENNOX COMMUNICATING INDOOR UNIT LENNOX COMMUNICATING THERMOSTAT OR DAMPER CONTROL MODULE CONVENTIONAL TERMINALS FLOAT SWITCH LENNOX COMMUNICATING INDOOR UNIT CONVENTIONAL OUTDOOR UNIT 1 OR 2 STAGE...

Page 69: ...2 minutes ON DO NOT CUT ANY ON BOARD LINKS S1 T STAT FURNACE TERM STRIP OUTDOOR UNIT H 1 Heat 2 Cool NOTE Use DIP switch 2 to set second stage heat ON delay OFF 7 minutes ON 12 minutes ON CUT ON BOARD...

Page 70: ...INK W915 2 STAGE COMPR S1 T STAT FURNACE TERM STRIP OUTDOOR UNIT H 2 Heat 2 Cool with t stat with humidity control OFF CUT ON BOARD LINK W915 2 STAGE COMPR CUT ON BOARD LINK W914 DEHUM OR HARMONY S1 T...

Page 71: ...T ON BOARD LINK W951 HEAT PUMP L7742U T STAT FURNACE TERM STRIP HEAT PUMP 67M41 Y H L Y2 D B L Y2 T T outdoor sensor H Dual Fuel Two Stage Heat Pump ComfortSense thermostat w bilities Capable of 2 sta...

Page 72: ...T ON BOARD LINK W914 DEHUM OR HARMONY L7742U T STAT FURNACE TERM STRIP HEAT PUMP 67M41 Y H L Y2 D B L Y2 T T outdoor sensor H Dual Fuel Two Stage Heat Pump ComfortSense thermostat w bilities Capable o...

Page 73: ...ntegrated control will store code in memory and will automatically exit Program Unit Capacity Size Mode and reset If second period expires or push button is held less than five seconds control will au...

Page 74: ...S H S I OFF NO INDUCER OFF AFTER POST PURGE HARD LOCKOUT ERROR CODE FLASHES YES YES YES 1 2 1 LOW PRESSURE SWITCH OPENS 1 2 HARD LOCKOUT REQUIRES THERMOSTAT RESET OR CYCLING OF POWER TO RESET THE LOCK...

Page 75: ...FOR 1ST REQUEST FOR 2ND STAGE HEAT YES CALL FOR HEAT SATISFIED INDUCER SWITCHED TO HIGH SPEED SINGLE STAGE THERMOSTAT 2 STAGE THERMOSTAT NO INDUCER SWITCHED TO LOW SPEED 5 MINUTE DELAY ERROR CODE FLA...

Page 76: ...AGE CALL FOR HEAT SATISFIED NO YES DE ENERGIZE 2ND STAGE GAS VALVE INDUCER SPEED SWITCHED TO LOW SPEED 1 2 3 1ST STAGE HEAT 1ST STAGE CALL FOR HEAT SATISFIED NO YES GAS VALVE DE ENERGIZED INDUCER OFF...

Page 77: ...PROFILES THE SPECIFIC PROFILE IS SELECTED USING THE 1 1 2 2 1 1 1 2 2 DE ENERGIZE 1ST STAGE COOLING CONTACTOR COMPRESSOR FAN 2ND STAGE COOLING REQUEST STILL ACTIVE COOLING REQUEST STILL ACTIVE CALL F...

Page 78: ...FOR HEAT RECEIVED REQUEST FOR COOLING RECEIVED GO TO CALL FOR 1ST STAGE HEAT YES GO TO CALL FOR COOLING 1 1 1 4 YES NO CALL FOR FAN INDOOR BLOWER ON CONTINUOUS FAN SPEED MAINTAIN INDOOR BLOWER AT CON...

Reviews: