Pag. 8
English
IMPORTANT:
The installing and the use of this professional equipment must be done by competent personnel,
that has the appropriate technical knowledge and respects the safety laws in force.
Before installing PGAUTO5NEW, it is necessary to set up the following facilities:
1.
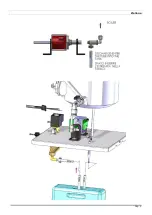
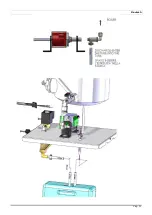
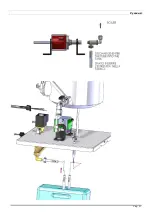
water connection (tap with hose holder); the steam generator will be connected to the tap with hose holder
called WATER INLET (fig.1), placed on PGAUTO5NEW, by means of a rubber tube which must have a
pressure capacity of at least 10 ATM. This rubber tube must be fixed tightly with 2 hose clamps. (NB: before
inserting the rubber tube into PGAUTO5NEW hose holder, you must exhaust a few litres of water in order to
clean the conduit).
2.
protected electrical plug, suitable to the power voltage of the steam generator.
PACKAGE OPENING:
Open the box containing PGAUTO5NEW from the upper side marked as ALTO, take the instructions manual and
read it carefully.
Remove PGAUTO5NEW from the box, fix the wands, connect iron sockets and steam tubes (fig. 1), fix the iron
cable to cable support hook.
ATTENTION: irons must be placed on their iron rests, on the ironing board.
CONNECTION TO WATER PIPE AND STARTING:
1.
Connect the rubber tube to the tube holder called WATER INLET placed on the steam generator (fig. 1) and
turn the water tap on.
2.
Connect the power supply cable to a protected plug with earth protector switch, with observance of the law
in force and a voltage suitable to the steam generator’s features.
3.
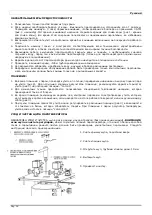
After switching on the boiler (fig. 2: E) and the irons (fig. 2: B), wait for the boiler green pilot light to switch
off (fig. 2: H) and for the manometer to indicate 3,5/4 ATM. At this point seize the iron by the cork handle
and press the steam button 3 or 4 times (fig. 4), so that the steam comes out: this operation must be
carried out in order to heat up the conduit that takes steam to the iron. In this way you prevent also the
falling of small drops of water on the garments (the steam iron must always be held in such a way as not to
harm the operator, i.e. with the iron always pointed downwards).
4.
To adjust steam flow, regulate the steam adjustment tap (fig. 1: solenoid valve).
5.
After this operation, the PGAUTO5NEW is ready for use. During ironing, the “steam ready” pilot light switches on
and off (fig. 2: H).
ATTENTION: Make sure that the water is always available for the steam generator, otherwise the lack of water
can cause air bubbles inside the conduit, i.e. that the water will not reach the boiler while the boiler is under
pressure. In case of lack of water, the pump will function for about a minute; after that the alarm will go on
and will cause the automatic shut down of the entire unit.
6.Water pressure should never go over 2,5 BAR, otherwise the pump will stop and, accordingly, the water will
not reach the boiler.
CONNECTION TO THE WATER TANK:
1.In order to make the steam generator load the water from a separate water tank, it’s obligatory to buy the
accessory kit PG50/1.
2.To assemble the kit please proceed as follows:
-
Open the front panel unscrewing the 4 fixing screws.
-
Unscrew the nut that fixes the teflon hose to the pump.
-
Unscrew the “L” joint from the pump, where the teflon hose was seated, screw the joint on the valve
MC111 supplied to the kit PG50/1.
-
Screw the valve MC111 onto the pump.
-
Screw the nut back on the teflon hose.
-
Insert the silicon hose on the valve MC111 and place the opposite end into the water tank.
-
Insert the other silicon hose on the “L” joint (1), placing the other end into the water tank.
Summary of Contents for PGAUTO5NEW
Page 1: ...PGAUTO5NEW GENERATORE DI VAPORE 5L 5L STEAM GENERATOR 5L DAMPFERZEUGER 5...
Page 2: ...Pag 2 Fig 1 Fig 2 Fig 3 Fig 4...
Page 5: ...Pag 5 Italiano...
Page 9: ...Pag 9 English...
Page 13: ...Pag 13 Deutsch...
Page 17: ...Pag 17...
Page 18: ...Pag 18 1 2 3 0 1 1 3 4 5 6 7 8 9 1 4 3 cotone 2 3 3 4 3 cotone lino 1 2 3 19 4 5...
Page 23: ...Pag 23...
Page 24: ...Pag 24...


