11
Player Portfolio Audio System
| Product Manual
WIRELESS SETUP
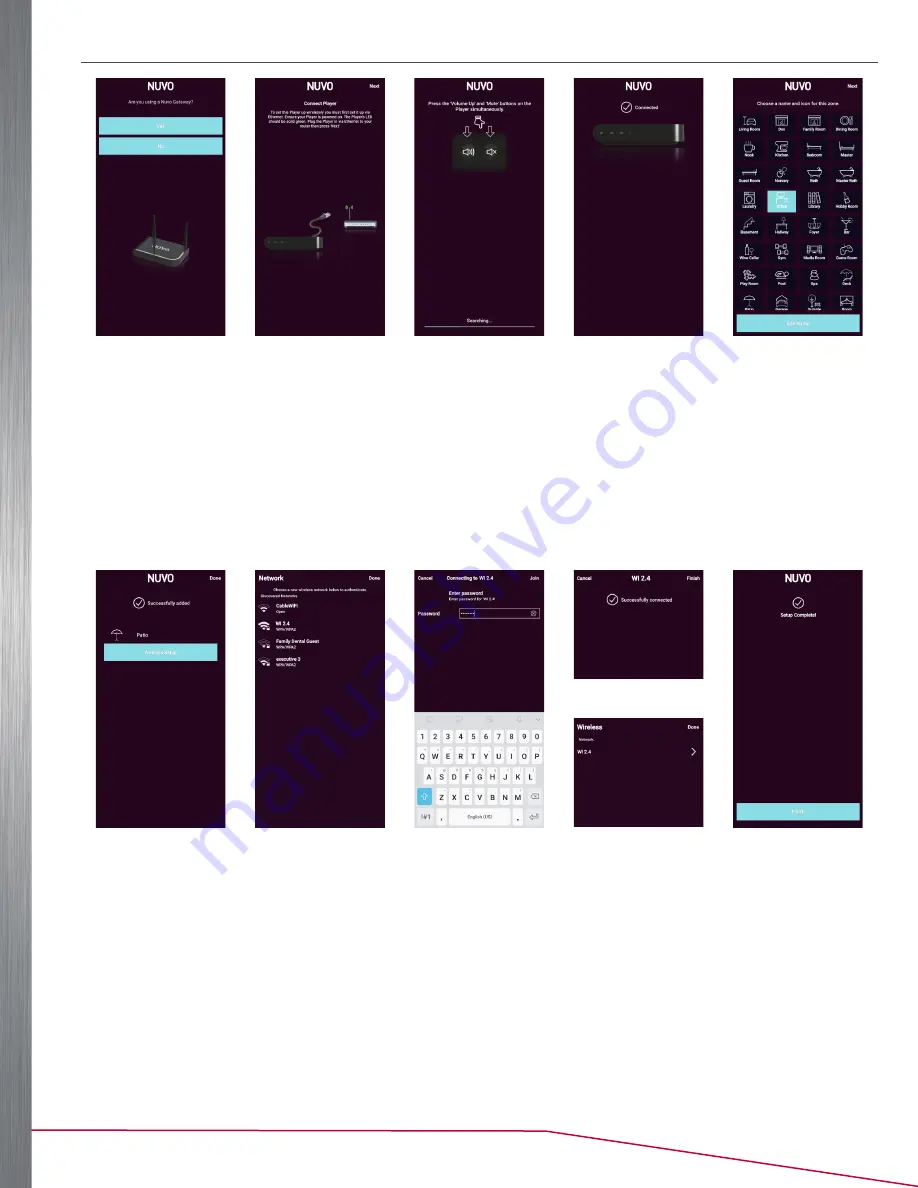
Figure 10
Figure 11
Figure 12
Figure 13
Figure 14
1.
Select
No
as the response to “Are you using a Nuvo Gateway?” (See Figure 10).
2.
Confirm that the component is powered on and has an Ethernet connection to the same network as the mobile
device running the Nuvo Player app (See Figure 11). The status LED on the Player illuminates a solid green.
3.
Press the
Volume up
and
Mute
buttons simultaneously on the component to initiate the binding process (See
Figure 12). Once bound, the component shows as connected (See Figure 13). The status LED on the component
illuminates a solid white and the app moves to the ZONE ICON screen.
4.
Choose a name and icon for the zone, then press
Next
to continue (See Figure 14).
NOTE:
A name can be later edited by selecting Edit Name from the bottom of the app screen (See Figure 14).
Figure 15
Figure 16
Figure 17
Figure 18
Figure 19
Figure 20
5.
The screen displays the zone and a message that the zone was added successfully. Select
Wireless Setup
to
search for available wireless networks. (See Figure 15).
6.
After the networks have been discovered (See Figure 16), select the same network as where the Nuvo Player app
is connected, then enter the password for the network. Select
Join
7.
If the correct password is entered, “Joining” displays on the screen. When successfully connected, the screen
displays a successful connection message (See Figure 18).
NOTE:
If an incorrect password is entered,
Connection Failed
displays and you need to enter the password again.
8.
The screen shows the connection in the wireless settings (See Figure 19). Press
Done
to continue.
9.
If you are prompted to register, choose one of the following options:
• Complete the registration form and select
Register
.
• Select
Later
to register the product at a later date (See “General” on page 20 for more detail).


