background image

38

®

6. Installation

Output connection

Before connecting the output make certain the UPS is off and there is no voltage on the output disconnector terminals.

-   Connect the output line earth cable to the terminal on the base of the equipment.

-   Connect the output line Neutral cable to its terminal on the output disconnector using a suitable cable terminal.

-  Insert a copper plate between terminals L1out, L2out and L3out of the output disconnector.

-   Connect the output line cable L1 to its terminal L1out on the output disconnector using a suitable cable terminal.

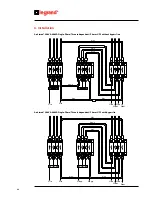
-   Plug the EC15 connector into the backplane of each UPS tunnel as shown in the figure.

 ATTENTION


The plate must be mounted in contact on the disconnector switch terminals with the cable terminals on top – and 

not vice versa.


In the single-phase output configuration the UPS could be seriously damaged if the EC15 connector is not plugged 

in to each UPS backplane.


When connecting the output line take great care not to reverse the UPS cables that are already on the terminals of 

the disconnector switch.

Archimod® 20kVA-40kVA Three-phase/Single-phase UPS (without separate bypass line)

Nin

Nout

L1in

L2in

L3in

L1out

L1byp

Nin

Nout

L1in

L2in

L3in

L1out

Nbyp

brown

brown

black

grey

blue

brown

black

grey

blue

blue

blue

blue

blue

Summary of Contents for Archimod

Page 1: ...Archimod Operating and Maintenance Manual Part LE05755AA 09 12 01 GF ...

Page 2: ...Archimod 2 EN ENGLISH 3 ...

Page 3: ... Features 11 3 3 Models 13 3 4 Technical specifications 16 3 5 Communication devices 20 3 5 1 RS232 serial ports 20 3 5 2 Relay interface 20 3 5 3 Logic level interface 21 3 5 4 Communications slot 21 3 5 5 Multi Slot 21 3 5 6 CAN BUS connector 22 4 Safety provisions 23 4 1 General notes 23 4 2 Symbols 23 4 3 Reference standards 23 4 4 Definitions of operator and specialized technician 23 4 4 1 Qu...

Page 4: ...ion three phase input single phase output only UPS Archimod 20kVA and 40 kVA 37 6 2 9 Single phase input single phase output connection only Archimod 20kVA and 40kVA 40 6 2 10 Single phase input three phase output connection only Archimod 20kVA and 40kVA Inverter in the 120 THREE PHASE mode 43 6 2 11 Single phase input three phase output connection only Archimod 20kVA and 40kVA Inverter in the THR...

Page 5: ...he manual maintenance Bypass mode 74 9 5 2 Replacing a power module or adding new modules 74 9 5 3 Manual exiting from maintenance bypass 75 9 6 Installing replacing battery boxes 75 9 6 1 Replacing battery boxes with the UPS On line Hot Swap 75 9 6 2 Installing replacing battery boxes with the UPS in the maintenance bypass mode 76 10 Dismantling 77 10 1 Disposing of the batteries 77 10 2 Dismantl...

Page 6: ... be taken in relation to the presence of dangerous electricity The persons to whom this publication is addressed normally defined users are all those people who for their field of expertise have the need and or obligation to provide instructions or work directly on the equipment These people can be the following managers heads of operating areas department heads operators directly concerned with t...

Page 7: ...egral part of it 1 5 Collaboration with the user The Manufacturer is available to its clientele to provide additional information and will take into consideration any suggestions made to improve this manual to bring it even closer to the requirements for which it was drawn up If the equipment is sold which always includes handing over this operating manual the primary user must notify the Manufact...

Page 8: ...rnover loss of equipment loss of data or software complaints from third parties and so on Use of its products for life supporting applications is not one recommended by LEGRAND because it is possible and reasonable to foresee that an anomaly or malfunction of the product can cause an anomaly in the life support device or significantly compromise its reliability and effectiveness LEGRAND does not r...

Page 9: ... you select via the display the correct output configuration for the system If the unit is configured with a three phase output it is possible to select management of the three phases as follows THREE 120 phases this is the default setting and it is normally used if three phase loads have been applied in output from the UPS e g three phase electrical motors or if three phase and single phase loads...

Page 10: ...nd or damage to things 5 Follow this path UPS settings Batteries total KB Check select the right number of KBs Battery Kits installed 6 Follow this path UPS settings Batteries Capacity Check select the right battery capacity value for each single KB in Ah The total KB value represents the number of strings of 21 batteries installed in series which are parallel with each other The Capacity in Ah to...

Page 11: ...ontacts and accessories slot All UPS functions can be accessed from any control panel and it is also possible to communicate through any interface installed thus even these peripheral devices are redundant In UPS installations where there are three separate single phase lines in output each line can be separately software controlled to privilege for example the autonomy of one of them when running...

Page 12: ...rating parameters analyse the state of each single power module select the language in which to see the messages start the Hot Swap mode and execute a set of functional tests Off Line mode The Archimod UPS features an Off Line mode for saving energy while still guaranteeing power continuity protection to the connected load When working in the Off Line mode the load is powered directly by the mains...

Page 13: ...Archimod Operating and maintenance manual 13 3 3 Models UPS Archimod 20 18U UPS Archimod 20 UPS Archimod 40 ...

Page 14: ...14 3 Technical description UPS Archimod 60 UPS Archimod 80 UPS Archimod 100 ...

Page 15: ...Archimod Operating and maintenance manual 15 UPS Archimod 120 UPS Archimod Battery ...

Page 16: ...ingle tri 111 A 222 A Maximum current single single 111 A 222 A Input nominal voltage Vac 400V Trifase N 15 20 Only Archimod 20 40kVA Vac 230 V 15 20 with input single phase Input frequency 50 Hz 60 Hz 2 Input connections Tri Neutral THD input current 3 Input power factor 0 99 3 104 51 3 104 52 3 104 53 3 104 54 3 104 55 3 104 56 3 104 57 Maximum current tri tri 29 A 58 A 87 A 116 A 145 A 174 A Ma...

Page 17: ...board N 3 Maximum output power during replacement mode Hot swappable modules 50 66 50 75 60 80 66 Maximum output power in case of failure of a module Redundancy 0 with 3 fhase load 50 66 75 80 84 66 with single fhase load Power Module PM7 3 6 9 12 15 18 Characteristics of Power Module PM7 Nominale Power 6 7kVA Active Power 5 4kW Hot swappable electronics is permitted by dedicated procedure replaci...

Page 18: ... Operating mode On line Eco Mode Maintenance By pass Yes Automatic by pass Yes Expendable Yes power modules and battery drawers Redundancy Yes Restart Yes after complete battery run down Other Max battery charging current for each module 2 5A installed 3 104 51 3 104 52 3 104 53 3 104 54 3 104 55 3 104 56 3 104 57 Output short circuits Yes Input Overvoltage Yes Overtemperature Yes Overload Yes Pow...

Page 19: ...0 3 Yes 3 104 51 3 104 52 3 104 53 3 104 54 3 104 55 3 104 56 3 104 57 Operating temperature 0 40 C Relative Humidity 20 80 non condensing Noise level at 1 m 50 65 dBA Thermal dissipation 2730 BTU h 5460 BTU h 8190 BTU h 10920 BTU h 13650 BTU h 16380 BTU h 3 104 51 3 104 52 3 104 53 3 104 54 3 104 55 3 104 56 3 104 57 Weight Kg modules and battery drawers not included 140 184 5 204 213 197 216 Dim...

Page 20: ...s dedicated exclusively to diagnostic functions and machine firmware upgrades The second called user interface is at the back of the UPS Thanks to this port a whole set of data on UPS operation can be accessed by means of a computer or network board besides being able to control the unmanned switching off of the operating system 3 5 2Relay interface E P O The relay interface contacts are programme...

Page 21: ...nect Pin 7 Overload open collector active low Pin 12 UPS on Battery open collector active low Pin 13 UPS on Bypass open collector active low Pin 14 Autonomy Reserve open collector active low Pin 15 Alarm open collector active low Electrical specifications Logic output 12VDC max output impedance 2 2kΩ in series RS232 power supply 12VDC 700mA max not adjusted Open collector outputs all 30VDC 100mA m...

Page 22: ...22 3 5 6 CAN BUS connector WARNING Do not use this connector C Do not remove the protective metal cap 3 Technical description A B C D E F G H ...

Page 23: ...ttention 4 3 Reference standards EN 62040 1 general provisions and safety recommendations for the UPS EN 62040 2 EMC provisions 4 4 Definitions of Operator and Specialized Technician The professional figure that is going to access the equipment for normal use and maintenance is defined by the term operator With this definition we mean personnel who know how to use and service the equipment and hav...

Page 24: ... selected among the professional people in the department and who has proven experience and capacities and specific technical expertise in relation to the type of work to be done WARNING The person in charge of safety is responsible for the protection against and prevention of company risks in accordance with the European Directive 89 391 EEC safety at the work place in ITALY it is part of the Law...

Page 25: ...le and cleaned periodically If a plate is ruined and or is no longer legible even only in part ask for a new one from the Manufacturer who is bound to supply a substitute WARNING The plates must be neither removed nor covered it is forbidden to affix others on the equipment without the prior written authorisation from the Manufacturer 4 7 Residual risks Residual risks are risks that were impossibl...

Page 26: ...ut the fixed protections in place panels etc In the case of breakages deformation or malfunctions of the equipment or parts of it repair or replace immediately avoiding emergency repairs It is not allowed for any reason to modify manipulate or in any way alter the structure of the equipment the devices mounted on it operating sequence etc without having first consulted the Manufacturer If the fuse...

Page 27: ...is instructions before commissioning the equipment 5 2 Positioning limits The UPS must be placed observing the following conditions humidity and temperature must be within the prescribed limits the fire protection regulations must be observed wiring must be of easy execution the front and rear must be accessible for assistance or routine maintenance the flow of cooling air must be guaranteed the a...

Page 28: ...and level of the UPS with the floor with a suitable instrument by adjusting the feet Please note lock the 4 feet with the check nut 7 Mount the 2 side base strips with the screws supplied 5 4 Checking the contents of the pack Below is a list of the materials supplied The list is general Please refer to the packing list for shipment details Archimod INVERTER No 1 UPS Archimod unit No 1 bag of acces...

Page 29: ... be on dry clean and fresh premises where the ambient temperature is between 0 C and 50 C 32 122 F and with humidity below 90 not condensing 5 6 2 Batteries The standard batteries of the UPS Archimod are sealed lead acid they are maintenance free and can be installed internally in the models 20 40 and 60 kVA Lead is a dangerous substance for the environment if it is not recycled by specialized com...

Page 30: ...oned in its final place of installation the authorised technician can start its installation ATTENTION The type and cross section of the connecting cables must be chosen according to their operating current and laying must be as established by existing laws this is the responsibility of the installer The UPS input current and output power are given in paragraph 3 4 and the battery current in Table...

Page 31: ...ng the Archimod BATTERY It is possible to connect external batteries to increase UPS autonomy of the 20 40 and 60kVA models The Archimod models 80 100 and 120kVA always need external battery cabinets for working For configurations with more than one battery cabinet all the Archimod BATTERY units must be positioned on the same side as the Archimod UPS and connected in parallel with each other with ...

Page 32: ...lder disconnectors of all battery cabinets are open 2 remove the front bottom panel of each Archimod BATTERY 3 remove the rear bottom panel of the Archimod UPS to reach the battery terminals 4 connect the UPS and the Archimod BATTERY battery cabinet s with the earth cable yellow green 5 connect the positive and negative terminals of the Archimod UPS to those of the adjacent Archimod BATTERY 6 conn...

Page 33: ...mod Operating and maintenance manual 33 POSITIVE NEGATIVE External Archimod 80 100 120kva battery connection Rear side positive pole External Archimod 80 100 120kva battery connection Rear side negative pole ...

Page 34: ... correct cyclicity of the phases L1 L2 and L3 ATTENTION The equipment s neutral passes through The neutral conductor cable of the mains input must ALWAYS be connected If the neutral is not connected the UPS could be seriously damaged when powered off the mains Inthethree phaseoutputconfigurationtheUPScouldbeseriouslydamagedifthereisoneormoreEC15connectors on the UPS backplane boards If this is the...

Page 35: ...le to the terminal on the base of the equipment Connect the output line Neutral cable to its terminal on the output disconnector using a suitable cable terminal Connect cables L1 L2 L3 one by one of the output line to their terminals L1out L2out and L3out on the output disconnector using suitable cable terminals and taking care to observe correct cyclicity of the phases L1 L2 and L3 UPS Archimod F...

Page 36: ...ne 6 Installation Nin Nout L1in brown black grey blue blue blue blue brown black grey blue L2in L3in L1out L2out L3out brown black grey blue Nin Nout L1in L2in L3in L1out L2out L3out L1byp L2byp L3byp Nbyp Archimod Three phase Three phase ups with separate bypass line ...

Page 37: ...bypass line is not used leave this cable where it is Connect cables L1 L2 L3 of the mains input line to their terminals L1in L2in and L3in on the mains input disconnector using suitable cable terminals and taking care to observe correct cyclicity of the phases L1 L2 and L3 ATTENTION The plate must be mounted in contact on the disconnector switch terminals with the cable terminals on top and not vi...

Page 38: ...isconnector using a suitable cable terminal Plug the EC15 connector into the backplane of each UPS tunnel as shown in the figure ATTENTION The plate must be mounted in contact on the disconnector switch terminals with the cable terminals on top and not vice versa In the single phase output configuration the UPS could be seriously damaged if the EC15 connector is not plugged in to each UPS backplan...

Page 39: ...rchimod 20kva 40kva Three phase Single phase ups with separate bypass line Nin Nout L1in L2in L3in L1out L1byp Nin Nout L1in L2in L3in L1out Nbyp brown brown black grey blue blue blue blue blue Archimod ups back panel plugging in the ec15 connector ...

Page 40: ... this cable where it is Connect cable L1 of the mains input line to its terminal L1in on the mains input disconnector using a suitable cable terminal ATTENTION The plate must be mounted in contact on the disconnector switch terminals with the cable terminals on top and not vice versa The equipment s neutral passes through The neutral conductor cable of the mains input must ALWAYS be connected If t...

Page 41: ...erminal L1out of the output disconnector using a suitable cable terminal Plug the EC15 connector into the backplane of each UPS tunnel as shown in the figure ATTENTION The plate must be mounted in contact on the disconnector switch terminals with the cable terminals on top and not vice versa In the single phase output configuration the UPS could be seriously damaged if the EC15 connector is not pl...

Page 42: ...chimod 20kva 40kva Single phase Single phase ups With separate bypass line Archimod ups back panel Plugging in the ec15 connector 6 Installation L1byp Nin Nout L1in L1out Nbyp brown black grey blue blue blue ...

Page 43: ...stribution panel is connected to the terminal on the base of the equipment Connect the Neutral mains input cable to its terminal on the mains input disconnector using a suitable cable terminal Remove the cables jumpering terminals L1in L1byp L2in L2byp and L3in L3byp on the relative disconnectors the bypass line must not be used Connect cable L1 of the mains input line to its terminal L1in on the ...

Page 44: ...on Note only the Archimod 20kVA and 40kVA models can be configured as single phase three independent phases ATTENTION The configuration with inverter in the THREE INDEPENDENT PHASES mode is only to be used when you are absolutely certain that loads are never connected to the UPS output line that require a three phase 120 supply such as motors transformers etc Follow the instructions in paragraph 2...

Page 45: ...ine and that of the mains input are in common the same potential The neutral of the UPS s mains input bypass input and through output are connected together internally Before connecting the bypass line check that the available mains power is higher or the same as the UPS s rated input power Also check that the cables to connect to the UPS are disconnected upstream and there is no voltage Connect t...

Page 46: ... black grey blue blue blue Nbyp L1byp Nin Nout L1in L1out L2out L3out brown black grey blue blue blue Archimod 20kVA 40kVA Single Phase Three independent Phases ups without bypass line Archimod 20kVA 40kVA Single Phase Three Independent Phases Ups with bypass lin ...

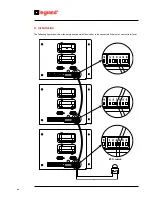
Page 47: ...f the 6 pole Combicon connector installed on all contact interfaces see 3 5 2 If there is more than one contact interface connect the E P O terminals on each contact interface as follows 1 connect the E P O terminals of all the contact interfaces in parallel pin 3 with pin 3 pin 4 with pin 4 2 close the parallel created on the n c contact of the emergency power off device To connect the emergency ...

Page 48: ...48 The following figure shows how the emergency power off device has to be connected if there are 3 contact interfaces 6 Installation 1 2 1 2 1 2 E P O switch ...

Page 49: ...nd return to displaying status Silencing the acoustic indicator 4 DOWN ARROW key Main functions Selects the next function Reduces a value inside a function Selects a new item inside a function e g from ENABLED to DISABLED Scrolls the menus that contain more than 4 lines Changes the main frame page 5 ENTER key Main functions Confirms a value Accesses a menu item Goes from a higher to a lower menu l...

Page 50: ...matically and shuts down 7 2 Main menu and Submenus Press the ON OFF button to start the UPS and confirm with the ENTER key when prompted At the end of the start up procedure the main frame appears on the display Remember that when starting the voltage in output from the machine is present only when the UPS STARTUP bar reaches the end and the main frame appears The UP ARROW and DOWN ARROW buttons ...

Page 51: ...ual time of operation in the case of a power failure 5 load availability in output 1st line UPS operating status 2nd line Phase L1 power in kVA or Watt with respect to nominal power or current with respect to the nominal and relative percentage 3rd line Phase L2 power in kVA or Watt with respect to nominal power or current with respect to the nominal and relative percentage 4th line Phase L3 power...

Page 52: ...oltage current and active power 9 bypass line voltages 1st line UPS operating status 2nd bypass line line voltage between phases L1 and L2 3rd bypass line line voltage between phases L2 and L3 4th bypass line line voltage between phases L3 and L1 10 Battery status 1st line UPS operating status 2nd line voltage load current negative value with ongoing load positive value when the batteries are powe...

Page 53: ...ow facing down or up appears on the right of the display when there are other items to see Use the arrow keys to see these items UPS STATUS UPS SETTINGS POWER MODULES EVENTS TOOLS LOG OUT o UPS Info Options PM status Visual display Batteries UPS Config Output Diagnostics Delete Signalling Test Measurements Input PM SW Update LCD Display Test Alarms Bypass Assistance Historical Data Batteries Reset...

Page 54: ... Peak current supplied in output from the UPS on phase X A Frequency Frequency of the sinusoid voltage in output from phase X Hz Crest I Factor Crest factor on phase X Power Factor Power factor of the load connected to the UPS on phase X Max W Maximum active power suppliable by the UPS on phase X W Power Active power supplied by the UPS on the X phase expressed as a percentage in relation to the m...

Page 55: ...e if the batteries are being charged A ResidualCapac Battery charged status expressed as a percentage 0 100 Chg Status Working status of the battery charger Batt in Standby Running down Autonomy reserve End of autonomy Charging f1 Charging f2 Charging maint Batt being tested Battery equalisation BATTERIES FAILED Max Battery time Tot autonomy Total autonomy the UPS would have with batteries charged...

Page 56: ...e Restart If enabled it allows automatic restarts Output Voltage It sets the output voltage value V Frequency It sets the output frequency value Hz Rated Value it allows the output frequency value to be set 50 or 60 Hz regardless of the supply voltage frequency Automatic Select if enabled the UPS measures the input voltage frequency and synchronises the output to the same value If disabled the UPS...

Page 57: ...sage for zero occurs at exactly the same time Hence if activated even if the bypass triggers e g due to an overload the input output synchronisation is always guaranteed ATTENTION If the PLL function is disabled the automatic bypass function is disabled automatically as well If the overload is prolonged the UPS switches off see Overload permitted in the Technical Description chapter Bypass Bypass ...

Page 58: ...imum percentage of autonomy for restarting Total KBs Sets the total number of KBs installed 1 KB 3 battery boxes Necessary for the UPS to supply correct autonomy values on the basis of the load applied and for correct battery charging Capacity Sets the capacity value of the batteries in the UPS Ah Operator Panel Language Sets the display language Buzzer Enables disables all acoustic signals Keyboa...

Page 59: ...power module X Hz for the bypass line Crest I Factor Crest factor applied by the power module X to the mains Power factor Power factor applied by the power module X to the mains Output X Power Active power supplied by the power module X W Appar Power Apparent power supplied in output by the power module X VA V rms Effective voltage supplied in output by the power module X V RMS Linked Vrms Line vo...

Page 60: ...mber of times the input mains voltage has exceeded the maximum value allowed by the power module No Overheat Total number of overheatings No Overloads Total number of overloads No HV Bus run Total number of overvoltages on the Bus No OutDCLevel Total number of continuous voltage presences in output from the PMs Diagnostics Reset PM Errors Deletes the memory of errors found in the power module Rese...

Page 61: ...UPS provides precise information about the charge status Battery cycle Executes a Battery Test and battery equalisation to verify their status and performance and to maximise battery life Signalling Test Tests the luminous signals Press ENTER to carry out the test on the signals of the status indicator green orange and red and the acoustic signals LCD Display Test Tests the alphanumerical display ...

Page 62: ...ON The shutting down procedure described below is to be used only and exclusively if the load applied to the UPS is off or does not need powering by it 1 Check there is no need to power the connected loads 2 Hold down the ON OFF button on the UPS control panel for at least 2 seconds 3 When asked Turn the UPS off confirm with the ENTER key 4 Wait for the shutdown operation to finish If the UPS need...

Page 63: ...REEN Fixed ORANGE Intermittent Off Modules off Hot swap control GREEN Fixed 1 module ORANGE Fixed The remaining modules GREEN Fixed Battery equalisation Batteries being equalised GREEN Fastintermittent GREEN Fast intermittent There is no mains voltage and or incorrect mains frequency on at least one module 68Hz or 43Hz and or the input PLL is not synchronised GREEN Fast intermittent No bypass inpu...

Page 64: ...eries failed or not connected RED Fastintermittent RED Short double blink with pause Fast intermittent RUNAWAY BATTERIES Excessive voltage on the batteries RED Fast intermittent RED Short double blink with pause Fast intermittent HVBUS RUNAWAY FAILURE Excessive voltage on the high voltage DC buses RED Fast intermittent RED Fixed Fast intermittent DC OUT LEVEL FAILURE Excessive DC level in output R...

Page 65: ...S The load is powered directly by the mains via a manual bypass In this configuration the load is not protected by the UPS UPS OFF LINE The load is powered directly by the bypass line The load is protected because if there is a power failure with the line it switches the load over to battery UPS ON BATTERY UPS on battery The cause for this configuration is a failure in the UPS feeding system or a ...

Page 66: ...be either repaired or changed LOAD OFF An excessive load e g short circuit has caused an excessive drop in the output voltage for too long a time or the load has been switched off due to a prolonged battery overload UPS IN EMERGENCY UPS in Emergency UPS STOPPED UPS has stopped Shutdown in progress The unit is shutting down because it was programmed by the user Modules off Command in hot swap The p...

Page 67: ... UPS Start up interrupted Start up possible only by confirming Start up was not confirmed within 30 seconds UPS shut down by programming UPS shut down by programming Shutting down due to an incorrect configuration An error occurred in configuration UPS in shutting down The number of Power Modules detected by the UPS is incorrect for the output configuration set Shutting down due to a wrong KBnumbe...

Page 68: ...on system with the Power Modules Emergency Emergency Load not powered Power to the loads has been interrupted Abnormal shutting down UPS shut down abnormally Shutting down due to an overload UPS shut down due to an prolonged overload Shutting down due to an Emergency Power Off UPS shut down due to an Emergency Power Off Batteries KO Battery failure PM battery connection failure Failure in the conn...

Page 69: ...The number of Power Modules installed on the UPS has changed Shutting down due to incorrect configuration UPS shutting down due to an incorrect configuration The number of Power Modules detected by the UPS is incorrect for the output configuration set Power Module FW update The Power Module Firmware updated Big overload Big overload Feeding from the output Voltage present on the UPS output Check c...

Page 70: ...put is off Battery test executed Battery test completed successfully Batteries calibrated Batteries calibrated successfully Forced bypass ON The forced bypass mode has been enabled The load is powered by force directly by the bypass Load not protected Forced bypass OFF The forced bypass mode has been disabled Maintenance bypass ON The load is powered directly by the manual bypass disconnector Load...

Page 71: ...tery to the Power Module Check the connection and the battery fuse inside the Power Module MAINS CONNECTION FAILURE Error in connecting the mains to the Power Module Check the connection and the mains fuse inside the Power Module H V BUS CONNECTION FAILURE Error in connecting the D C Bus to the Power Module Check the connection and the D C bus fuse inside the Power Module CM PM COMMUNICATION FAILU...

Page 72: ...he LEGRAND assistance centre immediately 9 3 Periodical checks Correct operation of the UPS must be guaranteed by periodical maintenance inspections essential for safeguarding the unit s operating life and reliability WARNING The periodical checks entail operations inside the UPS where dangerous voltages are present Only maintenance personnel trained and authorised by LEGRAND know all the parts of...

Page 73: ...t down 10 Briefly press less than 0 5 seconds the ON OFF button on the control of the tunnel where the power modules are being replaced 11 Select the CM Hot swap menu set ON and press Enter the control will start all modules automatically in the tunnels it controls 12 Completion of the operation can be monitored by means of the progress bar ATTENTION By pressing the ON OFF button continuously for ...

Page 74: ...or a few seconds 6 Open the mains input disconnector by putting it in the OFF position Open all the battery disconnectors FB and FB of the UPS and of the Archimod BATTERY units if installed 8 Press the ON OFF push button to discharge any internal capacities Now proceed with maintenance WARNING There are dangerous live parts inside the equipment due to the internal batteries even if all the battery...

Page 75: ... 3 1 KB Note if the installation replacement procedure has altered the total number of KBs installed in the UPS their setting will need to be updated by means of the front panel Once the above steps have been done we recommend a battery calibration in order to know exactly what the UPS s total autonomy is 9 6 1 Replacing battery boxes with the UPS On line Hot Swap If in total the UPS has more than...

Page 76: ...raph 9 5 1 2 Ensure that the UPS is not running on battery and that the battery charger is either in the maintenance or standby status 3 Extract the 3 battery boxes of just one KB To add another KB do not remove any battery boxes 4 Insert the 3 new battery boxes and screw them into place with the screws supplied 5 Repeat steps 2 3 and 4 for each KB to install replace 6 Do steps 1 to 7 described in...

Page 77: ...o remove and dismantle the unit wear the Individual Protective Gear described in chapter 3 and refer to the instructions and charts that you will find in this manual Once the various parts have been removed divide the components into groups separating metal from plastic from copper etc according to the selected disposal scheme used in the country where the unit is being dismantled If the parts hav...

Page 78: ...able 2 UPS Archimod Recommended battery fuse ratings 11 Tables POWER INPUT PHASES OUTPUT PHASES INPUT CABLE OUTPUT CABLE Input Imax 20 kVA 3 3 5 x 10 mm2 5 x 10 mm2 37 A 1 1 3 x 25 mm2 3 x 25 mm2 111 A 1 3 3 x 25 mm2 5 x 10 mm2 111 A 3 1 5 x 25 mm2 3 x 25 mm2 111 A 40 kVA 3 3 5 x 25 mm2 5 x 25 mm2 74 A 1 1 3 x 95 mm2 3 x 95 mm2 222 A 1 3 3 x 95 mm2 5 x 25 mm2 222 A 3 1 5 x 95 mm2 3 x 95 mm2 222 A ...

Page 79: ... 22 x 58 N 5 100A 500V gG 22 x 58 120 kVA N 6 100A 500V gG 22 x 58 N 6 100A 500V gG 22 x 58 Power Battery fuse UPS Archimod battery FB FB 20 kVA N 1 100A 500V gG 22 x 58 N 1 125A 500V gG 22 x 58 40 60 kVA N 2 100A 500V gG 22 x 58 N 2 125A 500V gG 22 x 58 80 kVA N 3 100A 500V gG 22 x 58 N 3 125A 500V gG 22 x 58 100 120 kVA N 4 100A 500V gG 22 x 58 N 4 125A 500V gG 22 x 58 Power Recommended Input Au...

Page 80: ...fferential Breaker Differential Current 20 kVA 300 mA 40 kVA 300 mA 60 kVA 300 mA 80 kVA 300 mA 100 kVA 300 mA 120 kVA 300 mA Power Battery current Minimum wires section 20 kVA 88 A 1 x 25 mm2 per pole 40 kVA 176 A 1 x 70 mm2 per pole 60 kVA 264 A 2 x 50 mm2 per pole 80 kVA 352 A 2 x 70 mm2 per pole 100 kVA 440 A 2 x 95 mm2 per pole 120 kVA 528 A 3 x 70 mm2 per pole ...

Page 81: ...81 Archimod ...

Page 82: ...82 ...

Page 83: ......

Page 84: ...5 LIMOGES CEDEX FRANCE 33 5 55 06 87 87 Fax 33 5 55 06 74 55 www legrandelectric com Installer stamp Legrand reserves at any time the right to modify the contents of this booklet and to communicate in any form and modality the changes brought to the same ...

Reviews: