


23
Utility Sewing
Tips:
Slightly reduce the upper tension to
produce better results.
Use backing material for fine or
stretchy materials.
We recommend placing a pin across
the end of the buttonhole as a
precaution against cutting the stitches
with the seam ripper.
It is advisable to use gimp cord for
stretch or knit fabrics. The zigzag
should sew over the gimp.
The lines on the buttonhole foot can
be used guides when sewing multiple
buttonholes.
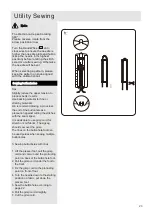
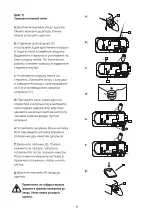
h: Sewing buttonholes with lines
1. Lift the presser foot, pull the gimp
cord and come round the protruding
point on back of the buttonhole foot.
2. Pull the gimp cord under the foot to
the front.
3. Fix the gimp cord to the protruding
point on front of foot.
4. Turn the needle down to the starting
position on fabric, put down the
presser foot.
5. Sew the buttonhole according to
page 22.
6. Pull the gimp cord straightly.
7. Cut the gimp cord.
Note
:
Sewing buttonholes
The dial can not repeat rotating
360°,
Please reverse rotate from the
arrow position arrow.
Turn the Hand Wheel anti-
clockwise to ensure the needle is
higher than needle plate and fabric
(keep the needle in its highest
position) before rotating the stitch
selector or after sewing. Otherwise
the needle will be bent.
When selecting a pattern, please
keep the pattern on knob aligned
with the calibration tail.
Summary of Contents for Like Me
Page 1: ......
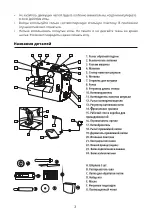
Page 31: ...1 2 3 4 4 5 6 7 8 8 9 10 11 12 15 14 13 18 18 17 16 16 22 21 21 20 19 19 24 30 28 27 18 25 25...
Page 32: ...1 2 1 2 3 4 14 5 6 7 9 10 11 12 13 14 15 16 4C 333B 17 18 19 20...
Page 33: ......
Page 34: ......
Page 35: ......
Page 36: ......
Page 37: ...19 26...
Page 38: ......
Page 39: ......
Page 40: ......
Page 41: ......
Page 42: ...38...
Page 43: ...35...
Page 44: ......
Page 45: ......
Page 46: ......
Page 47: ......
Page 48: ......
Page 49: ......
Page 50: ......
Page 51: ......
Page 52: ......
Page 53: ......
Page 54: ......
Page 55: ......
Page 56: ......
Page 57: ......
Page 58: ......
Page 59: ......
Page 60: ......


