background image

User Manual of LV-D1104CW,LV-D1108CW, LV-D1116CW Series DVR 


60 

6.1


Playing Back Record Files 

6.1.1


Playing Back by Channel 

Purpose: 

Play back the recorded video files of a specific channel in the live view mode. Channel switch is supported. 

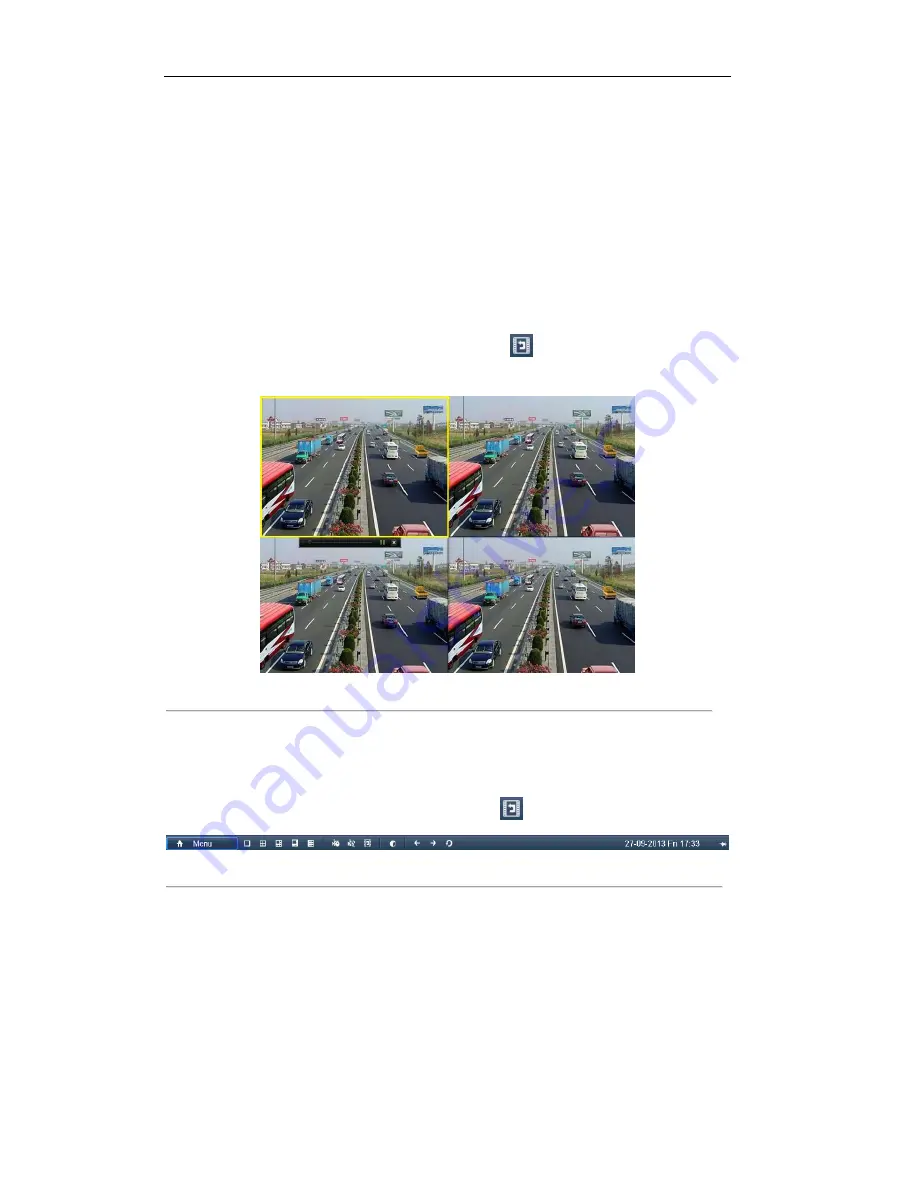
Instant playback by channel: 

Choose a channel in live view mode using the mouse and click the 

  button in the quick setting toolbar. 

Note:


Only record files recorded during the last five minutes on this channel will be played back. 


Figure 6. 1


Instant Playback Interface 


Playback by channel 

Steps: 

1.


Enter the Playback interface.


Mouse: Right-click a channel in live view mode and select 

  from the menu, as shown in Figure 6.2. 


Figure 6. 2


Right-click Menu under Live View 


Front Panel: press PLAY button to play back record files of the channel under single-screen live view mode. 

Under multi-screen live view mode, the recorded files of the top-left channel will be played back. 

Note:

 Pressing numerical buttons will switch playback to the corresponding channels during playback process. 


2.


Playback management. 

The toolbar in the bottom part of Playback interface can be used to control playing progress, as 

shown in Figure 6.3. 

Summary of Contents for LV-D1104CW SERIES

Page 1: ...Digital Video Recorder User Manual...

Page 2: ...e must accept any interference received including interference that may cause undesired operation EU Conformity Statement This product and if applicable the supplied accessories too are marked with CE...

Page 3: ...dealer This manual is applicable to the following models LV D1104CW LV D1108CW LV D1116CW This manual may contain several technically incorrect places or printing errors and the content is subject to...

Page 4: ...ure unit is properly secured to a rack or shelf Major shocks or jolts to the unit as a result of dropping it may cause damage to the sensitive electronics within the unit Use the device in conjunction...

Page 5: ...iew The selected live view channel can be shielded Motion detection tamper proof video exception and video loss alarm functions Privacy mask Multiple PTZ protocols supported setting and calling of PTZ...

Page 6: ...100M network interface IPv6 is supported TCP IP protocol PPPoE DHCP DNS DDNS RTSP NTP SADP SMTP SNMP UPnP NFS and iSCSI are supported TCP UDP and RTP for unicast Remote search playback download lockin...

Page 7: ...3 PTZ Controls 31 4 1 Configuring PTZ Settings 32 4 2 Setting PTZ Presets Patrols Patterns 32 4 2 1 Customizing Presets 32 4 2 2 Calling Presets 33 4 2 3 Customizing Patrols 35 4 2 4 Calling Patrols...

Page 8: ...apter 9 Network Settings 95 9 1 Configuring General Settings 96 9 2 Configuring Advanced Settings 97 9 2 1 Configuring PPPoE Settings 97 9 2 2 Configuring DDNS 97 9 2 3 Configuring NTP Server 100 9 2...

Page 9: ...iewing Record Information 130 12 1 4 Viewing Network Information 131 12 1 5 Viewing HDD Information 131 12 2 Searching Exporting Log Files 133 12 3 Importing Exporting Configuration Files 135 12 4 Upg...

Page 10: ...User Manual of LV D1104CW LV D1108CW LV D1116CW Series DVR 9 Chapter 1 Introduction...

Page 11: ...el is shown below Figure 1 1 Front Panel Table 1 1 Description of Panel No Name Function Description 1 Indicator turns red when DVR is powered up 2 Indicator lights in red when data is being read from...

Page 12: ...view or PTZ Control mode Inputting numbers and characters in Edit mode Switching between different channels in All day Playback mode 4 EDIT Button Editing text fields When editing text fields it will...

Page 13: ...n PTZ Control mode it will turn on off PTZ light 17 PTZ Control Buttons Adjusting the iris focus and zoom of a PTZ camera 18 F2 Button Cycle through tab pages Troubleshooting Remote Control Note Make...

Page 14: ...r provider The operation of the mouse Table 1 3 Description of the Mouse Control Name Action Description Left Click Single Click Live view Select channel and show the quick set menu Menu Select and en...

Page 15: ...put Method Description Figure 1 3 Soft Keyboard Description of the buttons on the soft keyboard Table 1 4 Description of the Soft Keyboard Icons Icons Description Icons Description English Capital Eng...

Page 16: ...nalog video input 2 VIDEO OUT BNC connector for video output 3 HDMI Interface Connects HDMI cable 4 AUDIO IN RCA connector for audio input 5 LAN Interface RJ45 10M 100M Ethernet interface 6 GND Ground...

Page 17: ...recommended that an Uninterruptible Power Supply UPS be used in conjunction with the device 2 Press the POWER button on the rear panel The Power indicator LED should turn green indicating that the uni...

Page 18: ...User Manual of LV D1104CW LV D1108CW LV D1116CW Series DVR 17 Chapter 1 Getting Started...

Page 19: ...rd next time by leaving the Start wizard when device starts checkbox checked 2 Click on the Wizard window to enter the Login window as shown in Figure 2 2 Figure 2 2 Login Window 3 Enter the admin pas...

Page 20: ...o enter the HDD Management window Figure 2 5 HDD Management 8 To initialize the HDD select the HDD and click Initialization removes all the data saved in the HDD 9 Click to enter the Record Settings w...

Page 21: ...User Manual of LV D1104CW LV D1108CW LV D1116CW Series DVR 20 Figure 2 7 Copy Record Settings 11 Click to complete the start wizard settings...

Page 22: ...User Manual of LV D1104CW LV D1108CW LV D1116CW Series DVR 21 Chapter 2 Live View...

Page 23: ...n which menu you re on brings you to the Live View mode Live View Icons In the live view mode there are icons at the right top of the screen for each channel showing the status of the record and alarm...

Page 24: ...e auxiliary video output for live view recording and PTZ controls When both HDMI and VGA are not connected it is used as the main video output for live view playback recording PTZ control and menu ope...

Page 25: ...camera supports intelligent function the Reboot Intelligence option is included when right clicking mouse on this camera 3 2 2 Quick Setting Toolbar in Live View Mode On the screen of each channel the...

Page 26: ...general lighting conditions default Indoor the image is relatively smoother Dim Light the image is smoother than the other three modes Outdoor the image is relatively clearer and sharper The degree o...

Page 27: ...to Other Camera s 2 Select the camera s to be configured with the image settings You can also click the checkbox of Analog to select all cameras 3 Click the OK button to finish the Copy settings Note...

Page 28: ...me The duration between switching of channels when enabling auto switch in Live View Enable Audio Output Enable disable audio output for the selected video output Notes 1 When the VGA HDMI output inte...

Page 29: ...ct a screen layout 3 Click to select a screen in the right region and double click to select a channel in the left region Thus the selected channel will be displayed in the corresponding screen Note m...

Page 30: ...cting the image quality channel zero encoding is supported as an option for you Steps 1 Enter the Live View Settings interface Menu Configuration Live View 2 Select the Channel Zero Encoding tab Figur...

Page 31: ...ive view mode and if you want to do some operation you need to enter user name and password to log in again Steps 1 Enter the Shutdown menu Menu Shutdown Figure 3 9 Shutdown 2 Click Logout Note After...

Page 32: ...User Manual of LV D1104CW LV D1108CW LV D1116CW Series DVR 31 Chapter 3 PTZ Controls...

Page 33: ...TZ camera Note All the parameters should be exactly the same as the PTZ camera parameters Only PTZ Protocol can be set for network cameras Example If the PTZ camera has a Baud rate as 115200 you shoul...

Page 34: ...set Repeat the steps2 4 to save more presets If the number of the presets you want to save is more than 17 you can click and choose the available numbers Figure 4 3 More Presets 4 2 2 Calling Presets...

Page 35: ...Call Preset 3 Choose the preset number Call preset in live view mode Steps 1 Click the PTZ Control icon in the quick setting bar to enter the PTZ setting menu in live view mode Figure 4 5 PTZ Toolbar...

Page 36: ...interface Menu Camera PTZ More Settings 2 Select patrol number 3 Select the under Patrol option box to add key points for the patrol Figure 4 6 PTZ Add Key Point 4 Configure key point parameters such...

Page 37: ...ints by clicking the trash icon Figure 4 8 KeyPoints Deletion 4 2 4 Calling Patrols Purpose Calling a patrol makes the PTZ to move according the predefined patrol path Calling patrol in the PTZ settin...

Page 38: ...Choose Patrol on the control bar 3 Click the patrol you want to call Figure 4 10 PTZ Toolbar Patrol 4 2 5 Customizing Patterns Purpose Patterns can be set by recording the movement of the PTZ You can...

Page 39: ...above steps to save more patterns 4 2 6 Calling Patterns Purpose Follow the procedure to move the PTZ camera according to the predefined patterns Calling pattern in the PTZ setting interface Steps 1 E...

Page 40: ...the pattern number you want to call or you can select the pattern number and click to call the pattern Figure 4 13 PTZ Toolbar Pattern 4 3 PTZ Control Toolbar In the Live View mode you can press the P...

Page 41: ...Icon Description Icon Description Direction button and the auto cycle button Zoom Focus Iris Zoom Focus Iris The speed of the PTZ movement Light on off Wiper on off 3D Zoom Image Centralization Prese...

Page 42: ...User Manual of LV D1104CW LV D1108CW LV D1116CW Series DVR 41 Chapter 5 Record Settings...

Page 43: ...the storage mode of the HDD 2 If the HDD mode is Quota please set the maximum record capacity and maximum picture capacity For detailed information see Chapter 10 5 Configuring Quota Mode 3 If the HD...

Page 44: ...s 5 seconds it records till 11 00 05 Expired Time day The expired time is the longest time for a record file to be kept in the HDD if the deadline is reached the file will be deleted You can set the e...

Page 45: ...rameters for the sub stream Refer to the step of main stream settings 3 Click Apply to save the settings Note You can click the Restore button to restore the current sub stream settings to the default...

Page 46: ...e 2 Choose the camera you want to configure 3 Check the check box after the Enable Schedule item There are two ways to configure the record schedule Task 1 Edit the Schedule Steps 1 Click Edit 2 In th...

Page 47: ...apped each other Repeat the above steps2 5 to schedule recording for other days in the week If the schedule can also be set to other days click Copy Figure 5 8 Copy Schedule to Other Days Note The Hol...

Page 48: ...nformation refer to Chapter 8 1 and Chapter 8 2 2 Use the mouse to drag and draw time periods Note Up to 8 periods can be configured for each day Figure 5 10 Draw the Schedule 3 You can repeat the abo...

Page 49: ...surveillance center and so on In this chapter you can follow the steps to schedule a record which triggered by the detected motion Steps 1 Enter the Motion Detection interface Menu Camera Motion Figur...

Page 50: ...the upper level menu 8 Exit the Motion Detection menu 3 Enter Schedule settings interface Menu Record Schedule Record Schedule Figure 5 15 Record Schedule 1 Check the checkbox after the Enable Schedul...

Page 51: ...an t be overlapped each other Repeat the above steps3 6 to schedule motion detection triggered recording for all the week If the schedule can also be set to other days click Copy Figure 5 18 Copy Sche...

Page 52: ...or you can enable recording for all cameras by clicking the status bar before Analog to change it to 3 Set recording mode to manual By default the camera is enabled with recording by schedule Click t...

Page 53: ...Holiday on the left bar Figure 5 22 Holiday Settings 3 Enable Edit Holiday schedule 1 Click to enter the Edit interface Figure 5 23 Edit Holiday Settings 2 Check the checkbox after Enable 3 Select Mo...

Page 54: ...g check the All Day checkbox Otherwise leave it blank 7 Set start end time for holiday schedule Note Up to 8 periods can be configured for each day And the time periods can t be overlapped each other...

Page 55: ...to Group before you set the HDD property to Redundant For detailed information please refer to Chapter 10 4 Managing HDD Group There should be at least another HDD NetHDD which is in R W mode Steps 1...

Page 56: ...Series DVR 55 Figure 5 27 Encoding Record 2 Select Camera you want to configure 3 Check the checkbox of the Redundant Record 4 Click Apply to save settings and back to the upper level menu Repeat the...

Page 57: ...g interface 4 Configuring HDD group 1 Choose a group number for the HDD group 2 Click Apply and then in the pop up message box click Yes to save your settings 3 Click OK to back to the upper level men...

Page 58: ...Figure 5 30 Playback 2 Select the channels by checking the checkbox to 3 Configure the record type file type and start end time 4 Click Search to show the results Figure 5 31 Playback Search Result 5...

Page 59: ...HDD you want to protect Figure 5 34 HDD General Editing 3 Set the HDD to Read only 4 Click OK to save settings and back to the upper level menu Note You can t save any files in a Read only HDD If you...

Page 60: ...User Manual of LV D1104CW LV D1108CW LV D1116CW Series DVR 59 Chapter 6 Playback...

Page 61: ...1 Instant Playback Interface Playback by channel Steps 1 Enter the Playback interface Mouse Right click a channel in live view mode and select from the menu as shown in Figure 6 2 Figure 6 2 Right cli...

Page 62: ...peration Button Operation Button Operation Button Operation Audio on Mute Start Stop clipping Add default tag Add customized tag Tag management Digital Zoom Pause reverse play Reverse play Single fram...

Page 63: ...and then double click to select a date on the calendar Figure 6 5 Playback Calendar Note If there are record files for that camera in that day in the calendar the icon for that day is displayed as Oth...

Page 64: ...ard 30s reverse Slow forward Fast forward Previous day Next day Scaling up down time bar Process bar Full Screen Exit Video type Note Playback progress bar use the mouse to click any point of the prog...

Page 65: ...0 if you set the pre play time as 5 seconds the video plays back from 9 59 55 Post play The time you set to play back after the event For example when an alarm triggered the recording ends at 11 00 if...

Page 66: ...Button Operation Button Operation Button Operation Audio on Mute Start Stop clipping Add default tag Add customized tag Tag management Digital Zoom Pause reverse play Reverse play Single frame revers...

Page 67: ...record files and position time point Before playing back by tag 1 Enter Playback Menu Playback interface 2 Search and play back the record file s Refer to Chapter 6 1 2 for the detailed information ab...

Page 68: ...ls edit the Start and End time and click to enter Search Result interface Note You can enter keyword in the textbox to search the tag on your command Figure 6 14 Video Search by Tag 4 Click button to...

Page 69: ...ion Audio on Mute Start Stop clipping Add default tag Add customized tag Tag management Digital Zoom Pause reverse play Reverse play Single frame reverse play Pause play Play Single frame play Stop 30...

Page 70: ...tenance Log Information Log Search Figure 6 17 Log Search Interface 2 Set search time and type and click 3 Choose a log with record file and click button to enter Playback interface Note If there is n...

Page 71: ...g USB flash drives USB HDDs Before you start Please insert the external device s with record files into the device Steps 1 Enter the Playback interface Menu Playback 2 Click and select to enter the Ex...

Page 72: ...Steps Using a Mouse Go to Playback interface If you choose playback of the record file click button and until the speed changes to Single frame and one click on the playback screen represents playbac...

Page 73: ...e the mouse to draw a red rectangle and the image within it will be enlarged up to 16 times 4 You can right click to exit the Digital Zoom mode Figure 6 21 Draw Area for Digital Zoom 6 2 3 Reverse Pla...

Page 74: ...User Manual of LV D1104CW LV D1108CW LV D1116CW Series DVR 73 Figure 6 22 4 ch Synchronous Playback Interface 3 Click to play back the record files reversely...

Page 75: ...User Manual of LV D1104CW LV D1108CW LV D1116CW Series DVR 74 Chapter 7 Backup...

Page 76: ...k Note The time duration of record files on a specified channel cannot exceed one day Otherwise the message box Max 24 hours are allowed for quick export will pop up Figure 7 1 Quick Export Interface...

Page 77: ...ing up by Normal Video Search Purpose The record files can be backup to various devices such as USB devices USB flash drives USB HDDs USB writer and DVD R W Backup using USB flash drives USB HDDs USB...

Page 78: ...ck it Check the checkbox before the record files you want to back up Note The size of the currently selected files is displayed in the lower left corner of the window Figure 7 6 Result of Normal Video...

Page 79: ...7 Export by Normal Video Search using USB Flash Drive Figure 7 8 Export by Normal Video Search using USB Writer Stay in the Exporting interface until all record files are exported with pop up message...

Page 80: ...ose the record file in Export interface and click button to check it Note The Player player exe will be exported automatically during record file export Figure 7 10 Checkup of Export Result using USB...

Page 81: ...dropdown list of Event Type 2 Click to enter the Search Result interface Figure 7 12 Event Search for Backup 2 Select record files to export 1 Select an alarm input in the list and click to enter Expo...

Page 82: ...p Note If the inserted USB device is not recognized Click Reconnect device Check for compatibility from vendor You can also format USB flash drive or USB HDDs via the device Figure 7 14 Export by Even...

Page 83: ...1108CW LV D1116CW Series DVR 82 Figure 7 15 Export Finished 4 Check backup result Note The Player player exe will be exported automatically during record file export Figure 7 16 Checkup of Event Expor...

Page 84: ...the playback toolbar to start or stop clipping record file s 3 Quit Playback interface after finishing clipping and you will then be prompted to save the clips Note A maximum of 30 clips can be selec...

Page 85: ...ve Stay in the Exporting interface until all record files are exported with pop up message Export finished Figure 7 20 Export Finished 6 Check backup result Note The Player player exe will be exported...

Page 86: ...lick Export button to enter Export interface Note At least one record file shall be selected Figure 7 2 Result of Normal Video Search for Backup 3 Backup device management Click New Folder button if y...

Page 87: ...Result interface of record files Menu Export Normal Set search condition and click Search button to enter Search Result interface Note At least one channel shall be selected Figure 7 4 Normal Video S...

Page 88: ...anagement Click Erase button if you want to erase the files from a re writable CD DVD Note There must be a re writable CD DVD when you make this operation Note If the inserted USB writer or SATA write...

Page 89: ...User Manual of LV D1104CW LV D1108CW LV D1116CW Series DVR 88 Chapter 8 Alarm Settings...

Page 90: ...sensitivity 1 Check the checkbox of Enable Motion Detection to enable motion detection use the mouse to draw detection area s and drag the sensitivity bar to set sensitivity 2 Click the icon of Handli...

Page 91: ...n also use Copy button to copy an arming schedule to other days Note Time periods shall not be repeated or overlapped Figure 8 4 Set Arming Schedule of Motion Detection 5 Click Handling tab to set up...

Page 92: ...s Steps 1 Enter Video Loss interface of Camera Management Menu Camera Video Loss Figure 8 7 Video Loss Setup Interface 2 Select a channel you want to detect 3 Check the checkbox of Enable Video Loss...

Page 93: ...9 Tamper proof Setup Interface 2 Select a channel you want to detect video tampering 3 Check the checkbox of Enable Tamper proof Note By default the tamper proof detection is configured in full screen...

Page 94: ...User Manual of LV D1104CW LV D1108CW LV D1116CW Series DVR 93 copy the above settings to it Figure 8 10 Copy Settings of Video Tampering...

Page 95: ...nected Disconnected network cable IP Conflicted Duplicated IP address Illegal Login Incorrect user ID or password Input Output Video Standard Mismatch I O video standards do not match Record Exception...

Page 96: ...User Manual of LV D1104CW LV D1108CW LV D1116CW Series DVR 95 Chapter 9 Network Settings...

Page 97: ...the General tab Figure 9 1 General Network Settings 3 In the General Settings interface You can configure the following settings NIC Type IPv4 Address IPv4 Gateway MTU and DNS Server If the DHCP serve...

Page 98: ...nterface 5 Click the Apply button to save and exit the interface 6 After successful settings the system asks you to reboot the device to enable the new settings and the PPPoE dial up is automatically...

Page 99: ...runs IPServer Figure 9 5 IPServer Settings Interface DynDNS 1 Enter Server Address for DynDNS e g members dyndns org 2 In the Device Domain Name text field enter the domain obtained from the DynDNS w...

Page 100: ...o create a new one Note If a new alias of the device domain name is defined in the DVR it will replace the old one registered on the server Figure 9 9 HiDDNS Settings Interface Laview DDNS Enter the S...

Page 101: ...server NTP Port Port of NTP server 5 Click the Apply button to save and exit the interface Note The time synchronization interval can be set from 1 to 10080min and the default value is 60min If the d...

Page 102: ...e fast connection of the device to the WAN via a router you should configure the UPnP parameters of the device Before you start If you want to enable the UPnP function of the device you must enable th...

Page 103: ...re 9 16 UPnP Settings Finished 7 Click the Apply button to save the settings 9 2 6 Configuring Remote Alarm Host Purpose With a remote alarm host configured the device will send the alarm event or exc...

Page 104: ...lass D IP range of 224 0 0 0 to 239 255 255 255 It is recommended to use the IP address ranging from 239 252 0 0 to 239 255 255 255 Steps 1 Enter the Network Settings interface Menu Configuration Netw...

Page 105: ...2 Select the More Settings tab to enter the More Settings interface 3 Enter new Server Port and HTTP Port Figure 9 21 Host Others Settings Menu 4 Enter the Server Port and HTTP Port in the text fields...

Page 106: ...save the settings 4 Select the Email tab to enter the Email Settings interface Figure 9 23 Email Settings Interface 5 Configure the following Email settings Enable Server Authentication optional Chec...

Page 107: ...ed Pictures Check the checkbox of Enable Attached Picture if you want to send email with attached alarm images Interval The interval refers to the time between two actions of sending attached pictures...

Page 108: ...c to obtain real time information of device such as linking status MTU sending receiving rate etc Steps 1 Enter the Network Traffic interface Menu Maintenance Net Detect Figure 9 26 Network Traffic In...

Page 109: ...nterface 3 Enter the destination address in the text field of Destination Address 4 Click the Test button to start testing network delay and packet loss The testing result pops up on the window If the...

Page 110: ...be displayed When it fails to detect the backup device please check whether it is compatible with the device You can format the backup device if the format is incorrect Figure 9 29 Export Network Pac...

Page 111: ...teps Click Status on the right bottom of the page Figure 9 31 Checking Network Status If the network is normal the following message box pops out Figure 9 32 Network Status Checking Result If the mess...

Page 112: ...rmation of the device Steps 1 Enter the Network Statistics interface Menu Maintenance Net Detect 2 Click the Network Stat tab to enter the Network Statistics menu Figure 9 34 Network Stat Interface 3...

Page 113: ...User Manual of LV D1104CW LV D1108CW LV D1116CW Series DVR 112 Chapter 10 HDD Management...

Page 114: ...Information interface Menu HDD General Figure 10 1 HDD Information Interface 2 Select the HDD to be initialized 3 Click the Init button Figure 10 2 Confirm Initialization 4 Select the OK button to st...

Page 115: ...e 10 4 HDD Information Interface 2 Click the Add button to enter the Add NetHDD interface as shown in Figure 10 5 Figure 10 5 Adding NetHDD Interface 3 Add the allocated NetHDD 4 Select the type to NA...

Page 116: ...he Search button to the available IP SAN disks 3 Select the IP SAN disk from the list shown below 4 Click the OK button to add the selected IP SAN disk Note Up to 1 IP SAN disk can be added Figure 10...

Page 117: ...ser Manual of LV D1104CW LV D1108CW LV D1116CW Series DVR 116 Note If the added NetHDD is uninitialized please select it and click the Init button for initialization Figure 10 8 Initialize Added NetHD...

Page 118: ...1 Enter the Storage Mode interface Menu HDD Advanced 2 Set the Mode to Group as shown below Figure 10 9 Storage Mode Interface 3 Click the Apply button and the following Attention box will pop up Fig...

Page 119: ...read only or read write R W Before setting the HDD property please set the storage mode to Group refer to step1 4 of Chapter 10 3 1 Setting HDD Groups A HDD can be set to read only to prevent importa...

Page 120: ...to R W Read only or Redundancy 4 Click the OK button to save the settings and exit the interface 5 In the HDD Information menu the HDD property will be displayed in the list Note At least 2 hard disk...

Page 121: ...f Max Record Capacity GB Figure 10 15 Configure Record Quota 4 You can copy the quota settings of the current camera to other cameras if required Click the Copy button to enter the Copy Camera menu as...

Page 122: ...Check the status of each HDD which is displayed on the list Figure 10 17 View HDD Status 1 Note If the status of HDD is Normal or Sleeping it works normally If the status is Uninitialized or Abnormal...

Page 123: ...er the S M A R T Settings interface Menu HDD HDD Detect S M A R T Settings 2 Select the HDD to view its S M A R T information list Note If you want to use the HDD even when the S M A R T checking is f...

Page 124: ...mmediate measures to repair it Steps 1 Enter the Bad Sector Detection interface Menu HDD HDD Detect Bad Sector Detection Figure 10 9 Figure 10 20 Bad Sector Detection 2 Select a HDD and click Detect t...

Page 125: ...ption interface Menu Configuration Exceptions 2 Select the Exception Type to HDD Error from the dropdown list 3 Click the checkbox s below to select the HDD error alarm type s Note The alarm type can...

Page 126: ...User Manual of LV D1104CW LV D1108CW LV D1116CW Series DVR 125 Chapter 11 Camera Settings...

Page 127: ...ation Interface 6 You can use the mouse to click and drag the text frame on the preview window to adjust the OSD position 7 Copy Camera Settings 1 If you want to copy the OSD settings of the current c...

Page 128: ...e zones will be marked with different frame colors Note Up to 4 privacy mask zones can be configured and the size of each area can be adjusted 5 The configured privacy mask zones on the window can be...

Page 129: ...Dim Light the image is smoother than the other three modes Outdoor the image is relatively clearer and sharper The degree of contrast and saturation is high 5 Adjust the image parameters including the...

Page 130: ...User Manual of LV D1104CW LV D1108CW LV D1116CW Series DVR 129 Chapter 12 Device Management and Maintenance...

Page 131: ...ion and encoding version Figure 12 1 Device Information Interface 12 1 2 Viewing Camera Information Steps 1 Enter the System Information interface Menu Maintenance System Info 2 Click the Camera tab t...

Page 132: ...formation interface Menu Maintenance System Info 2 Click the Network tab to enter the Network Information menu to view the network information Figure 12 4 Network Information Interface 12 1 5 Viewing...

Page 133: ...User Manual of LV D1104CW LV D1108CW LV D1116CW Series DVR 132 Figure 12 5 HDD Information Interface...

Page 134: ...2 6 Log Search Interface 2 Set the log search conditions to refine your search including the Start Time End Time Major Type and Minor Type 3 Click the Search button to start searching log files 4 The...

Page 135: ...he Export button to enter the Export menu You can also export all the log files stored in the HDD 1 Enter the Log Export interface Menu Maintenance Log Information Log Export Figure 12 9 Figure 12 9 L...

Page 136: ...xporting Configuration Files Purpose The configuration files of the device can be exported to local device for backup and the configuration files of one device can be imported to multiple device devic...

Page 137: ...al Upgrade tab to enter the local upgrade menu Figure 12 12 Local Upgrade Interface 4 Select the update file from the backup device 5 Click the Upgrade button to start upgrading 6 After the upgrading...

Page 138: ...LV D1116CW Series DVR 137 Figure 12 13 FTP Upgrade Interface 3 Enter the FTP Server Address in the text field 4 Click the Upgrade button to start upgrading 5 After the upgrading is complete reboot the...

Page 139: ...e Default interface Menu Maintenance Default Figure 12 14 Restore Factory Default 2 Click the OK button to restore the default settings Note Except the network parameters including IP address subnet m...

Page 140: ...User Manual of LV D1104CW LV D1108CW LV D1116CW Series DVR 139 Chapter 13 Others...

Page 141: ...Output Standard Select the CVBS output standard to NTSC or PAL which must be the same with the video input standard Resolution Select the VGA HDMI output resolution which must be the same with the re...

Page 142: ...ngs Steps 1 Enter the General Settings interface Menu Configuration General 2 Choose DST Settings tab Figure 13 2 DST Settings Interface You can check the checkbox before the Auto DST Adjustment item...

Page 143: ...CVBS Output Brightness Adjust the video output brightness Operation Timeout Set timeout time for menu inactivity E g when the timeout time is set to 5 Minutes the system will exit from the current op...

Page 144: ...w user including User Name Password Level and User s MAC Address Level Set the user level to Operator or Guest Different user levels have different operating permission Operator The Operator user leve...

Page 145: ...eration Operating HDD management initializing HDD setting HDD property upgrading system firmware clearing I O alarm output Local Shutdown Reboot Shutting down or rebooting the device Remote Configurat...

Page 146: ...Control Remotely controlling PTZ movement of the selected camera s Local Video Export Locally exporting recorded files of the selected camera s Note You should select the camera s on the Camera Config...

Page 147: ...l and MAC address 5 Click the OK button to save the settings and exit the menu 13 4 4 Changing Password of Admin Purpose The password of the admin user account can be changed in the User Management me...

Page 148: ...D1104CW LV D1108CW LV D1116CW Series DVR 147 Figure 13 12 Change Password 3 Enter the old password check checkbox enter new password and confirm password on the menu 4 Click OK to save the settings a...

Page 149: ...own interface Menu Shutdown Figure 13 13 Shutdown Menu 2 Click the Logout button to log out or Click the Shutdown button to shut down the device or Click the Reboot button to reboot the device Note Af...

Page 150: ...User Manual of LV D1104CW LV D1108CW LV D1116CW Series DVR 149 Chapter 14 Appendix...

Page 151: ...to the ADSL transceiver modem over Ethernet and in plain Metro Ethernet networks DDNS Dynamic DNS is a method protocol or network service that provides the capability for a networked device such as a...

Page 152: ...ect c The dome decoder speed configuration is correct d The dome decoder address bit configuration is correct e That the main board RS 485 interface is not broken Why is there no video recorded after...

Reviews: