background image

LAUNCH                                                                                                X-431IV English User’s Manual 

35 

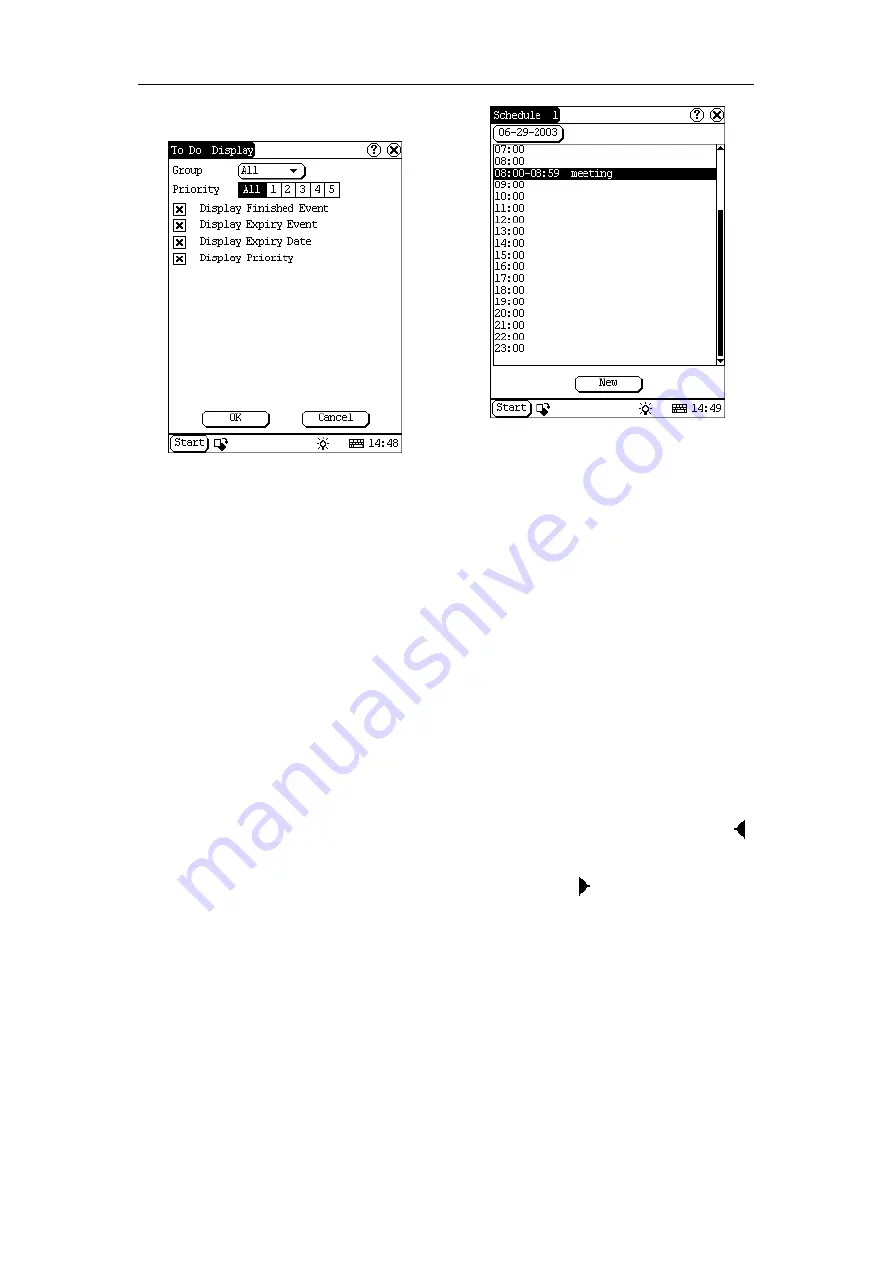
5.3.3.6 The Set of display   


Figure 5-26 

1)


In  the  To  Do  interface,  click  [Options] 
button  to  open  the  To  Do  Display 
interface. 

2)


In  the  To  Do  Display  interface,  click  the 
button  to  the  right  of  ‘Group’  to  pop-up 
type list, and select the type in the pop-up 
list. 

3)


Click  the  button  to  the  right  of  ‘Expired’, 
and select the data in the pop-up list. 

4)


Click  the  number  or  ‘All’  to  the  right  of 
‘Priority’ to set the priority of the displayed 
To Do. 

5)


Click the box to the right of each function. 
When  ‘X’  is  displayed  in  the  box,  the 
function is selected. (See Figure 5-26) 

6)


Click  [OK]  button  to  close  the  To  Do 
Display interface. 

7)


Then  you  can  see  the  corresponding  To 

Do in the list box of the To Do interface. 

5.3.4 Schedule 

The  basic  functions  of  Schedule  include:  add 
new schedule, view schedule, delete schedule, 
etc.   


Figure 5-27 

1)


In  the  pop-up  list  of  ‘PIM’,  select 
‘Schedule’ to open the Schedule interface. 

2)


Click the Date button on the upper left of 
the  interface  to  open  the  Select  Date 
interface. 

3)


In  the  list  box  in  the  middle  of  the 
interface,  all  schedules  on  that  day 
corresponding  to  the  Date  button  will  be 
displayed. (See Figure 5-27) 

4)


Click [New] button, and then the cycle list 
pops  up.  You  may  select  ‘Common’, 
‘Daily’, ‘Weekly’, ‘Monthly’ and ‘Annual’. 

5)


In  the  cycle  list,  select  one  item  to  open 
the Schedule New interface.


5.3.4.1 Add New Schedule 

Set the date of the schedule: 
1)


In  the  Schedule  interface,  click  the  Date 
button on the upper left to open the Select 
Date interface. 

2)


In  the  Select  Date  interface,  click  [

icon  to  the  left  of  the  month  or  year  to 
select the previous month or year. 

3)


Click  the  [

]  icon  to  the  right  of  the 

month or year to select the next month or 
year. (See Figure 5-28) 

4)


Click  to  select  the  date  in  the  current 
month.  When  it  is  highlighted,  it  is 
selected. 

5)


Or  click  [Today]  button  to  display  the 

Summary of Contents for X-431 IV

Page 1: ...ed Products by LAUNCH Trademark Information LAUNCH is a registered trademark of LAUNCH TECH CO LTD LAUNCH in China and other countries All other LAUNCH trademarks service marks domain names logos and...

Page 2: ...or which Customer has paid the required license fees Document means written information whether contained in user or technical manuals training materials specifications or otherwise specifically perta...

Page 3: ...re Upgrades and Additional Copies For purposes of this Agreement Software shall include and the terms and conditions of this Agreement shall apply to computer programs including firmware as provided t...

Page 4: ...tions of warranty shall survive termination of this Agreement Customer Records Customer grants to LAUNCH and its independent accountants the right to examine Customer s books records and accounts duri...

Page 5: ...ions 11 3 1 2 Connections 11 3 2 Start to diagnose 12 3 2 1 Enter diagnostic program 12 3 2 2 Read trouble code 13 3 2 3 Clear trouble code 14 3 2 4 DataStream Record Function 14 3 2 5 Special functio...

Page 6: ...r easy handling when traveling or taking it into a car shop Be careful when plugging and unplugging the main cable and diagnostic connector Tighten the screw before operation to avoid unexpected disco...

Page 7: ...e rotated within an angle of 90 and is flexible to use Performance Software structure has been optimized It runs more rapidly and stably and can directly diagnose without downloading diagnostic progra...

Page 8: ...431IV Main Unit The X 431IV main unit has all functions of a standard PDA including personal information management control panel game etc Smartbox SMARTBOX bears all the functions that are essential...

Page 9: ...ndicator to show SMARTBOX sending data to ECU 6 Indicator to show SMARTBOX receiving data from ECU 7 Serial port to connect with PCLINK for extending functions 8 Touch screen 9 HOTKEY button 10 POWER...

Page 10: ...RTBOX is receiving data from the vehicle s electronic control unit Figure 2 3 X 431IV structure view Rear Table 2 2 formulates all ports of X 431IV rear panel 14 CF card slot to install CF card 15 Pri...

Page 11: ...icle cigarette lighter 5 Main cable To connect the diagnostic connector and X 431IV main unt 6 Stylus Click or write on the screen with the stylus 7 Thermal paper For printing 2 3 Technical Specificat...

Page 12: ...sequence and it does not appear on the screen 2 5 2 Taskbar There is taskbar at the bottom of each operation interface of X 431IV and includes several icons as shown in the left figure their functions...

Page 13: ...instead of finger input on common keyboard the other is to input by handwriting Input method differs for different languages When in simplified Chinese click En to shift from English input to Chinese...

Page 14: ...ft keyboard 4 Click function button to shift to handwriting input see chapter Use Soft Keyboard for details 5 Write on the whiteboard to the right of the soft keyboard with the assistant of the functi...

Page 15: ...t some printing paper and introduce it along the slot until it comes out of the paper outlet shown as Fig c Otherwise paper can not be fed 4 Close the paper cover See Fig d Note The thermal paper shou...

Page 16: ...nd plug the CF card into the slot firmly with UP SIDE facing up 2 Connect one end of the diagnostic main cable to diagnostic port of X 431 IV and the other end to one end of the selected diagnostic co...

Page 17: ...ure 3 1 Button descriptions QUIT to exit the diagnostic program BOX INFO to display hardware and software version of SMARTBOX HELP to display help information START to proceed to the next step Click S...

Page 18: ...HOME to return to the homepage of vehicle diagnosis BACK to return to the previous interface PRINT to print the test result HELP to display the help information Click Engine button the screen will dis...

Page 19: ...the fault code The screen will display the residual fault code after erasing Figure 3 9 If all fault codes are erased or there is no fault code in the tested system the screen will be displayed as sh...

Page 20: ...3 13 Click SAVE the interface as shown in Figure 3 14 will appear Figure 3 14 Click SAVE and then input a filename after the soft keyboard has been activated see Figure 3 15 Figure 3 15 After the file...

Page 21: ...een saved The below interface will appear Figure 3 18 User could judge working status of the vehicle and select None Good Bad accordingly see figure 3 18 Click Good for example Stream save interface w...

Page 22: ...k or to view the previous or next frame of the data View and consider the data to find out the changes as well as the similarities and differences before after the fault thus to facilitate the analysi...

Page 23: ...that need to be updated Insert the CF card into the CF card reader writer Connect one end of the USB cable to the port of the CF card reader writer and the other end to the USB port of the computer 4...

Page 24: ...4 1 2 Fill in Product Information Figure 4 3 Choose the desired product type from the pull down list The serial No is marked on the back of your X 431 IV The registration password is in an envelope de...

Page 25: ...download period After purchase successfully the purchased software will be added to the download center list automatically All the software listed in the download center could be downloaded for free...

Page 26: ...but have to install if the operating system is Windows98 If card reader installation succeeds the icon will appear in My computer automatically Interruption may be caused for the following reasons du...

Page 27: ...e the serial number to choose the software To uncheck it just click it again Click Order to add the selected software to your shopping cart Click Pay to buy the software The bought software will be au...

Page 28: ...he priority of tasks and to browse the classified tasks Schedule To arrange the appointments journeys and meetings in a whole day to check time schedule on business daily weekly monthly and or annuall...

Page 29: ...preset the use of power to save on electricity as possible Clock Set To set the system time Contrast To adjust the contrast of display Language Set To select language to be used Vehicle maintenance Ve...

Page 30: ...in the pop up menu 3 Select User Register from the pop up list of System Information to open User Information interface 4 Activate soft keyboard for inputting the information 5 Click OK to save and qu...

Page 31: ...between scientific calculator and simple calculator 3 Click Unit Conversion button to switch between unit conversion calculator and simple calculator Figure 5 5 Figure 5 6 Common Calculator Refer to...

Page 32: ...he word from the list on the left 4 Click the word and then you can find the translation in the right list Figure 5 9 5 2 1 4 Picture View 1 Click Start button 2 Select Tools in the pop up menu 3 In t...

Page 33: ...t picture at will 5 2 2 Game Figure 5 11 1 Click Start button 2 Select Game in the pop up menu 3 Select the function in the pop up submenu See Figure 5 11 5 2 2 1 FIR 1 In the pop up submenu of Game s...

Page 34: ...each step When the chessboard is full of chessmen the number of the chessmen for each color should be counted The one who conserve more chessmen on the chessboard is winner 5 3 PIM 1 Click Start butt...

Page 35: ...st box of the Memo interface click the memo that you want to edit 2 Then you can edit the contents of the memo in the opened Memo Edit interface See Figure 5 16 3 After editing click OK button to save...

Page 36: ...dd new address view address delete address to search address etc 1 In the pop up PIM list select Address to open the Address Book interface 2 It lists the name of persons whose communication informati...

Page 37: ...ce See Figure 5 20 3 After editing click OK button to save the edited contents and close the Address Edit interface Figure 5 20 5 3 2 4 Delete Address 1 In the list box of the Address Book interface c...

Page 38: ...New button to open the To Do New interface See Figure 5 23 2 Activate Soft Keyboard and fill in the subject and contents 3 Click Detail button to open the To Do Detail interface See Figure 5 24 4 In...

Page 39: ...do that you want to delete 2 Then the contents will be shown in the opened To Do Edit interface 3 Click Delete button to delete the To Do and close the To Do Edit interface 5 3 3 5 Edit Type 1 Click...

Page 40: ...elete schedule etc Figure 5 27 1 In the pop up list of PIM select Schedule to open the Schedule interface 2 Click the Date button on the upper left of the interface to open the Select Date interface 3...

Page 41: ...ted date 3 Select Daily if it is done every day 4 Select Weekly if it is done on a fixed day every week 5 Select Monthly if it is done on a fixed day every month 6 Select Annual if it is done on a fix...

Page 42: ...o next page and click the schedule you want to edit 3 Then the contents of the schedule will be shown in the opened Schedule View interface 4 If the edited affair is Daily Weekly Monthly or Annual you...

Page 43: ...ut the item name and the file path Then choose a group as its parent and click OK button The path can be inputted directly or found out in a dialogue box after clicking Browser button See Figure 5 34...

Page 44: ...t the standby time See Figure 5 36 1 In the Control Panel interface click Power icon to open the Power Manager interface 2 Click the button to the right of Standby time and select the time or None in...

Page 45: ...ghted when it is selected 5 Click Set Time button to save the setting 6 Click Quit button to exit Set Time Zone 1 In the Date Time interface click Set Time zone button to open the Set Zone interface a...

Page 46: ...n the cross cursor will be displayed 1 After switching on the machine follow the tips to press the hot key The calibration interface will be opened 2 Click the cross cursor on the screen accurately an...

Page 47: ...5 43 5 4 2 3 About In Information list click About to display the information on system software and hardware then click OK button to close it See Figure 5 44 Figure 5 44 5 4 3 Turn Off Click Turn Off...

Page 48: ...C D and E originally the removable disk will be F The rest may be deduced by analogy Question Some downloaded diagnostic program is not listed in the update tool what is the reason Answer There are tw...

Page 49: ...tion Power cannot be turned on with the power button on the main unit after the machine is connected to vehicle diagnostic socket through cables and connectors What can I do Answer Check the power pin...

Page 50: ...Why can t I do operation in current interface Answer There are two possible causes 1 Your current interface has exited illegally In this situation you may not see the name of the application interfac...

Page 51: ...r The paper is mounted reversely Please take out the paper and mount it again See the section Printer Operation in the User s Manual Question The displayed information cannot be seen clearly when the...

Page 52: ...gnetic interference or incorrect connection of connector Question Why is there no response from vehicle ECU at communication Answer Make sure that the voltage of vehicle battery ignition timer and idl...

Page 53: ...If X 431IV is not used for a long time please switch off X 431IV main unit to save power and extend the life span of the screen as well Maintenance of CF card Do not take out the CF card when the main...

Page 54: ...help information for any current interface with the use of Help button or icon in each interface For more information about the latest products or diagnostic information please visit website at http w...

Page 55: ...icates the vehicle type or manufacturing division Fourth through eighth vehicle identification number digit reveals the vehicle features such as body style engine type model series etc The ninth vehic...

Page 56: ...egistrations warranty claims thefts and insurance coverage Common locations of the vehicle identification number VIN vary but the following are places to look Firewall of the vehicle Left hand inner w...

Page 57: ...ion representation or warranty concerning LAUNCH automotive meters except as stated herein Disclaimer THE ABOVE WARRANTY IS IN LIEU OF ANY OTHER WARRANTY EXPRESSED OR IMPLIED INCLUDING ANY WARRANTY OF...

Page 58: ...ptions in the manual in physical appearance color and configuration We have tried our best to make the descriptions and illustrations in the manual as accurate as possible and defects are inevitable i...

Reviews: