background image

LAUNCH 

      X-431 Diagun III English User’s Manual 

current screen.   
After printing, the system will exit the 

print interface.   


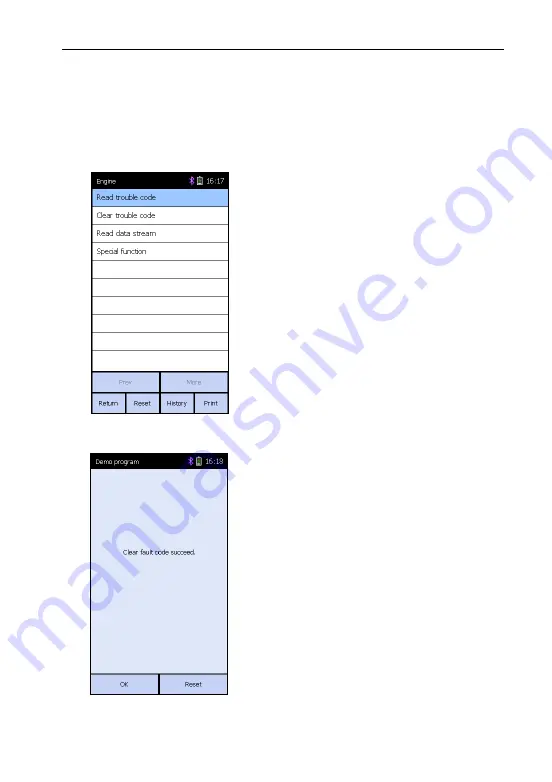
Fig. 3-12 


Fig. 3-11 

3.3.3 Clear trouble code 

Click [Clear trouble code] on Fig. 3-11, it 
starts to erase fault code. 


"Clear fault code succeed" will appear if 
succeed (See Fig. 3-12), or "No fault 
code" will appear on the screen if all the 

fault codes have been cleared or no 
fault code in the tested system. 
 
Button Description: 

z


[OK]: returns to the diagnostic 
system menu.


23 

www.obd2express.co.uk

Summary of Contents for X-431 Diagun III

Page 1: ... or any consumable products other than those designated as Original LAUNCH Products or LAUNCH Approved Products by LAUNCH Trademark Information LAUNCH is a registered trademark of LAUNCH TECH CO LTD also called LAUNCH for short in China and other countries All other LAUNCH trademarks service marks domain names logos and company names referred to in this manual are either trademarks registered trad...

Page 2: ... CO LTD Launch Industrial Park North of Wuhe Avenue Banxuegang Bantian Longgang Shenzhen Guangdong P R China to request written permission to use Materials on this manual for purposes or for all other questions relating to this manual ii www obd2express co uk ...

Page 3: ...ention to ECU and sensors when operation is next to them z Ground yourself when you disassemble PROM otherwise ECU and sensors will be damaged by static z Do not use the pointer ohm meter instead of DMM for testing ECU and sensor without special requirement z Do not test electric devices in relation with ECU with a test lamp unless otherwise expressly provided z Do wear a metal ground strip that o...

Page 4: ...appliance is properly connected to the DIAGNOSTIC CONNECTOR to avoid communication interruptions Do not insert and pull out TF card when the appliance is working Put the stylus into the slot at the back of X 431 Diagun III main unit after operation and place the cables connectors and other accessories into box Handle with care and avoid crashing iv www obd2express co uk ...

Page 5: ...n 8 2 5 3 Desktop and status bar 9 2 6 Battery and Charger 9 2 6 1 Battery 9 2 6 2 Installing disassembling battery 9 2 6 3 Recharging Method 10 2 6 4 Description of the Power Indicator State 10 2 6 5 Description of the Battery State 10 2 7 System settings 11 2 7 1 System information 11 2 7 2 Power management 12 2 7 3 Language change 12 2 7 4 Set Date Time 13 2 7 5 Set default Bluetooth 13 2 7 6 S...

Page 6: ...e 23 3 3 4 Read data stream 24 3 3 5 Special function 26 3 3 6 History data management 27 3 3 7 Capture Screen 29 4 Update of Diagnostic Software 31 4 1 Register a passport 31 4 2 Log in 31 4 3 Register your product 31 4 4 Software Download 31 4 5 Software Update 34 4 6 Purchase Software 36 5 FAQ 37 5 1 About Hardware 37 5 2 About software 38 5 3 About system 38 5 4 Other questions 39 vi www obd2e...

Page 7: ...agnostic result It has a smart portable design and is easy to operate and multiple languages are provided to cater for different areas in the world on the X 431 Diagun III stands for Car Cloud logo Car Cloud is a state of an art individual application product which is newly developed based on our LAUNCH s vehicle diagnostic devices and technology service platform with independent intellectual prop...

Page 8: ... main set X 431 Diagun III includes X 431 Diagun III main unit and DBScar diagnostic connector See Fig 2 1 X 431 Diagun III main unit communicates with the DBScar diagnostic connector via wireless Bluetooth also supports cable connection Fig 2 1 X 431 Diagun III external view 2 www obd2express co uk ...

Page 9: ...main unit ports and indicators Table 2 1 illustrates all ports and indicators of X 431 Diagun III Touch screen Black roller shutter DBScar diagnostic connector Battery location RESET Buzzer Stylus Power button TF card slot USB port Lanyard hole 2 3 X 431Diagun General Components Table 2 2 formulates the accessory checklist of X 431 Diagun III 3 www obd2express co uk ...

Page 10: ...r diagnostic connector A diagnostic connector compatible with OBDⅡ 16 pin connector 3 X 431 Diagun III main unit diagnostic cable to connect X 431 Diagun III main unit and DBScar diagnostic connector 4 OBDⅡ 16 extension cable 5 Stylus for clicking operation on X 431 Diagun III 6 Battery Charger for main unit charge by transforming AC 100 240V to DC 5V 4 www obd2express co uk ...

Page 11: ...User s Manual 7 TF card to store diagnostic program and data 8 TF card reader to read and store data and for online update when connected to PC 9 Printer cable connect X 431 Diagun III main unit to the printer 5 www obd2express co uk ...

Page 12: ...Card Main Unit Universal Serial Bus USB Main Unit Power DC5V X 431 Diagun Connector DC12V Printer Interface USB Display Screen 480X272 4 3 inch LCD with touch screen Rechargeable Battery 3800 mAh Effective Bluetooth communication distance 100m Upgrading Interface USB Support wired communication Extendible external memory 6 www obd2express co uk ...

Page 13: ...ion completes the system will prompt you whether to calibrate touch screen Touch the screen to enter screen calibration interface otherwise the system will enter the main menu interface How to power it off Press POWER for 3 seconds a dialog box similar to the following will appear Click Poweroff to turn it off Click Reboot to restart it Click Cancel to return to the previous screen For Snapshot op...

Page 14: ...er once it changes you complete a calibration Note If you click the cross cursor inaccurately it will repeat on the screen until the calibration completed Fig 2 5 After calibration the screen will display as Fig 2 5 Touch the screen to save your calibration and enter the main menu To exit without saving your changes wait for 30 seconds and the system will cancel it 8 www obd2express co uk ...

Page 15: ...our appliance is powered by a rechargeable lithium battery The followings such as crush the battery short circuit the battery dispose of the battery in a fire or in the high temperature environment and dispose as household waste etc are prohibited The standby time of the battery can last over 10 hours and the warranty period of battery is 6 months 2 6 2 Installing disassembling battery Installatio...

Page 16: ...arging saturation How to set standby press the POWER key on the main unit then the screen will turn black press the POWER key again to resume the normal state and wake up the screen 2 6 5 Description of the Battery State 1 While it is being charged icon appears on the status bar 2 When using the appliance without connecting an external power supply the icon appears on the status bar if the battery...

Page 17: ...ttings Fig 2 7 Fig 2 8 2 7 1 System information To view system information On X 431 Diagun III desktop click System Settings to enter setting options interface as shown on Fig 2 7 Click System information to enter Fig 2 8 Button description z Back return to the system setting main menu 11 www obd2express co uk ...

Page 18: ...return to the system setting main menu z Save save your settings Fig 2 10 2 7 3 Language change To set the language of user interfaces On the system setting main menu click Language switching the system will enter Fig 2 10 Choose the desired one and click OK follow the prompt message to restart it until it takes effect Button description z PgUp jump to the previous page z PgDn skip to the next pag...

Page 19: ...area and then click to set it and click Save it to confirm your changes Button description z Back return to the system setting main menu Fig 2 12 2 7 5 Set default Bluetooth This option is used to set the default Bluetooth device that X 431 Diagun III is linked On the system setting main menu click Set default Bluetooth the system will start searching Bluetooth devices and a screen similar to Fig ...

Page 20: ... via Bluetooth the system will automatically link with the default Bluetooth device Note 1 While using X 431 Diagun III for the first time or after replacing a new DBScar connector please set the default Bluetooth 2 In Diagnosis via Bluetooth mode make sure the default Bluetooth is the DBScar connector otherwise X 431 Diagun III will not work properly 2 7 6 Screen calibration To calibrate your tou...

Page 21: ...oil temperature is in normal working range water temperature is 90 110 C and transmission oil temperature is 50 80 C 2 Select Test Connector X 431 Diagun III is armed with an OBDⅡ 16PIN connector Select the corresponding connector optional when testing a vehicle with non OBDⅡ 16PIN DLC 3 1 2 TF Card Installation a b c Fig 3 1 TF card installation Installation steps are as follows 1 Take out the TF...

Page 22: ...nit diagnostic cable to the USB port of X 431 Diagun III main unit z Link the other end of X 431 Diagun III main unit diagnostic cable with the Micro USB port of the DBScar diagnostic connector z Find out the vehicle s DLC z Connect the other end of DBScar diagnostic connector to the vehicle s DLC and the power indicators of X 431 Diagun III and DBScar connector will light up Bluetooth wireless Co...

Page 23: ...rger to recharge it Insert one end 20PIN Male of the charger into the USB port of X 431Diagun main unit and plug the other end in AC 100 240V power socket 3 2 Begin to Diagnose Vehicle Vehicle makes models and systems tested by X 431 Diagun III update every day Please visit mycar dbscar com for the updates and download the latest diagnostic programs 17 www obd2express co uk ...

Page 24: ...luetooth z Diagnosis via Cable to perform diagnosing via data cable z My Data to manage my saved data z System Settings to make system settings Take Diagnosis via Bluetooth and DEMO application as examples to demonstrate how to diagnose vehicle Click Diagnosis via Bluetooth in Fig 3 3 The first time you click this option a dialog box prompting Please set the default Bluetooth diagnostic connector ...

Page 25: ...placing a new DBScar connector please set the default Bluetooth and make sure the default Bluetooth is the DBScar connector otherwise X 431 Diagun III will not work properly Button description z Prev jump to the previous page This button is invalid and in gray if there is only one page or the first page z More skip to the next page This button is invalid and in gray if there is only one page or th...

Page 26: ...ction for details and here we only take demo program for example Button description z OK proceed to the next step z Return return to the previous screen z Help view help information z About view copyright statement 3 3 How to Diagnose Select version V41 60 in Fig 3 5 and click OK to enter the diagnosis screen as shown on Fig 3 6 Note The diagnosis screen of different makes contains the tested mode...

Page 27: ...print the test result should be connected to an external printer through USB port Fig 3 8 Click Engine on the tested system menu Communication is initialized screen will appear After initialization the system will automatically jump to the diagnostic system menu as shown on Fig 3 8 1 Read trouble code 2 Clear trouble code 3 Read data stream 4 Special function Note The test method for different sys...

Page 28: ... system menu z Print prints the test result should be connected to an external printer through USB port Fig 3 10 3 3 2 Print Here we take the Mini printer for example to perform the printing function 1 Printer connection Connect one end 20PIN Male of the printer cable to the USB port on X 431 Diagun III main unit and the other end USB connector to the USB port on the printer 2 Start to print After...

Page 29: ...trouble code Click Clear trouble code on Fig 3 11 it starts to erase fault code Clear fault code succeed will appear if succeed See Fig 3 12 or No fault code will appear on the screen if all the fault codes have been cleared or no fault code in the tested system Button Description z OK returns to the diagnostic system menu 23 www obd2express co uk ...

Page 30: ... 14 The selected datastream items are displayed in blue as shown on Fig 3 14 Button Descriptions z More skip to the next page z OK display the dynamic data of the selected datastream z Return return back to the previous interface z Reset to exit the current operation if bug occurs and return to the vehicle selection screen z Help show the help information 24 www obd2express co uk ...

Page 31: ...ic duration click Stop to complete the record Button Descriptions z Graph display the waveform of a single datastream item z Record record dynamic datastream in a specific duration the button will shift to Stop after being clicked Fig 3 16 In Fig 3 15 select the desired datastream and click Graph to view the datastream waveform not more than two in a screen as shown on the left 25 www obd2express ...

Page 32: ...to test whether system parameters are normal or not Click Special function on the function menu as shown on the left Note Here take Cylinder 1 injector for example Fig 3 18 Click 1 injector as shown on the left to perform Note Click 1 injector to check if it works normally or not 26 www obd2express co uk ...

Page 33: ...e left Note If it fails to perform and 1 injector cannot work normally it indicates that malfunctions exist in the related components Fig 3 20 3 3 6 History data management View the saved datastream and waveform In vehicle model selection interface as shown on the left click History 27 www obd2express co uk ...

Page 34: ... left Click OK to view the recorded datastream of the selected model in a specific duration Button Description Delete delete a record Fig 3 22 Click in the box to select parameters in which you want to view the datastream the selected items will be marked with You could select Character or Graph to view datastream in different form as you want as shown on the left 28 www obd2express co uk ...

Page 35: ...ased on the captured snapshots Follow the steps described as below to proceed 1 To capture the current screen press POWER button for 3 seconds and then click Snapshot from the list to save the captured image into the TF card 2 Press the TF card gently and the TF card will automatically eject then take it out from the TF card slot 3 Insert the TF card into the card reader as shown in Fig 3 the side...

Page 36: ...s named with year month date hour minute secon d for example 2012 06 19 08 08 08 BMP are saved in Storage Card gag snapshot The time stands for the system time Please set the correct system time to make sure the pictures are properly recorded in order 30 www obd2express co uk ...

Page 37: ...ith must be filled and click Confirm to submit The system will immediately feedback a CC number to you 4 2 Log in After you registered successfully click User Center to enter login interface Input your CC number and password then click Login to enter user center 4 3 Register your product Click Register product on user center page to enter product registration screen The serial No is on the X 431 D...

Page 38: ...n the download center could be downloaded for free The name of software the latest version released by LAUNCH currently and the issue date as well as the latest version which could be downloaded for the product serial No are provided in the software list It s better for users to create a new folder named X 431 update to include all the downloaded software according to the following procedures Upda...

Page 39: ...ve on the pop up menu to save it in the folder X 431 update Click view to learn the detailed information of the version Users could download the other diagnostic program into the folder X 431 update Up to now the software that is for update is downloaded completely 33 www obd2express co uk ...

Page 40: ...be updated Necessary software Tested model software and update tool download from mycar dbscar com Connection Fig 1 Fig 2 Fig 3 Fig 4 Fig 5 Steps a Take out the TF card from the X 431Diagun main unit press the TF card slightly and it will pop up automatically as shown in Fig 1 and Fig 2 b Insert the TF card into the card reader as shown in Fig 3 the side printed with words faces upward and insert ...

Page 41: ...y again after solving the problem 1 TF card reader is poor connected to the computer or the drive program of the TF card is installed incorrectly 2 Space on TF is not enough 3 Other reasons Begin to Update Software Open the folder X 431 Update double click the icon and install the X 431 Diagun III update tool according to the Wizard After the installation the update icon for the X 431 Diagun III w...

Page 42: ...on mycar dbscar com Click Purchase center then you can tick box before the serial number to choose the software To uncheck it just click it again Click Order to add the selected software to your shopping cart Click Pay to buy the software The bought software will be automatically added to the user s download center Click Clear to empty the shopping cart Click Purchase other to buy other software T...

Page 43: ...e machine for 30 minutes before test Question Why there is no character on the backlit screen Answer Check if the power is well connected Turn off the machine unplug it and then plug it again for power supply one second later try to turn on the machine Question The screen does not respond or responds incorrectly when click with stylus Answer It is necessary to calibrate the screen Please see chapt...

Page 44: ...hine firmly connect the connector and switch on the machine again 5 3 About system Question Screen of main unit flashes at engine ignition moment Answer Caused by electromagnetic disturbance and this is normal phenomenon Question Diagnose interrupted during diagnosing process Answer Caused by electromagnetic disturbing or poor connecting Question There is no response when communicating with on boa...

Page 45: ...tion When the updated software is used in vehicle diagnosis some diagnostic program can not be downloaded successfully from the TF card Why Answer possible causes and solutions 1 The Display Program may have not been updated Please update the Display Program 2 The diagnostic program for the vehicle may be damaged Please re download the diagnostic program and update 39 www obd2express co uk ...

Page 46: ... for any automotive meter found to be defective is repair or replacement and LAUNCH shall not be liable for any consequential or incidental damages Final determination of defects shall be made by LAUNCH in accordance with procedures established by LAUNCH No agent employee or representative of LAUNCH has any authority to bind LAUNCH to any affirmation representation or warranty concerning LAUNCH au...

Page 47: ...ng the problem If the unit is determined to be in warranty it will be repaired or replaced at no charge If the unit is determined to be out of warranty it will be repaired for a nominal service charge plus return freight Send the unit pre paid to Attn Customer Service Department LAUNCH TECH CO LTD Launch Industrial Park North of Wuhe Avenue Banxuegang Bantian Longgang Shenzhen Guangdong P R China ...

Page 48: ...tached by manufacturer before shipping 2 Dealer should fill in the Dealer Code when selling the machine to customer and stamp on the code 3 The Product Serial No and Dealer Code is useful when updating the software Refer to the section Update of Diagnostic Software Keep the user s manual carefully 42 www obd2express co uk ...

Page 49: ...the manual in physical appearance color and configuration We have tried our best to make the descriptions and illustrations in the manual as accurate as possible and defects are inevitable if you have any question please contact local dealer or after sale service center of LAUNCH LAUNCH does not bear any responsibility arising from misunderstandings www obd2express co uk ...

Reviews: