- 47 -
Mercury II User Manual
5.2.1 Page Setup and Orientation
The first thing you must do before working with the LaserPro Mercury II Print Driver will be
to make sure the page and layout settings are properly configured within your graphics
software. You will need to access and edit the Page Setup or Layout page of your graphics
software to set your graphics software’s page layout to match the LaserPro Mercury II’s
work table’s dimensions and orientation.
From your graphic software’s Page Setup page:
•
Set the page orientation in the graphics software to Landscape mode.
•
Set page size horizontal length to 1300 mm (51.1 inches) and vertical height to 916
mm (36.1inches).
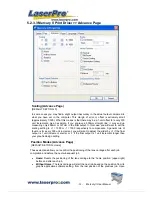
Corel Draw Example (Page Setup and Orientation)
The following is an example of how to set the Page Setup and Orientation in the graphics
software. CorelDraw is the designated graphics software used for this example. For other
graphics software, you will need to access the corresponding Page Setup page.
1)
From the primary menu, click LAYOUT
Æ
PAGE SETUP.
2)
From the navigation bar on the left, click DOCUMENT
Æ
PAGE
Æ
SIZE.
3)
Ensure that NORMAL PAPER and LANDSCAPE are selected.
4)
Ensure the Paper Width and Height dimensions match the LaserPro Mercury II’s
work table dimensions of 1300 mm (51.1 inches) and 916 mm (36.1 inches).
5)
Click OK to complete the paper size adjustment.
TIP
Instead of manually selecting the Landscape and setting the Paper Width and Height,
you can simply click the Set From Printer function and CorelDraw will automatically
set the proper orientation and dimensions based on LaserPro Mercury II’s work table.
(You MUST have the Mercury II set as the default printer prior to doing this.)
Summary of Contents for Mercury II
Page 1: ......
Page 49: ... 48 Mercury II User Manual ...


