Larson Electronics, LLC
Phone: (877) 348-9680
Fax: (903) 498-3364
www.larsonelectronics.com
4
of
10
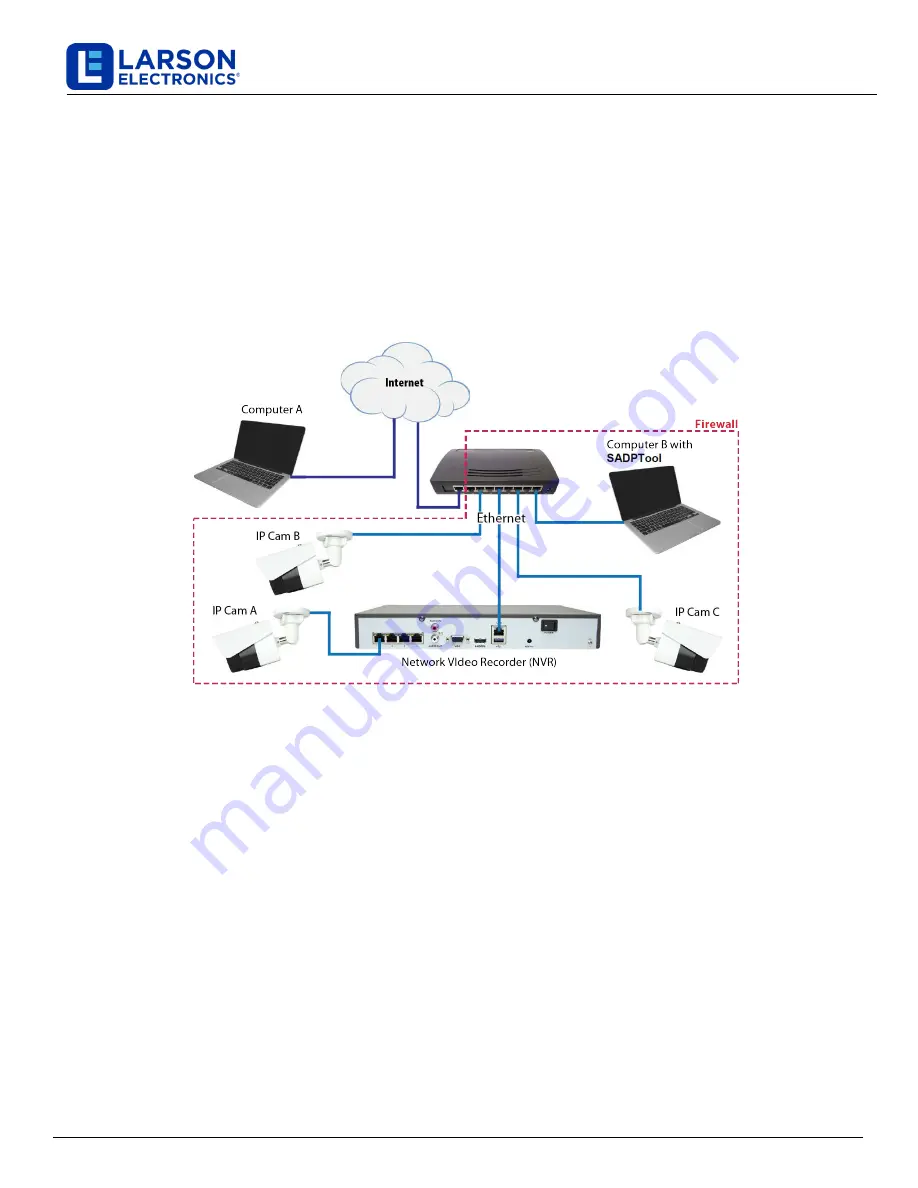
The Explosion Proof Network IP cameras are usually installed on a network in either of two ways:
Connected to the internal switch of a network video recorder (NVR):
In this configuration, Ethernet cables connect
the camera directly to an NVR back panel. The NVR automatically "Activates" the camera and configures the camera's
network parameters to establish a communications link between them. In the diagram below,
IP Cam A
is connected to
the NVR which activates the camera and set
s
up its network parameters.
Connected to a PoE Network switch:
In this configuration, Ethernet drop cables connect the camera to a network
switch. The network utility,
SADP Tool
, is used to "Activate" the camera and configure the camera's network parameters
so that the camera can communicate across the network. In the diagram below, I
P Cam B
and
IP Cam C
are connected to
the router, and are activated with the
SADP Tool
on
Computer B
.
In the diagram above,
NOTE
that:
Computer A
cannot directly access any devices within the router firewall (with a browser) unless the device
activated and setup with network parameters compatible with the router, and the router is configured for port
forwarding to the device.
Computer B
with
SADP
Tool
is used to activate cameras connected directly to the router (
IP Cam B, IP Cam C
)
and setup their network parameters. After devices on the router are activated and configured for the network,
Computer B
can access each device using I
nternet
E
xplorer or by reloading the page in Internet Explorer mode
in the Edge browser
.
This guide provides generic instructions for activating and setting up the network parameters for new cameras
Connected
to the network
switch
using the
SADP
Tool
. The examples shown herein activate a camera and configure its network
settings. Currently, the procedure is identical for all new
network attached
IP cameras.
About the SADP
Tool
The SADP
Tool is a PC-based network utility for discovery of compatible devices on an IP network. It provides an easy
way to activate devices, configure camera and record network configuration settings, and set device passwords. It can be
installed on a Microsoft Windows operating system that has access to the IP network where your devices are installed.
IP Camera Network Setup Guide


