background image

Installing the UBox

Installing the UBox Software 

The following instructions are for installing the UBox software for Windows operating 
systems. 

To install the UBox Software: 

1.  Insert the product CD into your CD drive. The CD should start automatically. 

If the CD does not auto start, open 

My Computer

, locate and then


double-click 

Launch.exe

2.  Click the UBox Software 

Installation

 button to install the application. 

3.  Follow the on-screen instructions. 

Note:


 During or after the software installation, the Windows New 

Hardware Wizard may ask you to install software several times. Select 

Install the software automatically

. If you see an additional prompt 

regarding logo testing, click 

Continue Anyway

 to proceed. 

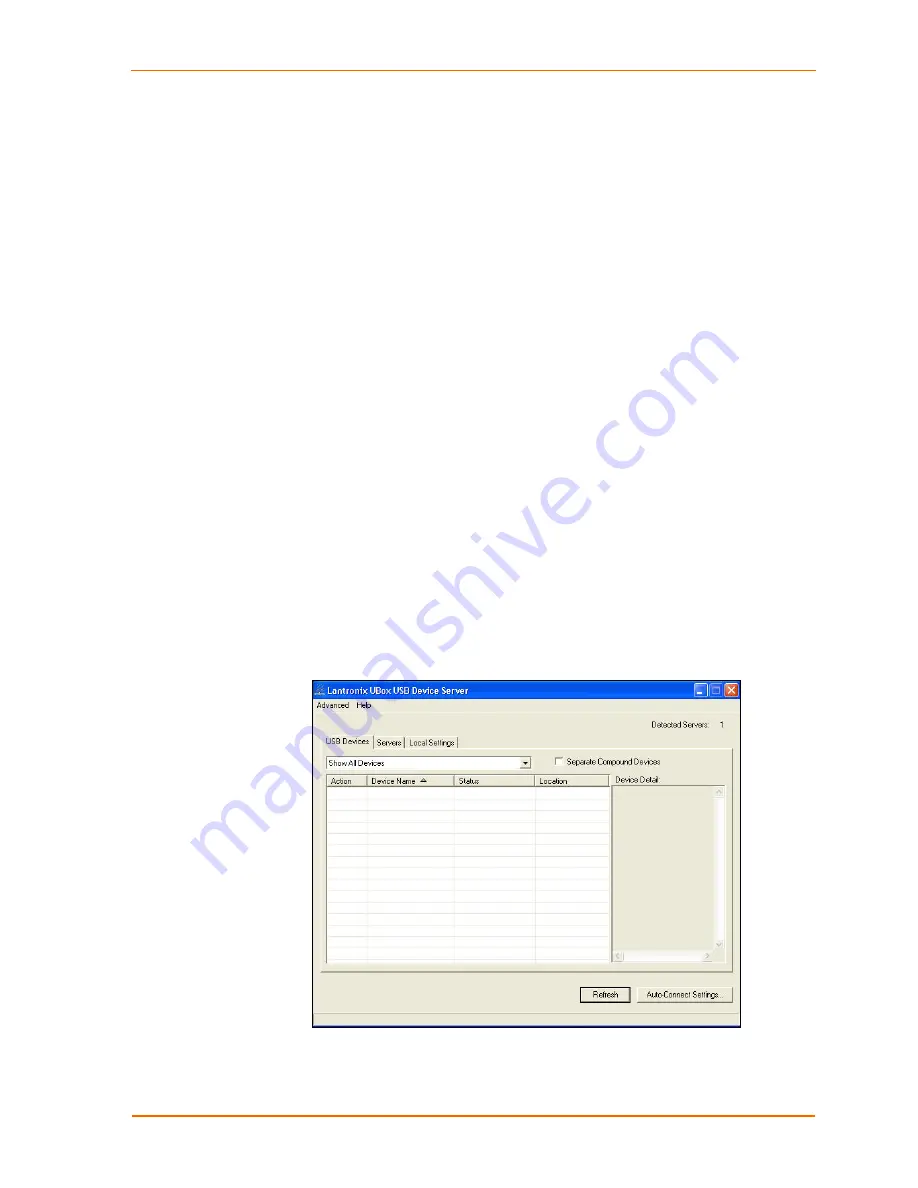
Once the Lantronix UBox Installer completes the installation, it automatically 
launches the Lantronix UBox application. The Lantronix UBox USB Device 
Server window opens with the 

USB Devices

 tab open. You will use this 

application to configure the UBox. 

Note

The first time you launch the UBox software, you may be asked to 

update your UBox’s firmware. If you get this message, please update 
your firmware using the on-screen instructions or see 

Updating the 

UBox's Firmware 

on page 

40. 

Figure 3-5. USB Devices Tab 


UBox User Guide 

13 

Summary of Contents for UBox UBX4100

Page 1: ...Part Number 900 373 Revision A June 2005 UBox USB Device Server User Guide Model UBX4100 ...

Page 2: ...r reproduced in any form or by any means without the written permission of Lantronix The information contained herein is subject to change without notice Printed in the United States of America Contacts Technical Support Online www lantronix com support Sales Offices For a current list of our domestic and international sales offices go to the Lantronix web site at www lantronix com Revisions Date ...

Page 3: ...e ____________________________________________________ 13 Uninstalling the Lantronix UBox Software __________________________________________ 14 4 Using USB Devices on the Network 15 Overview ___________________________________________________________________ 15 Connecting Your USB Device ___________________________________________________ 15 Step 1 Connect a USB Device to the UBox _______________...

Page 4: ...__________________________________ 46 Viewing or Removing Device Passwords___________________________________________ 47 Switching Between Sets of UBoxes _______________________________________________ 48 7 Troubleshooting 49 Before You Begin_____________________________________________________________ 49 Troubleshooting Status Lights___________________________________________________ 49 Boot Up _...

Page 5: ... Figure 2 1 Model UBX4100 Part Numbers 8 Figure 3 1 Ethernet Connection 10 Figure 3 2 UBox Power Supply 11 Figure 3 3 UBox Connections 11 Figure 3 4 SYSTEM LEDs 12 Figure 3 5 USB Devices Tab 13 Figure 3 6 Servers Tab Displaying a UBox 14 Figure 4 1 Connecting a USB Device to the UBox 15 Figure 4 2 USB Devices Tab Showing Attached Devices 16 Figure 4 3 Selected Device Displaying Device Details 18 F...

Page 6: ...anced Settings Window 64 Figure 7 7 Service Settings Adding a UDP 64 Figure 7 8 Service Settings Adding a TCP 65 Figure 7 9 Windows Firewall Window 66 Figure 7 10 Exceptions Tab 67 Figure 7 11 Add a Port Window UDP 67 Figure 7 12 Add a Port Window TCP 68 Tables Table 4 1 USB Device Status 27 Table 7 1 UBox Status Lights UBox is Booting UP 59 Table 7 2 UBox Status Lights UBox is Running 60 UBox Use...

Page 7: ... connecting to using and disconnecting from a USB device 5 Changing the UBox s Settings Describes how to change the UBox s settings to meet your specific needs 6 Changing Local Software Settings Describes how to change local settings such as the access password and TCP port 7 Troubleshooting Explains how to interpret the status lights and to diagnose problems with UDP ports your network and USB de...

Page 8: ...100002 01 4 Port USB Device Server European Power UB4100003 01 4 Port USB Device Server UK Power Compatible USB Devices This release of UBox software supports USB printers USB multi function printers USB scanners USB HID devices and USB hard drives and other mass storage devices While other USB devices may work this release does not officially support them USB audio and video products are not comp...

Page 9: ...auto sensing RJ45 Ethernet connector Half and full duplex support IP addressing Static DHCP Zeroconfig Requirements Windows Windows 2000 XP or later What s Inside the Package The Lantronix UBox package includes Lantronix UBox USB Device Server Power Supply Quick Start Guide CD with software and User Guide UBox User Guide 9 ...

Page 10: ...connect a USB device to the UBox until you have finished installing the software and hardware Chapter 4 Using USB Devices on the Network walks you through the process of using your USB devices Step 1 Connect the UBox to Your Network 1 Connect an Ethernet cable to the Ethernet port of the UBox Figure 3 1 Ethernet Connection Ethernet Port 2 Connect the other end of the cable to your network If you d...

Page 11: ...ep 2 Connect the UBox s Power Supply and Read the LEDs 1 Connect the power supply included in the box to the UBox s power connector Figure 3 2 UBox Power Supply Power Connector Figure 3 3 UBox Connections UBox User Guide 11 ...

Page 12: ...x can also indicate other statuses such as IP configuration type and UBox status For a detailed description of what the LED lights indicate see A Status Light Behavior Troubleshooting You may see red lights on the UBox at this point in the installation This is normal until you install the UBox software on at least one computer If you do not see the USB lights turn on or do not have a blinking gree...

Page 13: ...dware Wizard may ask you to install software several times Select Install the software automatically If you see an additional prompt regarding logo testing click Continue Anyway to proceed Once the Lantronix UBox Installer completes the installation it automatically launches the Lantronix UBox application The Lantronix UBox USB Device Server window opens with the USB Devices tab open You will use ...

Page 14: ... not display and you have it in a static network you can use the Override Server Network Settings option on the Advanced menu to configure the UBox See Overriding Server Network Settings on page 42 Uninstalling the Lantronix UBox Software To uninstall the Lantronix UBox software 1 Click StartÆSettingsÆControl Panel ÆAdd or Remove Programs 2 Select Lantronix UBox USB Device Server and click the Cha...

Page 15: ...e your USB device by means of the Lantronix UBox Note These instructions help you connect a USB device e g a printer or scanner to the UBox for the first time We recommend that you only connect one USB device at a time To connect additional devices repeat these instructions for each device Connecting Your USB Device Step 1 Connect a USB Device to the UBox 1 Connect your USB device to any USB port ...

Page 16: ...ce Server window opens The USB Devices tab displays a list of USB devices currently connected to each UBox on the network the status of the software connection and the location UBox name and port on the UBox to which it is attached In the example below UBox 1 4 means the device is attached to the fourth port of UBox 1 Initially your UBox location name displays as Unnamed For instructions on naming...

Page 17: ...Local Software Settings Status Current status of the USB device The status changes as you start to use USB devices through the UBox At the start you see only the Available status which means that the USB device is ready to be used by means of the UBox See USB Device Status Details on page 27 Location This column shows the UBox s name and the UBox s USB port number that your USB device is connected...

Page 18: ...disconnect from it before others can use it When you select a USB device information displays in the Device Details section of the window Typically this information includes Name Name for the USB device programmed into the device by the vendor If you rename the device see Editing Server Settings USB Device Configuration Tab on page 36 the custom name displays as Name USB Desc Description of the de...

Page 19: ...USB Device s When you have finished using your USB device you must virtually disconnect it from your computer before it is available to everyone else on the network 1 Open the Lantronix UBox application 2 Select the USB device and click the Disconnect icon The status changes to Available Note Some USB devices require additional action before you disconnect your USB device For example some USB devi...

Page 20: ...total of 32 USB devices in the UBox software however you can only have 12 USB devices simultaneously connected to your computer To use a 13th USB device disconnect one of your 12 USB devices using the Lantronix UBox software to free a location for the next USB device To have more than eight UBoxes configure your next eight UBoxes to use a different UDP port see 5 Changing the UBox s Settings Once ...

Page 21: ... the UBox settings Configure Auto Connect Connect to and disconnect from USB devices on your UBox To use the system tray 1 Find the Lantronix UBox System Tray icon The System Tray is in the lower right corner of your screen next to the time Figure 4 4 System Tray 2 Right click the UBox application icon A menu displays Figure 4 5 System Tray Menu 3 Select the desired function UBox User Guide 21 ...

Page 22: ...sables the Auto Connect feature Auto Connecting Printers This feature automatically connects and disconnects printers whenever you have a print job queued This gives you a printing experience that is similar to using a print server The Auto Connect feature for printers actually connects just the printer component of a compound device regardless of what the separate compound devices is set to This ...

Page 23: ...ect feature 1 Select the printer on the USB Devices tab and do one of the following Right click the UBox icon in the system tray and select Auto Connect Settings Click the Auto Connect Settings button in the lower right corner The Lantronix UBox Auto Connect window opens UBox User Guide 23 ...

Page 24: ...Auto Connect 2 Do one of the following To share the printer using Auto Connect click Yes If print jobs are in the queue for this printer click No and disconnect once the print jobs are processed Using Your Printer with Auto Connect Now that you have set up your printer by means of Auto Connect you are ready to print Just print your documents as you would normally Depending on your printer you may ...

Page 25: ...you to disconnect a USB device left in use connected by another user Warning Do not disconnect a USB device while that device is in use e g do not disconnect a scanner while it is scanning If the device is still in use you may damage your drive lose data cause a fire or create a host of other problems Only use Forced Device Disconnect if you are sure that the USB device is not in use Please note t...

Page 26: ...ltiple computers to use one USB device Again you must connect to the USB device before you can use it thus preventing other users from using your USB device at the same time In Multi User mode you can also dedicate USB devices to a certain computer set up passwords for a certain USB device and set up Auto Connect for printers Single User Mode This mode automatically connects USB devices to your co...

Page 27: ...t in brackets shows the name of the client using that device Note This client name is obtained from the computer s name as specified when that computer was set up You can change this name in the UBox s Local Settings tab See 6 Changing Local Software Settings Auto Connected The USB device either a printer or a multifunction printer has been set up for Auto Connect You cannot connect to an Auto Con...

Page 28: ... Separating Compound Devices The Separate Compound Devices option disabled by default changes how compound USB devices appear in the UBox software If this option is enabled the components inside a compound USB device appear as separate USB devices This allows you to connect to only one component of a USB device without having to connect the other components of that device For example if you have a...

Page 29: ...ow to change the UBox s settings and what the settings affect Note To modify settings for the UBox software use the Local Settings tab These settings are kept on your computer See 6 Changing Local Software Settings Viewing UBox Settings To view current settings 1 From the Start menu click Programs Lantronix UBox The USB Devices tab displays 2 Click the Servers tab The tab displays all of the UBoxe...

Page 30: ...are and software This column shows whether the UBox software has successfully communicated with your UBox hardware The codes include OK The UBox software has successfully found the UBox hardware You can now communicate with the selected UBox Note The UBox may have a Client Access Password or a Configuration Password that prevents users from accessing that specific server or changing the selected s...

Page 31: ...ry The UBox software is attempting to locate UBox hardware on your network This message temporarily displays when you first start your computer or when you reboot the UBox If this message does not go away see 7 Troubleshooting Attempting to Connect The UBox hardware is sending broadcast messages to your computer but your computer cannot connect to the UBox hardware If you have modified your UBox s...

Page 32: ...uration tab at any time only one user at a time can change the UBox settings on the Edit Server Configuration window If you are editing the UBox other users receive a message stating that you are editing the UBox Once you finish making changes and disconnect other users can make changes on a one user at a time basis 2 Update the following settings as desired Server Name Name of the selected UBox T...

Page 33: ...figure the UBox Once you set a password users can see the UBox on the Devices and Server tabs however they cannot edit any UBox settings without supplying the correct password Configuration Password and Renter Password Enter and then reenter the password a user must use to configure the UBox The password is case sensitive Requires Client Access Password Selecting this checkbox forces a user to ent...

Page 34: ...hods of assigning an IP address Using Defaults The UBox tries to get an IP address via DHCP first If it fails to obtain an IP address within 10 seconds it assigns itself an IP address using Zeroconfig This is the recommended setting for most users Use DHCP The UBox automatically obtains an address using DHCP server Select this setting if you only want to use an IP address obtained using a DHCP ser...

Page 35: ...ort These fields allow you to specify which port numbers on which the UBox communicates This communication happens between the UBox hardware and software By default these ports are set to 10010 UDP Port Change this setting to change the UDP port number on which the UBox broadcasts Other computers configured to use this UDP port number will be able to see this UBox This setting is useful if you wis...

Page 36: ...our discovery method See Changing Local Software Settings on page 44 Multicast Address The address on which the UBox will send discover messages You can enter any multicast address a long as it is in the range of 224 0 0 0 to 239 255 255 255 Default is 239 255 176 42 Note You would only change this if the default changes for example if you have a router that needs a different multicast address to ...

Page 37: ...s programmed into them For unnamed USB devices the USB device s programmed Vendor ID VID and Product ID PID display Location Serial Number The serial number of the USB device if it has one If it does not have a serial number the port 1 4 on the UBox to which the USB device is connected Cfg Displays an asterisk if the device was configured using the USB Device Configuration window Status Indicates ...

Page 38: ...ox If you move a USB device to another UBox reset the alternate name on the new UBox If your USB Device does not have a serial number and you move the USB device to a different port re enter the alternate name Requires Password To Connect Select the checkbox to share the specified USB device only with users who have the password to that USB device When you first attempt to connect to a password pr...

Page 39: ... if the share mode is Dedicated Client Name If you selected the Requires Password To Connect checkbox and the Share Mode of Dedicated enter the name of the computer See the Local Settings tab for the name 5 Click the OK button The updated information displays An asterisk displays in the Cfg column to indicate that the device has been configured 6 To edit the configuration a Select the device and c...

Page 40: ...If you previously changed your UDP port or multicast address remember to change the Lantronix UBox application s Local UDP Port to 10010 and multicast address to 239 255 176 42 You may not be able to see your UBox if you fail to do this Firewall Users If you have configured your firewall to allow access to the UBox remember to check your firewall s setting The UBox s IP address may have changed af...

Page 41: ... the Update button to start the upgrade Note Always have the latest firmware installed on your UBox We do not recommend using older firmware on your UBox with newer UBox software on your computer or vice versa Certain features such as Auto Connect may not work if your firmware is not compatible with the version of software that you have on your computer s UBox User Guide 41 ...

Page 42: ...2 From the Advanced menu select Override Server Network Settings The Override Server Network Settings window opens Figure 5 9 Override Server Network Settings Window 3 Enter the following information Server I D UBox s serial number IP Assignment Method Select one of the following methods of assigning an IP address to the UBox Automatic default The UBox tries to get an IP address using DHCP first I...

Page 43: ...dress on the network Enter the IP address as xxx xxx xxx xxx Example 192 168 20 1 Note The system administrator provides the IP address subnet mask and gateway Subnet Mask A subnet mask defines the number of bits taken from the IP address that are assigned for the host part Enter the subnet mask as xxx xxx xxx xxx Example 255 255 255 0 Gateway The gateway address or router allows communication to ...

Page 44: ... hardware and to other UBox users Change your UDP port number and multicast address used to access the UBox Create and manage server access settings allowing you to encode your communication with the UBox connect to UBoxes outside of your subnet active discovery and enter server access passwords View and delete saved passwords for password protected USB devices Updating Personal Communication Sett...

Page 45: ...rdware on your network The default value is 10010 If your UBox hardware is set to broadcast on a different port number you must change the UDP port number here to the same value Multicast Address This is the multicast address that the UBox software uses to discover UBox hardware on your network The default value is 239 255 176 42 If the UBox hardware is set to broadcast on a different address you ...

Page 46: ...on Selecting this checkbox encodes your communication between the UBox hardware and your computer You only need to enable this option in this window Warning Encoding the communication with your UBox affects overall performance of the UBox and the USB devices connected to it Active Discovery If your UBox is outside of your network for example in another office or if you need to access your UBox acr...

Page 47: ...a password for a USB device it displays in the Device Passwords area of the Local Settings tab To view or remove USB device passwords 1 In the Device Passwords area verify the following if you have saved a password previously Device Name Name that is programmed into your USB device by its manufacturer This name may different from the actual name and model number of your device For example if you h...

Page 48: ...ions Change both the local UDP port and the UBox UDP port to the same new port number so your computer can see the UBox This forces the UBox software to see only the UBoxes on the new UDP port it will not see UBoxes with a different UDP port Remove UBoxes with Yes in the Active Discovery column in the Server Access Settings area of the Local Settings tab This removes or prevents UBoxes that are on...

Page 49: ... now and return to this chapter when you have finished Note You can find the latest version of the Lantronix UBox software at http www lantronix com Please follow the instructions in this chapter in order as each section builds on the previous one If you cannot proceed past a certain section please contact Lantronix Technical Support Troubleshooting Status Lights Look at the status lights on your ...

Page 50: ...eftmost light under SYSTEM Status Condition Suggestions Off The UBox does not have power Check the UBox s power supply and its connection to an outlet On If this light does not blink on off within 6 seconds the UBox has failed to boot up Please follow the instructions in Resetting the UBox Hardware on page 55 Blinking Slowly This is normal and indicates the UBox hardware is working Proceed to the ...

Page 51: ...ng ing to communicate with puter has the current UBox has the UDP port set ve a personal firewall SYSTEM 3 is Off static IP and does not show any users connected to it V The computer try the UBox is on the same static IP Ethernet subnet The com software installed The UBox software correctly default 10010 The computer does not ha activated SYSTEM 2 is Off The UBox obtained an IP nd erify the follow...

Page 52: ...ontact Lantronix Technical Support for more information about compatible devices Blinking Blinking may indicate you have exceeded the number of USB devices per UBox One UBox supports up to eight USB devices While many USB devices appear as one USB device components of compound USB devices a device with an embedded hub or a device that has multiple components tied together by an internal USB hub co...

Page 53: ...ind the UBox hardware 1 Verify that the UBox software s local UDP port is set to match the UDP port used by the UBox hardware The default is 10010 See Updating Server Access Settings on page 46 2 If you do not know the UDP port that your UBox software is using set the Local UDP Port to 10010 3 If this does not work reset your UBox hardware see page 55 4 If you still cannot see your UBox proceed to...

Page 54: ...witches This is especially true when your UBox is using Zeroconfig to obtain an IP address To avoid these issues connect your UBox and your computer to the same Ethernet hub switch 4 If you can ping the UBox but the UBox software cannot establish a connection the UDP TCP port is not correct or is blocked by a firewall Temporarily disable the firewall and see if communication to the UBox is establi...

Page 55: ...ware please proceed to Resetting the UBox Hardware below Resetting the UBox Hardware Power Cycling or Using the Reset Button You can reset the UBox hardware at any time by two methods by power cycling it or by using its reset button To reset by power cycling 1 Disconnect the UBox s power supply and wait 5 seconds 2 Reconnect the power supply The UBox resets To reset using the reset button 1 Make s...

Page 56: ...ms with USB Devices 1 Open the Lantronix UBox application You should see your USB device listed Make sure Show All Devices displays in the list box below the tabs 2 If your USB device does not display a Check the USB LED status b Connect the device directly to the PC to verify that the device is functioning To troubleshoot issues with multiple users of a USB device If Suggestions You are sure that...

Page 57: ...9 0 89 31787 817 Email mailto eu_techsupp lantronix com or mailto eu_support lantronix com Firmware downloads FAQs and the most up to date documentation are available at http www lantronix com support When you report a problem please provide the following information Your name and your company name address and phone number Lantronix model number Software version Description of the problem Status o...

Page 58: ...The meaning of these lights changes depending on whether the UBox is booting up you have just turned on the UBox or if it is running The two tables on the following pages show all of the possible states of these LED lights and what they mean Note If you are having problems with your UBox please use this information in conjunction with the information in 7 Troubleshooting to diagnose the problem UB...

Page 59: ...r further details STAGE 3 Checking Ethernet Connection SYSTEM 2 and SYSTEM 3 both red start blinking while the UBox looks for an Ethernet signal a physical Ethernet connection and continue to blink until the UBox finds this signal STAGE 4 Finding IP Address SYSTEM 2 and SYSTEM 3 both red blink while the UBox tries to obtain an IP address Once the UBox obtains its IP address the UBox has finished b...

Page 60: ...UBox has detected a link speed of 100 Mbits If the light is off and NETWORK 3 is on the link speed is 10 Mbits Green ON OFF If the light is on the UBox s Ethernet port is in full duplex mode If the light is off and NETWORK 3 is on the Ethernet port is in half duplex mode Blinking NETWORK 2 Packet collision has occurred This is a normal and self recovering occurrence with Ethernet Green ON or Blink...

Page 61: ...ttings to your firewall to allow communication with your Lantronix UBox If you have multiple computers please repeat these steps for every computer that will access the UBox Step 1 Determine Which Version of Windows XP is Installed on Your Computer To determine Windows XP version 1 On the Start menu click Run 2 In the Open field type winver exe and click OK The About Windows window displays the ve...

Page 62: ...P port 10010 and TCP IP port 10010 If you have not changed these settings we will use these port numbers when we configure your firewall If you have changed the UBox s UDP and or TCP port numbers use that number instead of 10010 To obtain your IP address To obtain your IP address 1 Open the Lantronix UBox application 2 Click the Servers tab and locate your UBox 3 Select your UBox Its IP Address di...

Page 63: ... able to see the UBox Turn off the firewall to allow your computer to communicate temporarily with the UBox To obtain the Advanced Settings window 1 On the Start menu click SettingsÆNetwork Settings An icon for your network connection displays It is usually called Local Area Connection 2 Right click the icon A submenu opens 3 In the submenu select Properties The Local Area Connection Properties wi...

Page 64: ...tings window opens Figure 7 6 Advanced Settings Window Step 3a Add Settings to the Firewall to Allow Communication with the UBox To add your UDP Port to the firewall 1 In the Advanced Settings window click the Add button The Service Settings window opens Figure 7 7 Service Settings Adding a UDP UBox User Guide 64 ...

Page 65: ... Advanced tab to return to the Advanced Settings window 2 Click the Add button to create a new Service Settings window 3 In the Description of Service field enter something descriptive like Lantronix USB TCP 4 In the IP address field enter the IP address 5 In both the External Port and Internal Port fields enter the TCP port number 6 Select TCP 7 To save your changes click OK To close the remainin...

Page 66: ...r firewall software 1 From the Start menu click Control Panel The Control Panel window opens 2 Double click Windows Firewall The Windows Firewall window opens If you do not see Windows Firewall click Switch to Classic View on the side panel Figure 7 9 Windows Firewall Window 3 Select On 4 Click the Exceptions tab UBox User Guide 66 ...

Page 67: ...our UDP port to the firewall 1 On the Exceptions tab click the Add Port button The Add a Port window displays Figure 7 11 Add a Port Window UDP 2 In the Name field enter something descriptive like Lantronix UBox UDP 3 In the Port number field type 10010 UBox User Guide 67 ...

Page 68: ... TCP 2 In the Name field enter something descriptive like Lantronix UBox TCP 3 In the Port number field type 10010 4 Select TCP 5 Click OK To close the remaining windows 1 Click the OK buttons on the remaining windows Your firewall is now configured to allow access to the Lantronix UBox If you have multiple computers please repeat these steps for every computer that will access the UBox UBox User ...

Page 69: ... of the FCC Rules These limits are designed to provide reasonable protection against harmful interference in a residential installation This equipment generates uses and can radiate radio frequency energy and if not installed and used in accordance with the instructions may cause harmful interference to radio communications However there is no guarantee that interference will not occur in a partic...

Page 70: ...95 Canada Digital Apparatus EMI Standard This Class B digital apparatus meets all the requirements of the Canadian Interference Causing Equipment Regulations Cet appareil numerique de la classe B respecte toutes les exigences du Reglement sur le material brouilleur du Canada VCCI Voluntary Control Council for Interference from Information Technology Equipment Class B ITE Translation This is a Clas...

Page 71: ...Compliance Australia New Zealand This device complies with AS NZS 3548 Class B limits for the operation of Information Technology Equipment UBox User Guide 71 ...

Page 72: ... portion of the Software is strictly prohibited by such laws and treaty provisions Nothing in this Agreement constitutes a waiver of Lantronix s rights under any copyright law 2 Grant of License Lantronix grants to you the right to use this copy of the software Software on one or more computers provided that the Software is only used with the Lantronix UBX4100 hardware 3 Transfer Restrictions You ...

Page 73: ... BE CORRECTED SOME STATES DO NOT ALLOW THE EXCLUSION OF IMPLIED WARRANTIES SO THE ABOVE EXCLUSIONS MAY NOT APPLY TO YOU THIS WARRANTY GIVES YOU SPECIFIC LIMITED RIGHTS YOU MANY HAVE OTHER RIGHTS WHICH VARY FROM STATE TO STATE 6 LIMITATION OF LIABILITY Lantronix s entire liability and your sole remedy under this License Agreement is at Lantronix s option either a the return of payment as evidenced ...

Page 74: ...eplacement media to the customer In no event will Lantronix be responsible to the user in contract in tort including negligence strict liability or otherwise for any special indirect incidental or consequential damage or loss of equipment plant or power system cost of capital loss of profits or revenues cost of replacement power additional expenses in the use of existing software hardware equipmen...

Reviews: