background image

86 


23.) METHODS OF SELECTING PROGRAMS 

(Cont’d.)

-


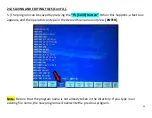
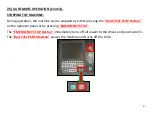
5.) Select each parameter by using the up and down arrow keys. After each parameter is changed, 
press the 

[ENTER]

 key. Once the changes are made, press 

“F8 [APPLY]”

 and the geometry will 

update to the new values. 


Summary of Contents for Plasma Level 2 CNC

Page 1: ...1 Safety Maintenance Receiving Unpacking Locating New Machine Parts Operation Procedures Programming ...

Page 2: ...tion Upon Receiving Machine Pg 32 9 Parts of Machine Pg 44 52 Basic Operations Pg 53 75 10 Basic Operations Pg 53 75 11 Adjusting Speeds Pg 76 77 12 Selecting Programs Pg 76 77 13 Saving Editing Files Pg 88 96 14 Automatic Operations Pg 96 97 15 Break Point Resume Operation Pg 96 100 16 Nesting Pg 101 105 17 Saving Cut Parameters Pg 106 18 Test Mode Dry Run pg 107 19 Contour Mode Pg 108 20 Program...

Page 3: ...lying distributor Read carefully before operating the machine 1 Keep the working area clean and be sure adequate lighting is available 2 Do not wear loose clothing gloves bracelets necklaces or ornaments Wear face eye respiratory and body protection devices as indicated for the operation or environment 3 Be sure that the power is disconnected from the machine before tools are serviced or an attach...

Page 4: ...ve that programmers machine operators and maintenance personnel be trained adequately in the use and care of the equipment These employees should receive the proper instruction to have a complete understanding of the operation of this machine before beginning to program operate or service it Careful programming and debugging of new programs are essential for successful operation of this machine Us...

Page 5: ...her personal protective equipment as required by applicable federal local industry and plant safety program standards 3 Wear proper clothing Do not wear watches rings jewelry or loose fitting clothes 4 Read and review the manual carefully 5 Be familiar with the operation of the machine 6 Practice preventative maintenance Inspect the equipment regularly and repair or replace worn components and too...

Page 6: ...tion Report any minor problems immediately so that they can be corrected before becoming major difficulties Only qualified personnel should make repairs on the machine 1 Be familiar with the machine Read and review the manuals carefully 2 Be Alert about the significance of the various warning indicators and be conscious of the functions of pushbuttons and other controls Use the controls properly R...

Page 7: ...ies that puts the operator in a hazardous position 7 Recognize and avoid unsafe operating conditions 8 Maintain a clean work area Avoid accidents by keeping work areas clean and neat 9 Never leave the machine in an unsafe condition 10 Never leave a machine running unattended 11 Never remove or bypass safety devices 12 Report any unsafe conditions personal injury or machine problems immediately to ...

Page 8: ...nt uses high open circuit voltages to initiate the plasma arc Normal load voltages are higher than experienced with other types of welding equipment Extreme CAUTION must be exercised when operating or servicing this equipment ...

Page 9: ...insulation against electric shock Disconnect main power before servicing the torch power supply or service connections to the plasma arc system or any part of the machine bed Wear adequate personal equipment overalls gloves safety boots etc when operating the machine Remove or secure articles of clothing such as ties and loose sleeves which may catch or be drawn into moving machinery ...

Page 10: ... to the eyes and skin It is recommended that the cutting area be prepared in such a way as to minimize the reflection and transmission of ultra violet radiation Walls and other surface areas should be painted in dark colors to reduce reflection Protective screens or curtains may be installed to avoid unnecessary ultra violet transmission ...

Page 11: ...rent of the plasma arc power supply 3 Primary power cable must be provided with a minimum 600v rating GROUNDING Input Power 1 Connect the ground lead of the four conductor three phase input cable to the electrical system ground in the disconnect box and the ground stud provided in the plasma arc supply 2 Be sure all ground lugs are of adequate size to carry the rated current load 3 Make all connec...

Page 12: ...l grid of the worktable to a good earth ground BURN PREVENTION High intensity ultraviolet and infrared radiation is produced by the plasma arc and is of similar intensity to typical high current welding arcs This radiation is damaging to the eyes and skin As the operator comes closer to the torch the level of exposure increases rapidly ...

Page 13: ...d other degreasing agents should be removed from the immediate area around the plasma arc Metals coated with or containing significant amounts of lead cadmium zinc mercury or beryllium can produce harmful concentrations of toxic fumes when the plasma arc cuts Adequate local exhaust ventilation must be used or the operator must be supplied with special equipment to guarantee a supply of fresh air s...

Page 14: ...y the reaction of the plasma arc s ultraviolet radiation with oxygen in the air Uncontrolled excessive levels of ozone can constitute a hazard When there is proper venting to the outside and the machine s internal ventilation system is functioning properly there is adequate control of ozone during torch cutting Nitrogen Dioxide Nitrogen dioxide gas is produced when nitrogen and oxygen in the air p...

Page 15: ...gases are being produced Shut down the plasma arc cutting system immediately if you detect the acetyl chloride odor Do not resume cutting until you locate and control the source of the vapors Various cleaning solvents and vapor degreasers contain chemicals that decompose rapidly when exposed to ultraviolet radiation If the solvents cleaning solutions or vapor degreasers used in the shop contain an...

Page 16: ...ve advisable to provide separate ventilation for the solvent degreaser storage area Metal Fumes Metal Fumes are produced when the plasma arc vaporizes the metal A hazard may exist when uncontrolled excessive levels of metal fumes are produced some vaporized metals form toxic gases These metals may be in their pure metallic state in an alloy or in a coating such as paint or plating Metals that are ...

Page 17: ...orch cutting For proper ventilation at least 90 of the worktable should be covered by the workpiece or other sheet metal covers See dust collector vendor installation and operation manual for additional precautions FIRE PREVENTION All combustible materials must be removed from the immediate cutting area to at least 35 feet away Appropriate fire extinguishing equipment must be available in the imme...

Page 18: ...n accordance with appropriate national safety standards Never use a cylinder that is physically damaged or leaks Never move or transport a cylinder without the protective valve cover in place Never use a gas cylinder or its contents for any other purpose than that for which it is intended Never lubricate cylinder valves with oil or grease Never allow electrical contact such as welding arcs with cy...

Page 19: ...cturers designated facility by trained repair technicians Never use a regulator for any other gas than that for which it is intended Never use a regulator that leaks excessively creeps or is physically damaged in any way Never attempt to lubricate a regulator with oil or grease HOSES Gas hoses used for Plasma Arc Cutting Systems adhere to the following Color Coding Red Acetylene Orange LPG Blue Ox...

Page 20: ...revent possible volume flow restriction Please refer to national standards for more information on hoses SAFETY DEVICES Plasma Arc Units are provided with certain safety interlocks designed to prevent equipment damage and or personal injury Never short out or in any way attempt to defeat the safety interlock devices All exposed electrical connections must be covered with the proper insulation mate...

Page 21: ...when the machine is in operation This safety precaution also applies when the machine is manually moved and when the plasma system is off IMPORTANT Read this manual thoroughly before operating the machine Read the Torch Height Control Manual before operating the machine Read the CNC Control Operator Manual before operating the machine ...

Page 22: ... material being cut the cutting current and the feed rate Where practical keep all combustible material at least 35 ft 10 7 m away from the plasma arc work area Where this is not practical protect all combustible materials with close fitting flame proof covers or shields Protect wooden or other combustible floors by covering them with sand or installing fire resistant shields Shield any wall openi...

Page 23: ...ernment ordinances Air pollution control devices are the responsibility of each individual user Internal Ventilation System Due to the noxious and toxic nature of many torch cutting by products Phoenix recommends venting the machine s internal ventilation system referred to as the dust collector to the outside atmosphere This recommendation is especially important when the shop has one of the foll...

Page 24: ...uctions presented in the General Safety Requirements section of this manual Ultraviolet rays and other radiant energy reflected off the workpiece can produce sunburn Therefore when plasma arc cutting is being performed anyone working within 25 feet 7 5M of the arc should wear an approved protective full face mask a long sleeved shirt gloves and long pants Operations such as edge cutting that can c...

Page 25: ...ens and TIG welders people who have implanted heart pacemakers must exercise caution when working near the equipment Phoenix Plasma recommends that a person with a pacemaker who works near where plasma arc cutting is being performed should wear a Holter monitor for one day of work to record the existence of electromagnetic fields A qualified doctor should review the recorded data with the pacemake...

Page 26: ...contact with these components unless you are wearing heat resistant gloves NOISE The noise levels generated during plasma arc cutting may be as high as 105 decibels This depends on the distance from the machine arc plasma torch nozzle design gas velocity material type and plate thickness Phoenix Plasma recommends that each user check the sound levels in his own shop under normal operating conditio...

Page 27: ... list of safety instructions for any configuration of the Phoenix plasma Cutting Table Warnings and other safety information related to operations described in this manual are presented in the chapters in which those operations are explained Specific equipment being used by the customer and its application in the customer s factory may require supplementary safety information NOTE It is the respon...

Page 28: ...livery documents and signed by you and the delivery driver You must then contact the seller Laguna Tools within 24 hours Required Equipment Tools The following tools will be required for the installation and handling of the plasma table 1 Metric Allen Wrenches Set 2 Two Adjustable Crescent Wrenches for adjusting the Leveling Pads 3 Minimum of 3 ft Bubble Level for Leveling the Machine on the Floor...

Page 29: ...ed with the machine will be packed on or inside the machine Please note the machine is heavy and it is recommended that professional assistance rigging be used for unloading and placing the machine 4 Use a forklift with sufficient lifting capacity and forks that are long enough to reach the complete width of the machine before attempting to lift the machine 5 Remove the securing bolts that attach ...

Page 30: ...t will be delivered Curbside in other words the Machine will be delivered in front of the Driveway of one s Garage Shop or Workspace It is the Purchasers responsibility of moving the Machine into His or Hers Garage Shop or Workspace 2 One should obtain a Crane Hydraulic crane crane 10T or above 4 groups of 10T rings 2 10M long 10T straps 3 One should obtain a Forklift The forklift can fork items w...

Page 31: ...31 2 2 Unloading Requirements b Pry Bar c Wire Cutters d Cordless Drill 5 Cut all straps only on the Crate ...

Page 32: ...aving any or our Laguna Tools Facilities but that does not mean the Machines would not experience any damage in transit 2 Before one Signs the Bill of Lading See Example Below when the Trucking Company drops off the Machine visually inspect the entire crate and check for any damage ...

Page 33: ...he CNC control and the gantry will be secured off centered on the cutting table bed CAUTION Extreme care must be taken when lifting and moving the machine Obtain the weight of the machine NOTE It is the responsibility of the customer to verify that the forklift truck and or crane is of adequate lifting capacity and that any maneuver is undertaken safely Damage caused to the machine through incorre...

Page 34: ...feet length that are rated for the weight of the load dependent on the size of machine 3 Slide one of the lifting strap under the machine base close to the gantry side as shown on the picture below NOTE Longer lifting straps may be required if the crane does not have hoist chains attached Gantry Center Leg Strap Location ...

Page 35: ...e the other lifting strap under the machine base off centered of machine length NOTE Ensure both straps are between the cable carrier guideway and frame so lifting the machine will not cause damage to the cable carrier Strap Location Caterpillar Track ...

Page 36: ... 9 Begin to lift the machine above the truck bed and confirm that load is not tipping in either direction by doing a complete walkaround 10 Reposition straps and crane as necessary to keep load stable and balanced 11 Once the load is balanced and stable lift the machine clear of the vehicle 12 Lower the machine to floor level and place it firmly on the ground at the designated area of operation CA...

Page 37: ... to the frame You may want to put padding between the forklift and frame to protect the machine from any scratches or damage CAUTION A forklift of adequate fork length 8 ft minimum is required to lift the machine otherwise the frame will get damaged NOTE The forklift must not lift the machine from the cable carrier side instead lifting must be done from opposite side to prevent damage to the track...

Page 38: ...38 6 Lifting with Forklift Cont d 4 Ensure that forks extend all the way through the machine base to the opposite side Center Leg Forks Location and Extension Forklift ...

Page 39: ... Travel with forks close to the ground so the machine is not suspended very high in the air This will reduce damage to the machine if accidently dropped 9 Lower the machine to floor level and place it firmly on the ground at the designated area of operation CAUTION Before moving the machine into position it is essential to plan for the path of travel to ensure that no hazards exist in the path tha...

Page 40: ...be able to work 3 Solid Floor You should select a solid flat floor preferably concrete or something similar 4 Machine should be located close to adequate Power Source 220 Volt If no power source is available make sure to have a Power Source 220 Volt installed by a licensed qualified Electrician 6 Assembly and set up Cleaning the machine The machine is shipped with the non painted surfaces protecte...

Page 41: ...ician must carry out the electrical installation 9 Shielding and Grounding This section is preliminary and offers only typical shielding and grounding techniques to reduce RF Electronic Radio Frequency Noise noise As with all electrical devices it is important to always follow all local electrical codes including but not limited to the National Electrical Code 10 Motor Controller and other Control...

Page 42: ...lly conductive Plasma arc cutting uses the plasma as an electrode to transfer an electrical arc to the work piece The heat of the arc melts the work piece and the force of the plasma and shield gases blow away the molten metal to cut the work piece Different metals react differently to plasma cutting Carbon steel can be oxidized and is usually cut with a plasma containing oxygen to take advantage ...

Page 43: ...lleague Merle Thorpe founded Thermal Dynamics Corp to manufacture the device Within three years the start up had sales of 1 million A decade later Thayer Professor Robert Dean and C H p I Additional instructions for the use of the CNC Plasma Like all machines there is danger associated with the machine Injury is frequently caused by lack of knowledge or familiarity Use this machine with respect If...

Page 44: ...ts of the CNC Plasma Controller Electrical Cabinet Caterpillar Track Plasma Head Torch Emergency Stop Button 2 One Button on Opposite Side of Gantry Gantry Bed Frame Gantry Supporting Legs Oiler on opposite side ...

Page 45: ...point contact with the job and are consumable as they will be cut by the plasma cutting head 2 Gantry The gantry straddles the bed and carries the Plasma cutting head motion system It is moved along the length of the bed by a precision rack and pinion system that is controlled by the machine controller Bed Plasma Cutting Head Caterpillar Track Emergency Stop Gantry Frame ...

Page 46: ...rical Cabinet The Controller Electrical cabinet is located on the side of the machine The enclosure houses all the electrical components for controlling and powering the machine 6 Caterpillar Track The caterpillar track runs along the side of the machine and across the gantry in a trough and carries all the electrical cables and gas pipes 7 Emergency Stop To reset the emergency stop twist clockwis...

Page 47: ...47 16 Control Panel from Controller Electrical Cabinet Display Cycle On Off Buttons Function Buttons USB Port Controls for Electrical Cabinet Controls for Plasma Torch Head Control Panel ...

Page 48: ...the Right to pop out Locator Switch This is the On Off Switch that turns on the Red Dot Laser Locator alongside the Plasma Cutting System Power Light Indicator This indicator light when lite tells operator if the Electrical Control Cabinet has power Power Switch This is the On Off Switch that turns on off the Power to the Electrical Control Cabinet Controls for Electrical Cabinet ...

Page 49: ...rol Panel from Controller Electrical Cabinet Cont d Controls for Plasma Torch Head USB Port Information Display 1 Auto Manual Control 2 Torch Up Torch Down Control 3 Arc Strike Push Button 4 Zero Test Push Button ...

Page 50: ...50 16 Control Panel from Controller Electrical Cabinet Cont d Controls for Plasma Torch Head 5 IHS Height Adjustment Control 6 Sensitivity Control 7 Set Arc Voltage Menu Control ...

Page 51: ...Button Torch approaches downward and touches metal and raises to IHS height also saves Start Point Origin Point of the cut 5 IHS Height Control IHS Initial Peirce Height Plasma manual will give you this number whether it is a Hypertherm or Thermal Dynamics 6 Sensitivity Control Controls how fast the height control reacts to the metal warping Lower More Sensitive Higher Less sensitive 7 Set Arc Vol...

Page 52: ... Controller Electrical Cabinet Cont d Rear Components of the Electrical Cabinet Main Electrical Switch Torch Controller Relays Fuses Drivers 220v Volt Terminal Driver Direction Terminal Block Sensors Limit Switches Exhaust Fan ...

Page 53: ...53 17 Basic Operations Rear Door of the Electrical Cabinet ...

Page 54: ...lace the plasma power supply and or remote arc starter at the rear of the frame Keep the CNC computer controller as far from the power supply and or remote arc starter as possible Follow the power supply grounding diagram found in the system manual ...

Page 55: ...d as close to the table as possible It may be necessary to weld a second rod to reach the moisture layer to achieve a proper ground Follow the attached instructions for proper earth ground rod testing If multiple ground rods are required to achieve proper grounding keep a minimum distance of 1 1 times the driven length between driven rods Create a main star ground on one of the table legs The main...

Page 56: ...h ground rod Do not connect any other grounds directly to the ground rod Create an auxiliary star ground point as needed to connect ground leads from moving points of the table to the main ground The point should have good metal to metal contact Connect this star to the main star using 4 AWG minimum Connect the power supply safety ground directly to the main star ground with a minimum 1 0 cable Co...

Page 57: ...d A larger diameter rod which has more surface area may help Sometimes keeping the soil around the ground rod moist by continuously running a small amount of water into it will work Adding salt to the soil by soaking it in salt water may also help to reduce its resistance When you use these methods periodic checking of the ground resistance is required to ensure that the ground is still good Note ...

Page 58: ...slide back over the electrical connectors and terminate only the one end to the sensitive equipment side ground Use a metal cable clamp to attach the shield to the ground See Figure Below 20 2 Double Shield Method Better Cover all shielded cables with a tightly woven Braided Shield Slide the shield over the cable leaving enough to slide back over the electrical connectors Use a metal cable clamp t...

Page 59: ...2 Cables as an alternative fiber optic converters will offer the best noise immunity Computer and Motor Controller AC power cord Control cables and encoder cables I O Cables Open the Ferrites Clamp and Pass 4 to 10 turns around one half of the core then close and snap the clamp shut Ferrite Cores are not recommended for use with Braided Shielding ...

Page 60: ...e one outlet with a good surge suppression device and multiple power outlets The Plasma Power Supply may be connected to a different power outlet however it is best if the outlet is common to the same panel as the cutting table Do not coil wires and cables If you need to clean up the install do so by wire tying the loops of extra cable so the major length of the cable is touching Remove as much ai...

Page 61: ...djustment should be required If adjustment is required contact your service technician prior to conducting any adjustment Z Axis Upper Lower Limit Switch Z Axis Limit Switches within the Plasma Cutting Motion System on Gantry Z Axis Upper Limit Switch Location Z Axis Upper Limit Switch Location Z Axis Lower Limit Switch Location Z Axis Lower Limit Switch Location Z Axis Direction ...

Page 62: ...62 21 Basic Machine Operations Cont d X Axis Home Switch X Axis Home Limit Switch Location on the Gantry X Axis Direction ...

Page 63: ...63 21 Basic Machine Operations Cont d Y Axis Home Switch Y Axis Home Limit Switch alongside Rail Y Axis Direction Y Axis Home Limit Switch Stop Y Axis Direction ...

Page 64: ... 1 Turn on the Electrical Control Cabinet and CNC Display a Turn the Main Electrical Switch on the back of the Electrical Control Cabinet to the On Position b Turn On the Power Switch on the front of the Electrical Control Cabinet ...

Page 65: ... 21 1 b Ensure all E Stops are out Two on each side of the bridge and one on the CNC Control Ensure all E Stops are out Turn On the Power Switch c Press F2 on the keyboard to get into the Manual Mode Once in manual mode you should be able to jog the gantry and control movement using the arrows keys on the keyboard Welcome Screen will appear Press the F2 Button USB Port ...

Page 66: ...or operator Input into the Machine Control b The Display Shows Data and Information to the operator The Red Emergency Stop Button is located on the upper right hand side of the keypad When this button is depressed power is removed from the motion components motors and drives and the plasma arc is turned off b The Display a The Keypad ...

Page 67: ...67 21 Basic Operations Cont d Red Emergency Stop Buttons on Both Sides of the Gantry on the Frame Emergency Stop Button Emergency Stop Button ...

Page 68: ...68 21 Basic Operations Cont d CNC CONTROL NAVIGATION The CNC Control Menu is located at the bottom of the screen ...

Page 69: ...eys at the top of the Operator s keypad To select the corresponding block Press the FUNCTION Key Example F1 for AUTO in the diagram below The ESCAPE functions on either side of the block cancels out the active function and returns to the previous page THE SCREEN IS NOT A TOUCH SCREEN ESCAPE ESC F1 AUTO ESCAPE ESC ...

Page 70: ...rations such as jogging the machine F3 EDIT Edit Change Save Files Load Files F4 SETUP Set or modify cutting parameters F5 DIAGNOSE See the status of Input Outputs F6 LIBRARY Parametric shape library F7 NEST Create or load shapes F8 DATABASE Cut parameter database Each of the functions keys has at least one additional sub menu below it Navigate by pressing the appropriate function key and return b...

Page 71: ...71 21 Basic Operations Cont d The Main Display ...

Page 72: ...ng the 4 key will toggle the arc on and off 5 Pressing the 5 key will jog the torch to the up position 6 Pressing the 6 key will jog the torch down X Pressing the X key will toggle the machine between TEST MODE and RUN MODE See Section on TEST MODE DRY RUN W Auto Speed Mode highlights when running at a controlled cutting speed G If Program is stopped Pressing the G key will Continue with Program F...

Page 73: ...wo Functions 1 When in VIEW Mode this allows the operator to zoom in to certain areas of the nest 2 When not in VIEW Mode this allows the operator to select parameters from the DATABASE Z When in VIEW Mode use the Z Key to zoom out after using Y Key to zoom in ...

Page 74: ... jog the machine without running it from a program This is commonly used to bring the machine to the operator so that he can change cutting consumables or to move the machine out of the way while the operator unloads finished parts and loads new material From the HOME page select F2 MANUAL ...

Page 75: ...n MANUAL is selected a new menu appears In MANUAL Mode you can move the X and Y axis by Pressing the Arrow Buttons on the operator keypad Make sure that no one is near the machine gantry and that the torch is all the way up prior to moving the machine Arrow Keys USB Port ...

Page 76: ...EED this is the speed at which the machine moves when the plasma torch is cutting JOG SPEED this is the speed at which the machine moves when manually moving the machine with the arrow keys In the MANUAL menu when H SPED is selected the button will highlight with a dark blue background and the RAPID SPEED can be adjusted as a percentage of the MAXIMUM TRAVERSE SPEED using the F F Buttons ...

Page 77: ... SPED is selected the JOG SPEED is the same as the RAPID SPEED When H SPED is not selected JOG SPEED is the same as CUTTING SPEED 23 METHODS OF SELECTING PROGRAMS There are three methods of selecting programs Selecting a pre programmed part or nest from the USB drive Selecting a file from CNC Control memory that has already been saved in the control Selecting a program from the Parametric Shape Li...

Page 78: ...78 23 METHODS OF SELECTING PROGRAMS Cont d SELECTING A PROGRAM FROM USB DRIVE From the MAIN SCREEN select F3 EDIT ...

Page 79: ... PROGRAMS Cont d From the EDIT SCREEN select F6 USB From the USB SCREEN select F1 INPUT From the INPUT SCREEN use arrow up down to highlight program to be loaded and Select F1 COPY By pressing ENTER ONE can view the Program CODE ...

Page 80: ... 23 METHODS OF SELECTING PROGRAMS Cont d LOADING A PROGRAM FROM CONTROL MEMORY From the EDIT SCREEN select F2 LOAD From the LOAD SCREEN use arrow up down to highlight program to be loaded and press ENTER ...

Page 81: ... 23 METHODS OF SELECTING PROGRAMS Cont d After pressing ENTER the selected program will be loaded and the Program Code will display Pressing F7 VIEW will display a graphical representation of the program ...

Page 82: ... AUTO SCREEN pressing F4 VIEW will display a graphical representation of the Loaded Program The red dots with numbers show the pierce points and cut order The red crosshairs show the program zero location location the operator needs to set PROGRAM ZERO ...

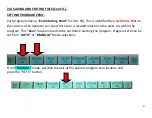
Page 83: ...METRIC SHAPE LIBRARY The CNC Control has several common shapes that are used in the Metal Fabrication industry The size of the features within each shape can be adjusted easily to achieve customer requirements 1 Choose F6 LIBRARY 2 There are two pages of Shapes to choose from ...

Page 84: ...84 23 METHODS OF SELECTING PROGRAMS Cont d Shapes in Library 1 Shapes in Library 2 ...

Page 85: ...he name of the shape and press ENTER 4 This is the shape from HOLE2 located in Library 2 In this shape the holes are centered on the rectangle Parameters are as follows W Width H Height D2 Diameter of the two holes A8 Vertical distance between the holes LEN1 Lead In Distance LEN2 Lead Out Distance ...

Page 86: ...ECTING PROGRAMS Cont d 5 Select each parameter by using the up and down arrow keys After each parameter is changed press the ENTER key Once the changes are made press F8 APPLY and the geometry will update to the new values ...

Page 87: ...8 OK and you will be directed to the HOME screen 7 At this point the geometry of the part has NOT been saved While it can be run on the machine it cannot be nested modified or used later To save it see the section on Editing Programs and File Management 8 The program can now be run in AUTO Mode ...

Page 88: ...n on the control 1 After a program has been selected from the USB drive or from the Shape Library go to the HOME screen and select F3 EDIT 2 The display should now show the part program If the operator has familiarity with M Code and G Code programming the program can be edited just as a normal text file can be edited on a home computer Do not try to edit a program if you are not familiar with M c...

Page 89: ...89 24 SAVING AND EDITING FILES Cont d 3 Entire lines can be deleted by pressing F5 DELL Delete Line 4 The entire file can be deleted by pressing F4 DELF Delete File ...

Page 90: ... F3 SAVE Button When this happens a text box appears and the operator can type in the desired file name and press ENTER Note Be sure that the program name is not already taken in the directory If you type in an existing file name the new program will overwrite the previous program ...

Page 91: ... Cross Hair on the screen so the operator can see where zero is located relative to the parts cut within the program This Zero location needs to be set before starting the program Program zero can be set from AUTO or MANUAL Mode selections From MANUAL mode position the axis at the desired program zero location and press the REF 0 button ...

Page 92: ...VING AND EDITING FILES Cont d From AUTO Mode press the MANUAL Mode button Position the axis at the desired program zero location and press the REF 0 Button Press the AUTO Button to return to the automatic menu ...

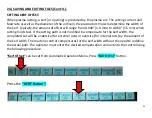
Page 93: ...to 0 060 1 5 mm when cutting mild steel If the cutting path is not modified to compensate for the kerf width the completed cut will be undersize for external cuts or oversize for internal cuts by the amount of the kerf width The machine control compensates for the kerf width without the need to redefine the actual path The operator must enter the desired compensation amount into the control using ...

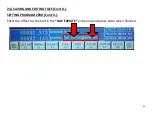
Page 94: ...94 24 SAVING AND EDITING FILES Cont d SETTING PROGRAM ZERO Cont d Enter the offset for the Kerf in the GAP EXPIATE entry area and press enter when finished ...

Page 95: ...ration the program zero must be set the kerf offset must set and the correct program must be selected Please refer to SETTING PROGRAM ZERO SETTING KERF OFFSET and SELECTING A PROGRAM sections in this manual for further information Set the machine to AUTO F1 Mode from the HOME screen ...

Page 96: ...lue is too small and the operator should add to it If it is oversize then the kerf value is too large and the operator should subtract from it 25 AUTOMATIC OPERATION Prior to cutting the part it may be desired to test run the program without cutting See the section on TEST MODE DRY RUN to test run the program Pressing the Green CYCLE START Button at this point will start the program execution ...

Page 97: ...machine can be stopped by either pressing the Red CYCLE STOP Button on the operator panel or by pressing EMERGENCY STOP The EMERGENCY STOP Button immediately turns off all power to the drives and plasma torch The Red CYCLE STOP Button pauses the machine and turns off the torch ...

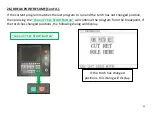
Page 98: ...rrent torch position as a breakpoint The breakpoint will remain active even if the system is turned off If the program selected after power off is different from the program prior to power off then the breakpoint will be lost To use the BREAK POINT RESUME function the control must be in AUTO Mode Press the RESBREK Button ...

Page 99: ...run and the torch has not changed position then pressing the Green CYCLE START Button will continue the program from the breakpoint If the torch has changed positions the following dialog will display Green CYCLE START Button If the torch has changed positions this dialog will display ...

Page 100: ...l pierce at its current location and move in a straight line at cut speed to the breakpoint and then continue with the programmed contour The third option is HOLE HERE with this selection the system will pierce in its current location and shift the machine coordinates such that the breakpoint is located at the current pierce location and the program will continue the contour from this pierce locat...

Page 101: ... can be automatically placed on a sheet of material for cutting This can be used with items within the Shape Library or with items that are programmed using the Fast CAM programming system Use the following sequence to create nests 1 From the HOME page select F7 NEST ...

Page 102: ...27 NESTING Cont d 2 The following screen will appear Press the F5 STEEL key to adjust the size of the plate 3 Select the part program you wish to nest This can be from the Shape Library F1 or from a File F2 ...

Page 103: ...103 27 NESTING Cont d 4 Select the Saved File you wish to nest and press ENTER ...

Page 104: ...104 27 NESTING Cont d 5 You will be prompted to input the number of parts Type in the number of parts you wish to cut and press ENTER The screen will then populate the parts onto the raw material ...

Page 105: ...n and edit as follows a F2 DEL Delete s a Part b F3 FORWARD Moves the part in the cut order c F7 ANGLE Rotates the part 7 Additional different parts can be added by loading more parts Use the F1 LOAD Key to add more parts 8 Once you are satisfied with the nest press F8 OK You will be prompted for a file name to save the nest 9 You can now run the nest in AUTO Mode ...

Page 106: ...aterial library allows the operator to save cut conditions Cutting Speeds Arc Voltage The Cutting Speed can then be loaded for any program the Arc Voltage is a quick reference to be used to set the Torch Height Control 1 From the HOME screen select F8 DATABASE 2 The following Screen Appears ...

Page 107: ...ton and the TEST location on the Display becomes illuminated The operator can now press the START Button and the program will run without cutting In TEST Mode the program defaults to maximum federate it will not run at the programmed cutting speed To quit the TEST Mode press the X Key again and the TEST location no longer will be illuminated ...

Page 108: ...ill test run a rectangle around the entire outside of the program This will allow the operator to see if the part program or nest will fit on the sheet of material as it is located on the machine To run CONTOUR from AUTO Mode press the F7 CONTOUR Key ...

Page 109: ...upgrade to Fast CAM Professional is available through Phoenix Plasma Please see Appendix A for setting up Fast CAM Please see the following online documents to help understand Fast CAM Fast NEST Getting Started Pack Starter Pack In addition there is a Fast CAM Community website available for common Questions and Answers Q A s Fast Cam s How to Draw guide is located at DEMO videos on Fast Cam s You...

Page 110: ...110 31 PROGRAMMING Cont d PROGRAMMING CODES G Codes ...

Page 111: ...111 31 PROGRAMMING Cont d PROGRAMMING CODES M Codes ...

Page 112: ...ENANCE The following maintenance items should be done on a planned basis In addition the operator should take care to clean the machine and surrounding areas regularly as needed to maintain a safe work environment ...

Page 113: ...113 32 MAINTENANCE Cont d Error Code List ...

Page 114: ...114 MAINTENANCE Cont d MACHINE SETUP PARAMETERS The parameters in the SETUP section of the control should be set as follows ...

Page 115: ...115 MAINTENANCE Cont d MACHINE SETUP PARAMETERS ...

Page 116: ...ZERO In the event that the machine has lost its zero home position use the following procedure to re set MACHINE ZERO MACHINE ZERO is different than PROGRAM ZERO this procedure should not be used to set PROGRAM ZERO 1 Press F2 MANUAL 2 Press F8 ASSIST ...

Page 117: ...CEDURE SETTING MACHINE ZERO 3 Press F5 MEASURE 4 Choose F4 SETUP from the Home Screen 5 Choose F2 SYSTEM NOTE As an alternative to the first three steps you can simply jog the machine to the location you wish to set machine zero ...

Page 118: ...118 MAINTENANCE Cont d PROCEDURE SETTING MACHINE ZERO 6 In the parameters find DIR ORIGIN Set X 00 Y 00 ...

Page 119: ...119 MAINTENANCE Cont d PROCEDURE SETTING MACHINE ZERO 7 Press F8 SAVE 8 Press ESC until you get back to the Home Screen 9 Press F2 MANUAL 10 Press F8 ASSIST 11 Press F6 ORIGIN ...

Page 120: ...120 MAINTENANCE Cont d PROCEDURE SETTING MACHINE ORIGIN 12 Press ESC until you get back to the Home Screen 13 Choose F4 SETUP from the Home Screen 14 Choose F2 SYSTEM ...

Page 121: ...121 MAINTENANCE Cont d PROCEDURE SETTING MACHINE ORIGIN 15 In the parameters find DIR ORIGIN Set X to 1 and Y to 1 16 Press F8 SAVE ...

Page 122: ...AINTENANCE PROCEDURE UPDATING CONTROL SOFTWARE FROM USB DRIVE 1 Before placing a Program Drive into the USB Drive a Push the Update ARROW Button and b Turn On the Plasma 2 CNC Machine 1 a Update Arrow Button ...

Page 123: ...123 MAINTENANCE PROCEDURE UPDATING CONTROL SOFTWARE FROM USB DRIVE 1 Before placing a Program Drive into the USB Drive a Push the Update ARROW Button and b Turn On the Plasma 2 CNC Machine ...

Page 124: ...NTENANCE PROCEDURE UPDATING CONTROL SOFTWARE FROM USB DRIVE Cont d 2 When the screen display will appear 3 When the screen stops changing locate and note the Version of STARFIRE Control Software on the screen ...

Page 125: ...MAINTENANCE PROCEDURE UPDATING CONTROL SOFTWARE FROM USB DRIVE Cont d 4 Choose the USB for updating the control from that version 5 Turn the power supply off plug in the USB drive Turn the Power Supply Off ...

Page 126: ...126 MAINTENANCE PROCEDURE UPDATING CONTROL SOFTWARE FROM USB DRIVE Cont d 6 Hold the Update ARROW Down and turn the power on Turn the Power Supply On Update Arrow Button ...

Page 127: ...E PROCEDURE UPDATING CONTROL SOFTWARE FROM USB DRIVE Cont d 7 Release the Update Arrow Button when the screen starts to change 8 You will see the blue screen with two white squares on bottom left Update Arrow Button ...

Page 128: ...128 MAINTENANCE PROCEDURE UPDATING CONTROL SOFTWARE FROM USB DRIVE Cont d 9 Push F1 ...

Page 129: ...129 MAINTENANCE PROCEDURE UPDATING CONTROL SOFTWARE FROM USB DRIVE Cont d 10 Turn Off the power with the Green Power Button when the screen stops changing Turn the Power Supply Off ...

Page 130: ...130 MAINTENANCE PROCEDURE UPDATING CONTROL SOFTWARE FROM USB DRIVE Cont d 11 Re start the Control with the Green Power Button Turn the Power Supply On ...

Page 131: ...AM SETUP How to setup FastCAM Run the CD choose ENGLISH then choose START and follow the instruction to finish installation When you finish Fastcam installation you will see a file holder FastCAM on your desktop ...

Page 132: ...132 FastCAM SETUP Cont d ...

Page 133: ...133 FastCAM SETUP Cont d ...

Page 134: ...134 FastCAM SETUP Cont d ...

Page 135: ...135 FastCAM SETUP Cont d ...

Page 136: ...136 FastCAM SETUP Cont d ...

Page 137: ...137 FastCAM SETUP Cont d ...

Page 138: ...138 FastCAM SETUP Cont d ...

Page 139: ...139 FastCAM SETUP Cont d ...

Page 140: ...140 FastCAM SETUP Cont d ...

Page 141: ...141 FastCAM SETUP Cont d ...

Page 142: ...142 FastCAM SETUP Cont d ...

Page 143: ...143 FastCAM SETUP Cont d ...

Page 144: ...144 FastCAM SETUP Cont d ...

Page 145: ...145 FastCAM SETUP Cont d ...

Page 146: ...146 FastCAM SETUP Cont d ...

Page 147: ...147 FastCAM SETUP Cont d ...

Page 148: ...148 FastCAM SETUP Cont d ...

Page 149: ...149 FastCAM SETUP Cont d ...

Page 150: ...150 FastCAM SETUP Cont d ...

Page 151: ...long Please notify Sales Representative with any Delivery Restrictions Customer is required to have a forklift 6000lb or larger is recommended with 72 forks or fork extensions and operator Note any visible damage torn packaging scuffs or any abnormal marks on the delivery receipt or Bill of Lading BOL ...

Page 152: ...h any and all returned parts components requesting warranty coverage Any machines returned to Laguna Tools must be returned with packaging in the same manner in which it was received If a part or blade is being returned it must have adequate packaging to ensure no damage is received during shipping In the event the item part is determined to be damaged due to lack of maintenance cleaning or misuse...

Page 153: ...determined on a case by case basis Software purchased through Laguna Tools Inc is not covered under this warranty and all technical support must be managed through the software provider Normal user alignment adjustment tuning and machine settings are not covered by this warranty It is the responsibility of the user to understand basic woodworking machinery settings and procedures and to properly m...

Page 154: ...154 Laguna Tools Warranty ...

Page 155: ...th the standards provided by the manufacturer Parts under warranty are shipped at Laguna Tools Inc s cost either by common carrier FEDEX ground service or a similar method Technical support to install replacement parts is primarily provided by phone fax e mail or Laguna Tools Customer Support Website The labor required to install replacement parts is the responsibility of the user Laguna Tools is ...

Page 156: ...156 Laguna Tools Packaging Laguna Tools BILL of LADING Example ...

Page 157: ...pping In the event the item part is determined to be damaged due to lack of maintenance cleaning or misuse abuse the customer will be responsible for the cost to replace the item part plus all related shipping charges We require that the defective item part be returned to Laguna Tools with the complaint The end user must request an RMA Return Material Authorization Number from Customer Service and...

Page 158: ...158 Laguna Tools Packaging Laguna Tools RMA Example ...

Page 159: ...determined on a case by case basis Software purchased through Laguna Tools Inc is not covered under this warranty and all technical support must be managed through the software provider Normal user alignment adjustment tuning and machine settings are not covered by this warranty It is the responsibility of the user to understand basic woodworking machinery settings and procedures and to properly m...

Page 160: ...160 Manual Revision Record Date of Change Revision Engineering Design Description 7 16 2021 1 New Proposed Plasma 2 CNC Manual ...

Reviews: