background image

© copyright 2005  

(P/N)12-249 v2 • 9/08 

Kaba Mas LLC

page 3 of 8

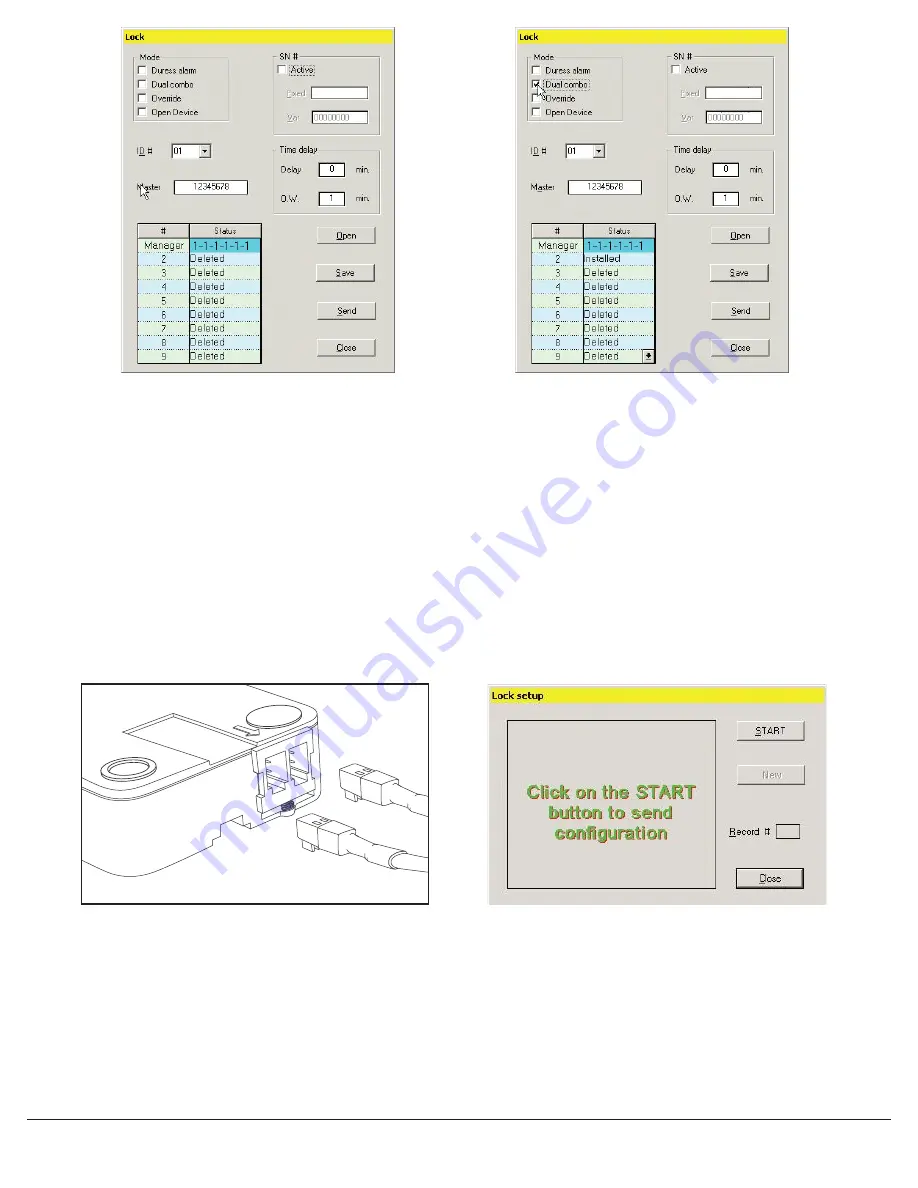
SENDING SET-UP TO THE LOCK
This function requires the use of the Lock Programming Cable (P/N 43098) and a Serial Interface Connector.

1. Connect power to the lock via the Logic Module or small/large battery box through the port on the lock marked BAT. The use of Duracell

TM

  or Eveready

TM

 batteries is recommended (see Figure 1).

2. Plug Interface and cable into PC and open SMARTLINC Set-up Software.
3. Plug the 43098 cable into the lock through the port on the lock marked ENT.
4. Select the lock ID for the lock to be programmed. It is a good idea to mark the lock itself with its ID number.  
5. Press the Send button on the software and then the Start button (see Screen 7).
6. On the screen the software will scroll through each Record Number (1 - 12) as it downloads to the lock, then it will show OK.
7. Repeat steps 3 - 6 for each lock to be programmed with this configuration.

NOTE: If the computer does not have a serial port, a serial to USB connector will be required.

ENT

BAT

DE

PR

ES

S

FO

R P

LU

G

IN

ST

AL

LA

TIO

N

Screen 5

Screen 6

Figure 1

Screen 7

Summary of Contents for SMARTLINC

Page 1: ...Box Required Programmable on each lock Unavailable on a single lock system using AC Power AUDIT Each lock will record the last 500 operations with time date user and the activity DUAL CODE Programmab...

Page 2: ...ed Each lock can be assigned a serial number in this window Checking this box allows the option of entering a Fixed Field which is alphabetical and a Variable Field which is alphanumeric If entered th...

Page 3: ...3 Plug the 43098 cable into the lock through the port on the lock marked ENT 4 Select the lock ID for the lock to be programmed It is a good idea to mark the lock itself with its ID number 5 Press the...

Page 4: ...ill program ALL locks on the system that have a Time Delay set up Multiple Time Lock periods are available by checking the box marked Multi TL Active see screen 11 If there is no check in the Multi TL...

Page 5: ...will show PC LINK Press the OK button to start communication with the PC 10 On the screen the software will scroll through each Record number as it downloads then it will show OK In order to exit fro...

Page 6: ...ult configuration will appear see Screen 17 This window allows the set up of Standard Week and Special Events Time Lock It is possible to set up two different Time Lock periods STANDARD WEEK 1 Select...

Page 7: ...le to the Logic Module through the port on the keypad 4 Open the correct file for the Time Lock period 1 or 2 that will be downloaded to this lock 5 Press the Send button on the software see Screen 23...

Page 8: ...en SMARTLINC Set up software 3 Connect the 43097 cable to the Logic Module through the port on the keypad 4 Press the Send button on the software see Screen 23 5 The software will instruct you to acti...

Reviews: