background image


M

A

N

O

I


209

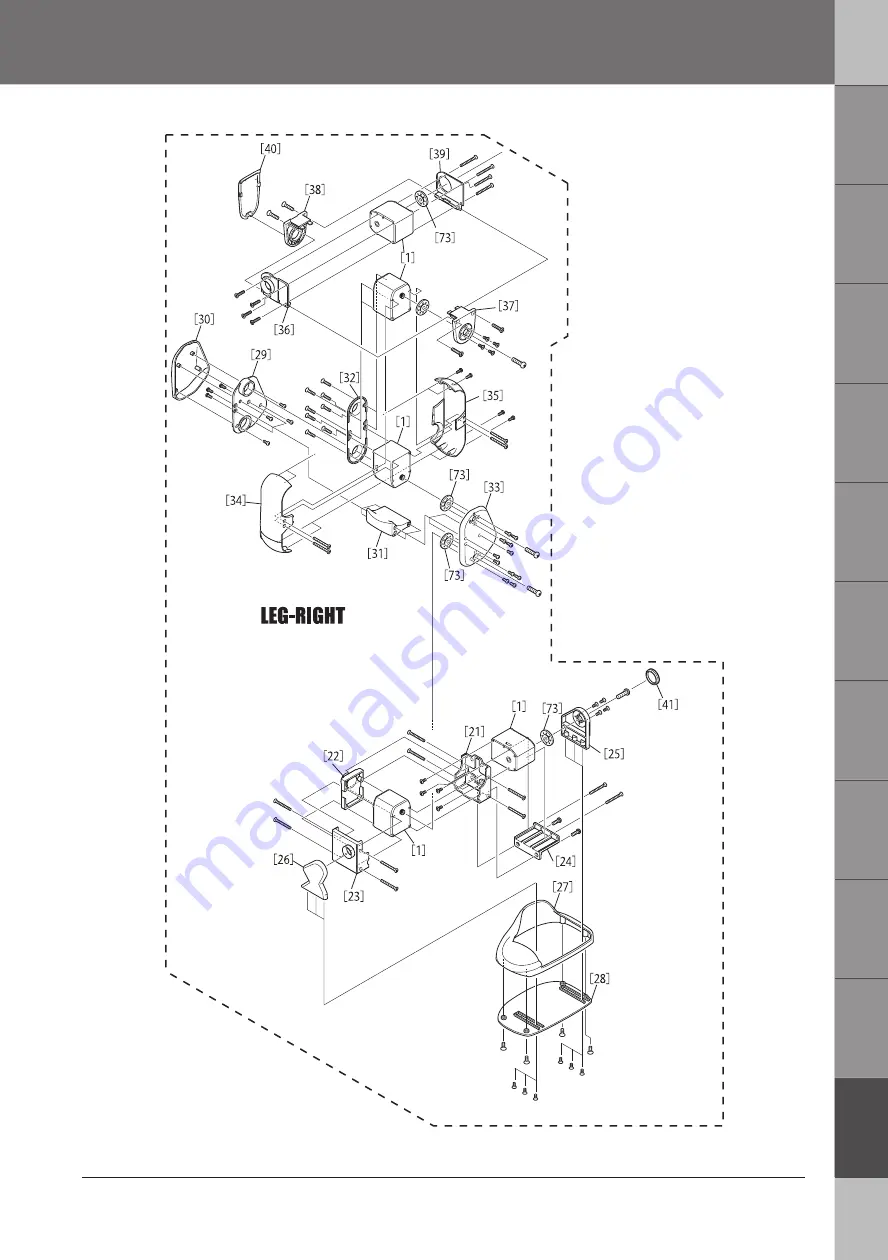
E x p a n d i n g   V i e w   3

Summary of Contents for Manoi Athlete Humanoid Series

Page 1: ...this first TM Specifications are subject to change without prior notice Thank you for purchasing of MANOI PF01 the bipedal walking Robot Assembling Kit This instruction is about assembling and operati...

Page 2: ...open Positon Window Choose Setting of Combination from LINK at right below of Position Window Choose TCH from pull down window of CH6 Right Shoulder CH7 Base of Right Arm and CH8 Right Elbow in Setti...

Page 3: ...Motions such as Left Arm or Both Legs to combin CHs which are connected with Servo motor In Pull Down Menu of LINK of POS1 there is Right Arm Teaching so choose this Click Camera Button When click Cam...

Page 4: ...Camera Button CH in Free condition will be fixed Close Position winfow of PO1 Choose POS Button again and Left Click on Data Sheet to creat POS2 Double Click POS2 to open Position Window In Pull Down...

Page 5: ...rm which is in Free condition at Hip pose of Hip hip hurray Support MANOI s body for this process Choose POS Button again and Lect Click on Data Sheet to creat POS5 Double Click POS5 to open Position...

Page 6: ...condition will be fixed Close Position winfow of PO1 Set Right Arm which is in Free condition at hurray pose of Hip hip hurray Support MANOI s body for this process Click Connecting Line Button Connec...

Page 7: ...otion of Scenario to set Start Flag Double Click Data Sheet to Open DataDlg and name created Motion The name given to Motion will be displayed in Data Table Any name is okay but it is recommended to c...

Page 8: ...il This is process of creating Motions by Teaching To save Motion see 3 Save Motion in Creat by setting numeric number on HTH3 for reference When playing MANOI is over turn Power Switch OFF and remove...

Page 9: ...n instruct the way to aseembling Radio Control Unit In this Operation KONDO KAGAKU s KRC 1 Radio Control Set not included in this product RC Pipe Anntena not included in this product Servo Lead 240mm...

Page 10: ...Remove all Servo Lead and Connector of Li Po Savor from Control Board Basically hold Connector to remove Servo Lead If it is difficult to hold connector part hold Servo Lead and pull slowly and direct...

Page 11: ...6 14 pan head Tapping Screw 4 5 Remove M2x8 pan head Tapping Screw Remove insulating tape Removed screws and Control Board will be used later Keep them Removed screws and Parts will be used later Kee...

Page 12: ...Tapping Screw 61 Back Head 6 7 55 Neck Base M 2 8 countersunk Tapping Screw Remove Neck Base Removed screws and Control Board will be used later Keep them Removed screws and Control Board will be use...

Page 13: ...ead No HRL111BK not included with this product to Receiver KRR 1 of KRC 1 Radio Control Set Fix KRR 1 by Double Faced Tape M2 x 20 countersnk machine Screw Connector from KRR 1 Anntena Wire from KRR 1...

Page 14: ...t 5 Tighten M2x20 countersunk Machine screw which is fixing Neck Suport again M2x20 countersunk Machine Screw Bring Connector and Anntena Wire form KRR 1 and let them in between Neck Support and CH1 S...

Page 15: ...6 1 0 pan head Tapping Screw 61 Back Head 61 Back Head 6 7 Folloe numbers for assembling order Pull Servo Lead of KRR 1 out from same place of CH1 Pull Annetena Wire of KRR 1 out from same place of S...

Page 16: ...2 6x14 pan head Tapping Screw Check below points grey color in above views to know if all units assembled corectly or not There is no big gap at backside of Neck There is no big gap at frontside of Ne...

Page 17: ...ad of Insulating Tape Insert connector until click and locked Cable from Li Po Savor Insert as convex parts of connector facing inside of Board Do not use tools for insert or remove of connector etc B...

Page 18: ...ing 1 Apply Double Faced Tape to Anntena Holder 2 Attach Anntena Holder at positon as view 3 Round Shape Hole should be upside Reference Reference Fix Backcowl temporarily to check where poition of fo...

Page 19: ...f about 6mm size by Knife Edge Reamer Be careful with handling of Knife Edge Reamer because it is very sharp tool Let Anntena Wire of KRR 1 in Anntena Holder then let it in R C Pipe Anntena not includ...

Page 20: ...Follow numbers for assembling Order M2 6 8 pan head Machine Screw M2 6 8 pan head Machine Screw Insert RC Pipe Anntena into Anttena Holder Let RC Pipe Anntena in the hole of Backcowl which is made in...

Page 21: ...4 CH06 CH07 CH08 CH21 CH20 CH19 CH18 CH17 High Speed Serial Terminal 4 190 Insert Serial USB Adaptor with cable into USB Port which was used in Operation 1 and 2 Start HertaToHerat3 HTH3 Serial Extens...

Page 22: ...into bottom place of Battery Slot If it is hard to insert all of battery packs into Battery Slot check direction of battery pack and make sure it is correct Do not push battry into forcibly 3 of batt...

Page 23: ...Turn Power Switch of MANOI ON If Start Up Motion registered when turn switch ON MANOI moves to Home Position see Operation S3 2 So let MANOI stand at Home Position to decrease load to MANOI Check on...

Page 24: ...urn KRC 1 ON then keep pressing upper part of Cross shape button at left side and click Receive button Keep pressing KRC 1 and same time click Receive button Once click Read butto signal will stop to...

Page 25: ...d recognizes number which is sent from KRC 1 by wireless and play motion which has same reghistered number in Control Board Therefore even if motion is registered in Control Board without matching num...

Page 26: ...cess Battery Hatch Li Po Battery Battery Hatch Put finger at reentrant part and pull out Remove all of 3 battery packs First pull tab of battery at the lowest part Put finger into space of the lowest...

Page 27: ...ove Serial Extension Cable form Control Board Hold Cable part and pull out straight above slowly Hook at convex parts of both shoulder and cover whole Body Flame Covex part at edge will be attched wit...

Page 28: ...re not sent to every Joints and MANOI is like loosing strength If Start Up Motion is not registered register it See Operation S3 2 Case 2 Power is ON Home Position is ON but No control Serial USB Adap...

Page 29: ...done situation does not change there may be some problem on method of Assembling Disassemble parts of pertinent part and set nutral point of Servo Motor See Operation 2 4 then re assemble pertinent pa...

Page 30: ...Servo Motor See Operation 2 4 then re assemble pertinent part Abnormal noise is from Servo Motor of joint There is possiblity of that gear in Servo motor is broken Stop operationg and conatct the sto...

Page 31: ...rge batteries See Operation 1 1 Even using full charged battries situation does not change it could be protecting circuit working by some reasons Turn Power Switch OFF and remove all batteries then di...

Page 32: ...SHO Corporation or the store where you purchased MANOI When contact if you have MANOI Instruction Manual in your hand and have detail information of your situation it will be helpful to solve problem...

Page 33: ...d combination of CPU and Memory Motions are stored on this unit Read Motion Data to send signal to Servo Motors and follow signal from sensor to adjust each joints This unit acts as brain of MANOI Sen...

Page 34: ...1 Switch 90 1 KYOSHO HRA114BK Arm Base MANOI PF01 BK Arm Base 10 2 KYOSHO HRA115BK Arm Giide Set MANOI PF01 BK Front Arm Guide 11 1 Rear Arm Guide 12 1 KYOSHO HRA116BK Arm Flame Set MANOI PF01 BK Fron...

Page 35: ...Hatch 65 1 KYOSHO HRB101BK Cap Set for 1 model MANOI PF01 BK Hand Cap 16 4 Ankle Cap 41 2 Back Head Cap 63 1 KYOSHO HRB102Y Knuckle Set L R MANOI PF01 Y Knuckle Left 20 1 Knuckle Right 17 1 KYOSHO HRH...

Page 36: ...ker PF Logo Sticker 96 1 KYOSHO HRE101 Li Po Savor MANOI 01 Li Po Savor 88 1 KYOSHO HRA012 Extention Cable for Serial USB Extention Cable for Serial USB 112 1 KYOSHO HRD001 Servo CH Label Servo CH Lab...

Page 37: ...206 M A N O IT M P F 01 Exploded View...

Page 38: ...MANOI 207 Expanding View 1...

Page 39: ...208 Expanding View 2...

Page 40: ...MANOI 209 Expanding View 3...

Page 41: ...210 Expanding View 4...

Page 42: ...0mm 0 10 20 Check Sheet for Servo Lead This kit has different length of Servo Leads Before assembling check the Servo Leads with Full Size Drawing in this sheet Length means length of Servo Leard only...

Reviews: