background image


40


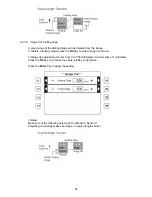
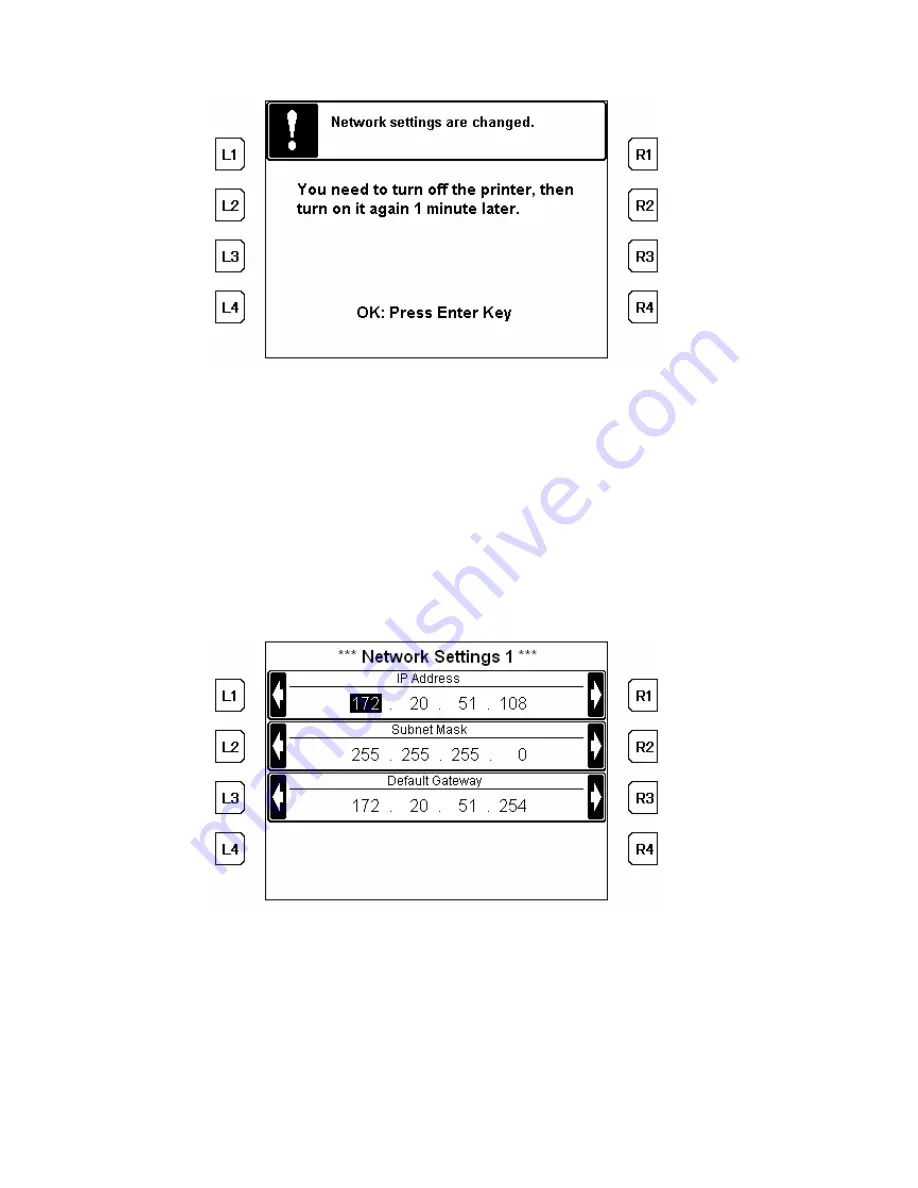
The message shown below is displayed when any setting is changed. 


Applying the change requires KM-3650w’s reboot. 
Press the 

Enter

 Key and turn off KM-3650w. 

Turn it on after an interval of 1 minute. 


5.2.3.8.1 DHCP 

Server 

 
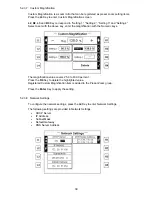
Press the 

L1

 Key repeatedly and specify whether a DHCP server exists on the network. 


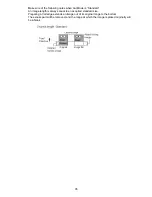
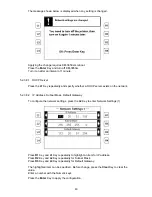
5.2.3.8.2  IP Address, Subnet Mask, Default Gateway 

 
To configure the network settings, press the 

L2

 Key to enter Network Settings (1).  


Press 

R1

 Key and 

L1

 Key repeatedly to highlight an item for IP address. 

Press 

R2

 Key and 

L2

 Key repeatedly for Subnet Mask. 

Press 

R3

 Key and 

L3

 Key repeatedly for Default Gateway. 

 
The highlighted item can be specified.  Before change, press the 

Clear

 Key to clear the 

value. 
Enter a number with the Numeric keys. 
 
Press the 

Enter

 Key to apply the configuration. 


Summary of Contents for KM-3650W

Page 1: ...KM 3650w Copy Scan Operation Manual ...

Page 2: ...this Manual If you are using the inch version use the messages provided for the metric version as reference only In the body text only the metric messages are given if these versions differ only in capitalization When there is even a slight difference in the message we have listed the information for the metric version followed in brackets by the corresponding information for the inch version ...

Page 3: ... 13 3 3 3 Density 13 3 3 4 Media Source 13 3 3 5 Zoom 15 3 3 6 Set Copy Count or Set Copy Count 17 3 3 7 Advanced settings 17 4 SCAN 25 4 1 SCAN MODE SCREEN 25 4 2 SCAN OPERATION 26 4 2 1 Basic Scan 26 4 2 2 Multi Scan 26 4 2 3 Rescan 26 4 2 4 Password 27 4 2 5 Downloading image files 28 4 3 SCAN SETTINGS 29 4 3 1 Original Width 29 4 3 2 Original Length 30 4 3 3 Original Orientation 30 4 3 4 Image...

Page 4: ...k Key 6 Power Save Key 7 Interrupt Key 8 ReCopy Key 9 ReScan Key 10 Reset Key 11 Stop Key 12 Start Key 13 Numeric Keys 14 Clear Key 15 L1 Key 16 L2 Key 17 L3 Key 18 L4 Key 19 R1 key 20 R2 Key 21 R3 Key 22 R4 Key Bolded words mean the key names throughout this manual ...

Page 5: ...opy Copy Mode Screen is launched directly with Copy Key Copy Key cannot be effective during scanning 2 2Scan Key Press the Scan Key to scan originals for a data file Scan Mode Screen is launched directly with Scan Key Scan Key cannot be effective during copying ...

Page 6: ...y Enter Key is also used to accept the instruction such as error information 2 5Back Key Press the Back Key to display the proceeding step of each configuration screen The changes are cancelled by pressing Back Key before these are applied with Enter Key Back Key is not available in Copy Mode Scan Mode and Menu Mode 2 6Power Save Key Press the Power Save Key to start Power Save Mode Press any key ...

Page 7: ...eling Interrupt Mode the changes in Interrupt Mode are cancelled and the paused jobs are carried out 2 8ReCopy Key Press the ReCopy Key to make a copy of the previous copy set copy job ReCopy Key cannot be effective during printing Recopy is disabled in case no image exists for recopy Recopy is disabled or requires a password entry with Recopy setting in Basic Configuration is indicated on the bot...

Page 8: ... exists for Rescan Rescan is disabled in case of changing the destination to be saved Rescan Mode is cancelled when finished scanning the original Pressing the ReScan Key again is another measure to cancel Rescan Mode 2 10 Reset Key Press the Reset Key to initialize the settings in the current screen and delete images for Recopy Acquired image files in the scan folders are not deleted with Reset R...

Page 9: ... Key to start a set copy 2 13 Numeric Keys The Numeric Keys are used to enter numeric data such as set copy count or magnification value 2 14 Clear Key Press the Clear Key to ignore the changes and recover the default setting 2 15 L1 L2 L3 L4 R1 R2 R3 and R4 L1 L2 L3 L4 R1 R2 R3 and R4 keys are used to operate the assigned functions with the signs beside the respective keys and indicated in the sc...

Page 10: ...9 used in Custom Magnification Configuration used to enter a password used in Custom Magnification Configuration ...

Page 11: ...t Ready to Set Copy is indicated in the upper left of the screen before set copy How to launch or cancel Ready to Set Copy is described later After reading the first page of the original Ready to Set Copy and Press Start to start printing are indicated by turns The number of the scan originals is indicated in upper right of the screen The other settings you should check before copy are as followin...

Page 12: ... all the originals Any original inserted to the scanner can prevent KM 3650w from starting printing You should wait for the completion of the current printing to make another set copy You can choose between two sort orders for set copy in Advanced Settings a Sort Mode 1 2 3 Æ 123 123 123 b Sort Mode 1 2 3 Æ 111 222 333 How to make a set copy and choose Sort Mode is described later The number of or...

Page 13: ...ettings 3 3 1 Size The following settings in image printing size are provided Auto Size Auto Zoom Manual 3 3 1 1 Auto Size Considering both the original size and the magnification a suitable paper which fits the image is automatically specified In such the image may be rotated on a print so as to fit the paper To apply Auto Size press the L1 Key repeatedly for Auto Size The message shown below app...

Page 14: ...e image is larger than the media in such part of the image may be lost To apply Manual press the L1 Key repeatedly for Manual 3 3 2 Image Type The following settings are provided for the original image type Line is suitable for simple line originals Line Grayscale is suitable for originals which include lines and areas of shade together Grayscale is suitable for photographic originals and areas of...

Page 15: ... width can be specified in Advanced Settings 1 How to launch Advanced Settings 1 is described later Note The other setting screen shown below is displayed when Media Source is Manual Advanced Settings 1 appears automatically if the Roll Deck or the Bypass Feeder is opened KM 3650w does not start printing when the Roll Deck is open Press the Enter Key to apply the setting Press the Copy Key to go b...

Page 16: ...the value directly Press the L1 Key to decrease the value press the R1 Key to increase Press the Enter Key to apply the setting 3 3 5 2 Preset Zoom To specify the magnification with the preset zoom press the R2 Key or L2 Key repeatedly and select a proper magnification The following preset zoom settings are provided DIN 25 0 35 3 50 0 70 6 100 0 141 4 200 0 282 8 400 0 ENG 25 0 50 0 64 7 100 0 129...

Page 17: ...e following combinations Original size Paper size Actual magnification 36x48 Æ 8 5x11 23 percent 36x48 Æ A4 23 percent Magnification is automatically corrected to 400 0 for the following combinations Original size Paper size Actual magnification 8 5x11 Æ 36x48 436 percent A4 Æ 36x48 435 percent 3 3 5 4 Calibrate Mag The vertical length zoom and horizontal width zoom can be specified separately Pre...

Page 18: ...he R3 Key to enter Advanced Settings The following settings are provided in Advanced Settings Cut Mode Width Media Setting Contrast Sharpness Margin Leading edge Margin Trailing edge Image Shift Mirror Background Date Stamp Set Copy Sort Mode Note The other setting screen shown below is displayed when Media Source is Manual Cut Mode and Width Media Setting will be replaced with Bypass Tray Width a...

Page 19: ...he L1 Key repeatedly for the media width press R1 Key for media type For Roll Deck 2 press the L2 Key repeatedly for the media width press R2 Key for media type For Bypass Tray press the L3 Key repeatedly for the media width press R3 Key the media type The following Media Width settings can be specified for roll papers DIN 36 A0 A1 A2 A3 ENG 36 34 22 17 11 ARCH 36 30 24 18 12 The following Media W...

Page 20: ...py or part of the image can be deleted from a copy To specify the leading edge press the R2 Key or L2 Key to enter Advanced Settings 2 Leading edge adjustment covers from 100 to 100 millimeters in increments of 1 millimeter To provide a margin input a positive value To delete the leading image input a negative value Press the R3 Key to increase the value L3 Key to decrease Press the Enter Key to a...

Page 21: ...ge can be deleted from a copy To specify the training edge press the R2 Key or L2 Key to enter Advanced Settings 2 Training edge adjustment covers from 100 to 100 millimeters in increments of 1 millimeter To provide a margin input a positive value To delete the trailing image input a negative value Press the R3 Key to increase the value L3 Key to decrease Press the Enter Key to apply the setting N...

Page 22: ...e image out of the paper The excess part will be removed and the range at which the image is placed originally will be a blank If you specify both leading edge and trailing edge with selecting Standard Cut only the leading edge will be applied trailing edge is ignored Relationship between magnification and leading trailing edge Margin A margin you specified is simply provided ...

Page 23: ...and horizontally To shift an image on a print press the R2 Key or L2 Key to enter Advanced Settings 2 Shift adjustment covers 0 to 200 millimeters in increments of 1 millimeter Press the L3 Key repeatedly to choose Left or Right press R3 Key repeatedly to choose Upper or Bottom Enter a margin amount with the numeric keys Press the Enter Key to apply the setting ...

Page 24: ...y to enter Advanced Settings 3 Press the R1 Key repeatedly to choose ON or OFF Press the R2 Key repeatedly for the stamp position Stamp image is printed at the left upper on the image when Left is selected Stamp image is printed at the right upper on the image when Right is selected Press the R3 Key repeatedly for the shifting value of Stamp image Stamp image is shifted to the center when X is inc...

Page 25: ... Settings 3 Press the L3 Key repeatedly to choose ON or OFF Press the Enter Key to apply the setting 3 3 7 12 Sort Mode To choose a sort Mode press the R4 Key or L4 Key to enter Advanced Settings 3 Press the L4 Key repeatedly for either of them Press the Enter Key to apply the setting ...

Page 26: ...ulti Scan is indicated in the upper left of the screen before multi scan How to launch or cancel Ready to Multi Scan is described later After scanning the first page of the original Ready to Multi Scan and Press Enter to finish scanning are indicated by turns The number of the scan originals is indicated in upper right of the screen The other settings you should check before scan are as following ...

Page 27: ...files can contain up to 199 of originals The number of the originals you have scanned for Multi Scan is indicated in the upper right of the screen After scanning the first page of the original Ready to Multi Scan and Press Enter to finish scanning are indicated by turns Any original inserted to the scanner can prevent KM 3650w from starting printing Press the Enter Key after scanning all the origi...

Page 28: ... cancelled after scanning the ReScan Pressing the ReScan Key again is another measure to cancel Rescan Mode Rescan is disabled in case no image exists for Rescan Rescan is disabled in case of changing the destination or FTP to save 4 2 4 Password Making a scan image requires a password when a destination or FTP folder involves the password authentication Type a password with the numeric keys and p...

Page 29: ...ed with the client s Remote Web Manager Refer to the manual concerned for more information To download image files follow the process below 1 Launch Remote Web Manager on the client s PC 2 Log in to KM 3650w 3 Click Scan tab 4 Click a destination where the image files are saved 5 Opening a destination requires a password entry 6 Image files are listed 7 Select desired files click Download 8 Locate...

Page 30: ...with pressing the L1 Key repeatedly The scanner reads an original in a given original width Auto enables the scanner to detect the original width properly Auto disables Original Orientation The following original width settings are provided DIN Auto A3 A2 A1 A0 ENG Auto 11 17 22 34 36 ARCH Auto 12 18 24 30 36 Press the Enter Key to apply the setting ...

Page 31: ...Landscape 9 12 18 Not available 24 Original Orientation Portrait 18 24 36 42 48 Synchro disables Original Orientation 4 3 3 Original Orientation To specify the original orientation press the L1 Key to enter Original Size screen Landscape makes the scanner carry an original in landscape orientation Portrait makes the scanner carry an original in portrait orientation Press the L3 Key to choose Lands...

Page 32: ...o increase 4 3 7 Advanced Settings Press the R4 Key or L4 Key to enter Advanced Settings The following settings are provided in Advanced Settings STF DPI STF Format Multi Page Mirror Print Out Background Destination Image Cut Leading edge Image Cut Trailing edge 4 3 7 1 STF DPI Press the L1 Key repeatedly for a desired resolution Press the Enter Key to apply the setting 4 3 7 2 STF Format The foll...

Page 33: ...r OFF Press the Enter Key to apply the setting 4 3 7 5 Print Out Print Out enables to scan an original and make its copy at a time Press the L3 Key repeatedly to choose ON or OFF Press the Enter Key to apply the setting 4 3 7 6 Background Background ON removes a background of the originals Press the R3 Key repeatedly to choose ON or OFF Background is disabled when Image Type is Grayscale Press the...

Page 34: ...ding edge adjustment covers from 0 to 300 millimeters in increments of 1 millimeter Press the R1 Key to increase the value L1 Key to decrease Press the Enter Key to apply the setting Notes Make sure of the following note when Original Length is Synchro Preparing a leading edge makes an image shorter in a given length Make sure of the following notes when Original Length is Standard An image length...

Page 35: ...Key to enter Image Cut screen Trailing edge adjustment covers from 0 to 300 millimeters in increments of 1 millimeter Press the R2 Key to increase the value L2 Key to decrease Press the Enter Key to apply the setting Notes Make sure of the following note when Cut Mode is Synchro Preparing a trail edge makes an image in a given length shorter ...

Page 36: ...s Standard An image length is always equal to an acquired standard size Preparing a trail edge extends an image out of its original range to the bottom The excess part will be removed and the range at which the image is placed originally will be a blank ...

Page 37: ...the Menu Key to enter Menu Mode 5 2General Settings 5 2 1 Trim Cut Trim Cut makes the leading edge of roll paper straight by a cutoff Press the L1 Key repeatedly for Roll 1 or Roll 2 Press the Start Key to make a cutoff on the roll paper 5 2 2 Image data Delete Memory Press the R1 Key to delete the image for Recopy When the message shown below is displayed press the Enter Key to execute the operat...

Page 38: ...sic Configuration requires a password entry Type a password with the Numeric Keys and press the Enter Key Default password 3650 The following settings are provided in Basic Configuration Size Format Recopy Auto Start Reset Timer Warm Sleep Power Save Custom magnification Network Settings ...

Page 39: ...rrying originals Press the Enter Key to apply the setting 5 2 3 4 Reset Timer KM 3650w clears all the settings in the screen when a specified period has been passed without any operation To adjust the period press the R2 Key repeatedly for a desired setting OFF disables KM 3650w from clearing the settings Press the Enter Key to apply the setting 5 2 3 5 Warm Sleep KM 3650w goes into warm sleep whe...

Page 40: ...enter the magnification with the Numeric keys The magnification value covers 25 0 to 400 0 percent Press the R4 Key to delete the highlighted value Registered Custom Magnification item is added to the Preset Zoom group Press the Enter Key to apply the setting 5 2 3 8 Network Settings To configure the network settings press the L4 Key to enter Network Settings The following settings are provided in...

Page 41: ... the network 5 2 3 8 2 IP Address Subnet Mask Default Gateway To configure the network settings press the L2 Key to enter Network Settings 1 Press R1 Key and L1 Key repeatedly to highlight an item for IP address Press R2 Key and L2 Key repeatedly for Subnet Mask Press R3 Key and L3 Key repeatedly for Default Gateway The highlighted item can be specified Before change press the Clear Key to clear t...

Page 42: ... L2 Key repeatedly for DNS Server IP address 2 The highlighted item can be specified Before change press the Clear Key to clear the value Enter a number with the Numeric Keys Press the Enter Key to apply the configuration 5 2 4 Information Press the L3 Key to view information about KM 3650w The following information is displayed Date Print Counter Scanner Version Printer Version Controller Version...

Page 43: ... for Hour or Minute Enter a number with the Numeric Keys Press the Enter Key to apply the setting 5 2 4 2 Test Mode To inspect the printing scanning unit press the R2 Key to enter Test Mode Test Mode Screen requires a password entry 5 2 4 2 1 Test Print Four patterns for the test print are provided The test patterns show whether the printing unit works correctly Press the L1 Key repeatedly for a p...

Page 44: ...press the Start Key to start The following message is displayed Set the Calibration Sheet to the scanner and then press the Enter Key to start Be careful of the direction of Calibration Sheet A corner not right angled must be on left rear against the direction to insert This corner mist be on left rear Direction to insert Calibration Sheet ...

Page 45: ...following message is displayed when finished Press the Enter Key 5 2 5 User Mode To configure the following setting press the R3 Key to enter User Mode User Default Settings Change User Password Initialize Scan to File Password Printer Settings Language ...

Page 46: ...de in Copy Mode Press the L2 Key repeatedly to select a proper setting for Image Type in Copy Scan Mode Press the L3 Key repeatedly to choose either of the items for Density Contrast Sharpness in Copy Scan Mode Press the L4 Key repeatedly to choose either of the items for Background in Copy Scan Mode Press the R1 Key repeatedly to select a desired format for STF Format in Scan Mode Press the R2 Ke...

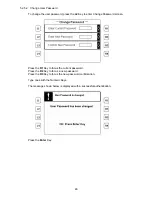
Page 47: ...Change Password screen Press the R1 Key to focus the current password Press the R2 Key to focus a new password Press the R3 Key to focus the new password confirmation Type ones with the Numeric Keys The message shown below is displayed with a successful authentication Press the Enter Key ...

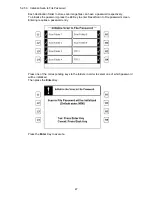
Page 48: ...sword respectively To initialize the password press the L3 Key to enter Reset Scan to File password screen Entering requires a password entry Press one of the corresponding keys to the folders in order to select one of which password will be initialized Then press the Enter Key Press the Enter Key to execute ...

Page 49: ...N makes printed images clearer Dot Enhancement ON emphasizes isolated dots Press the L4 Key to enter Printer Settings screen 5 2 5 5 Language Language settings for the screen displays are provided Press the R1 Key repeatedly and select a proper language Press the Enter Key to apply the setting 5 2 6 Service Mode No operation with the R4 Key in Menu Mode should be attempted by the customer This is ...

Page 50: ...49 Copy Scan Operation Manual 2006 3 Rev 1 0 The Copyright Act protects this manual It is prohibited to copy or duplicate all or a part of this manual without permission ...

Reviews: