background image

R

DK1100 TP/FP

18

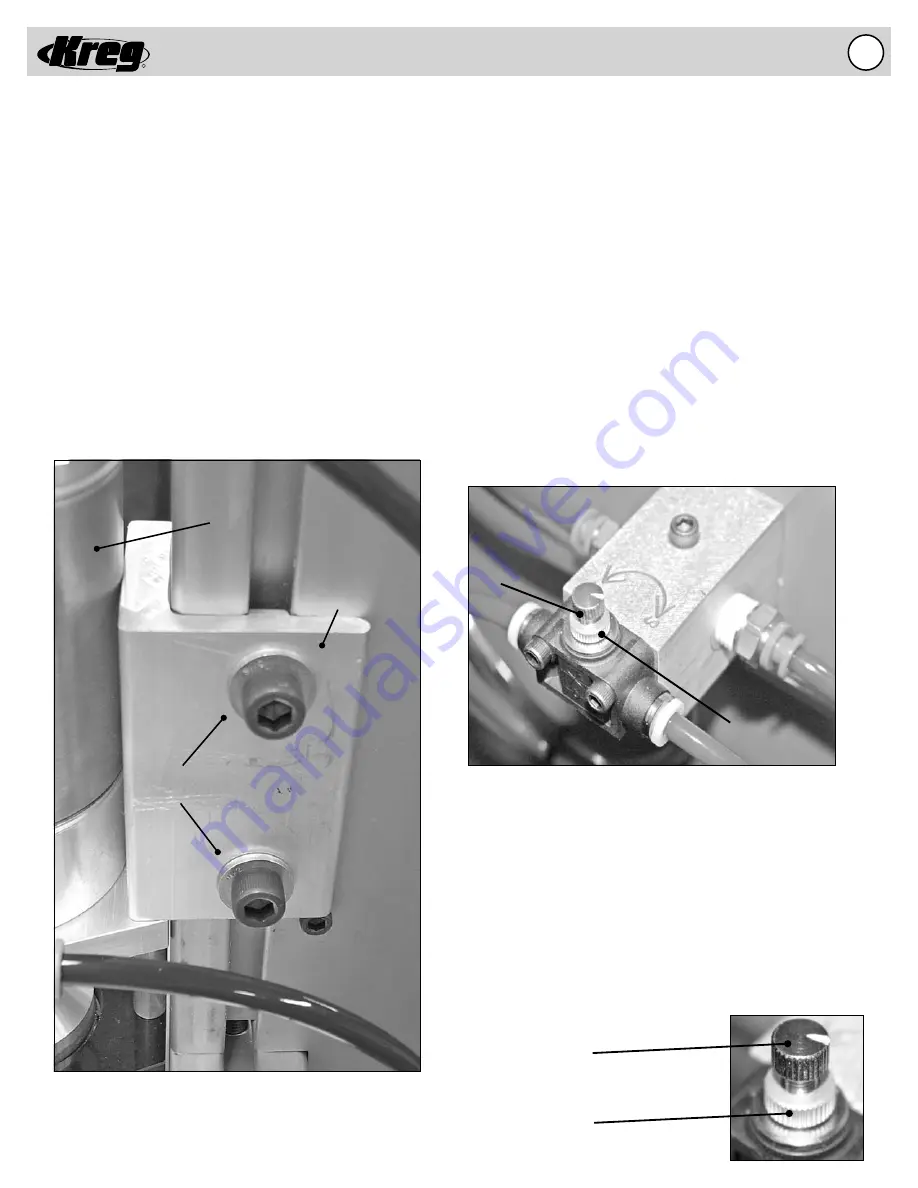
Feed Rate Flow Control

The Feed Rate Control Valve allows the user to adjust the speed at 
which the drill bit advances into the material. The factory setting of 
this valve will maintain a consistent feed rate for various thicknesses 
of different materials to optimize Drill Bit life. The Feed Rate Control 
Valve should only be adjusted when a faster or slower rate of 
Drill Bit feed is desired. This adjustment is only recommended for 
experienced users that consistently drill the same thickness of the 
same type of material on a daily basis. The Feed Rate Control Valve 
is adjusted by loosening the Locking Collar and rotating the Screw 
in the direction of the desired change in feed rate. “F” corresponds 
to a Faster feed rate, “S” corresponds to a Slower feed rate. Make 
these adjustments carefully as only a slight change in position will 
result in a large change of feed rate. Make certain to tighten the 
Locking Collar to prevent the Screw from accidentally drifting or 
vibrating out of adjustment. If you have changed the setting on the 
Feed Rate Control Valve and want to put it back to factory settings, 
please follow these simple directions to do so. Turn the locking collar 
(counter-clockwise) to loosen it up, then tighten the screw all the way 
down (clockwise) to start over. To reset it to the factory setting, turn 
the screw (counter-clockwise) 4 complete turns for our DK1100 TP 
and DK1100 FP machines. Then tighten the locking collar back down 
(clockwise) to prevent the Screw from accidentally drifting or vibrating 
out of adjustment.

Clamping Duration Control

Clamping Duration Control allows the user to adjust the duration 
that the pneumatic clamp engages the material before, during, 
and after the drilling operation is performed. The factory setting of 
this valve will maintain the correct amount of time that the material 
is clamped while drilling. If the work piece lifts off of the Drill Guide 
Plate during drilling then the Clamping Duration Control will need 
to be adjusted. Loosen the Locking Collar and turn the Screw in 
the clockwise direction to increase the duration (more clamping 
time). Turning the Screw in the counter-clockwise direction 
decreases the duration (less clamping time). Make certain to 
tighten the Locking Collar to prevent the Screw from accidentally 
drifting or vibrating out of adjustment.

Locking
Collar

Screw

Screw

Locking
Collar

Adjusting the Clamping Cylinder Height

The Clamping Cylinder can be adjusted for material of different 
thicknesses. The factory setting will clamp materials of 
approximate thicknesses between 1/2” and 3/4”. For materials 
thicker than 7/8”, the Clamping Cylinder will need to be moved 
upward to allow the material to locate below the Clamp Pad. 
Before adjusting the Clamping Cylinder make certain your 
machine is DISCONNECTED from the AIR SUPPLY and/or 
ELECTRICAL SUPPLY. Cycle the machine via the foot switch 
several times to remove air from the system. Without an air 
supply or electrical supply you can be certain the Clamping 
Cylinder will not accidentally engage or the drill bit will not rotate 
while you are performing maintenance.

Step 1:  Loosen the (4) Socket-head Cap Screws (two on each  
 

side) located on the Clamping Cylinder Bracket.

Step 2:  Adjust the Clamping Cylinder to allow the material to  
 

pass under the Clamp Pad.

Step 3:  Tighten the (4) Socket-head Cap Screws to lock the 
 

Clamping Cylinder in position.

Socket-head
Cap Screws

Clamping Cylinder 
Bracket

Clamping Cylinder

Summary of Contents for DK1100 FE

Page 1: ...MMENDED AIR PRESSURES Electric Models 90 psi Pneumatic Models 120 psi 5 2010 DK1149 Rev C R Pro Series INSTRUCTIONAL MANUAL DK1100 Electric and Pneumatic Models DK3100 DK3100 DK1100 TP DK1100 FE DK110...

Page 2: ...r Stock Thickness 11 Clamping Cyclinder Height Feed Rate Clamping Duration 12 Belt Tension 13 DK1100 TP FP Pnuematic Models 14 19 DK1100 TP FP QUICK START GUIDE 14 DK1100 TP FP PARTS DIAGRAM 15 Acryli...

Page 3: ...ion or repairs required due to natural causes or acts of God To obtain warranty service contact the distributor from which this Pocket Hole Boring Machine was purchased or you may contact Kreg Tool Co...

Page 4: ...aware of kickbacks Kickbacks occur when the workpiece binds up while being drilled causing it to twist jump and possibly become airborne To avoid kickbacks and potential injury always use sharp drill...

Page 5: ...s that may affect its operation A guard or other part that is damaged should be properly repaired or replaced as soon as possible preceding any additional use Do not use the machine if you are not qua...

Page 6: ...nez la machine avant d effectuer des ajustements N ajustez jamais le guide le dispositif anti oscillation le cylin dre de serrage la but e de profondeur de mortaise le foret ou tout autre l ment de la...

Page 7: ...convenablement d s que possible avant tout autre usage N utilisez pas la machine si vous n tes pas qualifi pour effectuer ce genre d valuation Ne laissez jamais une machine en marche sans surveillance...

Page 8: ...the risk of electric shock This tool is equipped with an electric cord having an equipment grounding conductor and a grounding plug The plug must be plugged into a matching outlet that is properly ins...

Page 9: ...T RIVE 0ULLY YCLE OUNTER RILL IT RIVE SSEMBLY RILL HUCK RILL IT EPTH ONTROL DJUSTER EED 2ATE LOW ONTROL EPTH ONTROL 3WITCH RILL UIDE LOCK LAMP 0AD 3WING 3TOP LAMPING YLINDER LAMPING 4OWER DK1100 FE El...

Page 10: ...0ULLY YCLE OUNTER RILL IT RIVE SSEMBLY RILL HUCK RILL ITS EPTH ONTROL DJUSTER EED 2ATE LOW ONTROL EPTH ONTROL 3WITCH RILL UIDE LOCK LAMP 0AD 3WING 3TOP LAMPING YLINDER LAMPING 4OWER IR ILTER IR AUGE D...

Page 11: ...supply or electrical supply you can be certain the bit will not acciden tally engage while you are performing maintenance Step 1 Disconnect the machine from the air supply and or electrical supply St...

Page 12: ...back into the resting position Lock Nut Depth Control Switch Head Depth Control Adjuster A Adjusting the Fence Setting The Fence can be adjusted to align the pocket hole to the center of material of d...

Page 13: ...more clamping time Turning the Screw in the counter clockwise direction decreases the duration less clamping time Make certain to tighten the Locking Collar to prevent the Screw from accidentally drif...

Page 14: ...machine is DISCONNECTED from the AIR SUPPLY and ELECTRICAL SUPPLY Cycle the machine via the foot switch several times to remove air from the system Without an air supply or electrical supply you can...

Page 15: ...reg does not recommend the use of a long extension hose for use with this product Depending on the frequency of use Kreg recommends that you grease the planetary gear on the pneumatic drill at least o...

Page 16: ...Y RILL HUCK RILL IT EPTH ONTROL DJUSTER EED 2ATE LOW ONTROL EPTH ONTROL 3WITCH RILL UIDE LOCK LAMP 0AD 3WING 3TOP LAMPING YLINDER LAMPING 4OWER IR ILTER IL UBRICATOR IR AUGE 0NEUMATIC OTOR EED 2ATE YL...

Page 17: ...the Drill Chuck and into the Drill Guide Plate until the Drill Bit clears the Drill Chuck Angle the Drill Bit slightly and pull clear of the Drill Guide Plate Step 5 Insert a new or re sharpened Dril...

Page 18: ...he Drill Depth Control Adjuster until the Head fully depresses the plunger on the Depth Control Switch Step 4 Tighten the Lock Nut to lock the Depth Control Adjuster in position Step 5 Pull the Drill...

Page 19: ...djust the duration that the pneumatic clamp engages the material before during and after the drilling operation is performed The factory setting of this valve will maintain the correct amount of time...

Page 20: ...t switch several times to remove air from the system Air System Lubricator An Air System Lubricator is provided to maintain proper lubrication to the pneumatic motor The Air System Lubricator is fille...

Page 21: ...R NOTES 20...

Page 22: ...R NOTES 21...

Page 23: ...R NOTES 22...

Page 24: ...Kreg Tool Company 201 Campus Drive Huxley IA 50124 800 447 8638 www kregtool com R...

Reviews: