26
ГАЗОВАЯ ПЛИТА
GAS STOVE
ИНСТРУКЦИЯ ПО ЭКСПЛУАТАЦИИ • USER GUIDE
liquefied balloon gas, make sure that the cylinder pressure regulator meets current local
standards.
• Connection to the gas system is made by means of a flexible metal pipe (copper or steel)
or a flexible stainless-steel pipe (UNI-EN14800) without exposing the appliance to load.
• The gas supply pipe to the appliance is equipped with a nut, which is connected to the
crankshaft fitting (included, 1/2 thread), which is rotated based on the installation needs.
• A rigid or flexible metal supply pipe (max. length 2 m) is connected to the opposite side of
the crankshaft fitting.
• Install sealing gaskets (included) at both ends of the crankshaft fitting, in accordance with
current regulations. If these parts are removed and re-installed, be sure to replace the
gaskets with new ones.
attention! The gas hose must not pass through the heated areas and come into
contact with them on the back side of the stove.
Important! after installation is complete, make sure that the gas hose is not crushed or
damaged by moving parts, and that the gaskets are tight. use soap solution instead of flame!
ADAPTING THE BURNERS TO DIFFERENT TYPES OF GAS
To adapt the appliance to a gas source other than the one it was
configured for, follow these steps:
1. Remove the bars.
2. Remove the caps and flame-spreader crowns. Use a 7 mm spanner to
unscrew and remove the jets.
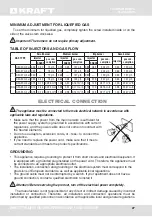
3. Replace the jets with suitable ones that are supplied with the equipment
(see the table of characteristics of burners and jets).
4. Assemble all components in reverse order.
If the pressure of the gas used differs from that provided by the
equipment (or is variable), a pressure regulator must be installed on the
inlet pipeline (passable gas) relevant to the standards.
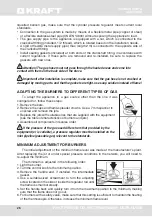
MINIMUM ADJUSTMENT FOR BURNERS
The initial adjustment of the minimum flame level was made at the manufacturer's plant.
After replacing the jet or under special pressure conditions in the network, you will need to
re-adjust the minimum.
The minimum is adjusted in the following order:
1. Light the burner.
2. Turn the control knob to the minimum position.
3. Remove the handle and, if installed, the intermediate
gasket.
4. Use a suitable-sized screwdriver to turn the adjusting
screw located on the side or inside the regulator rod until
the flame is small but steady.
5. Set the handle back and quickly turn it from the maximum position to the minimum, making
sure that the flame does not go out.
6. For burners with a safety valve, make sure that this setting is sufficient to maintain the heating
of the thermocouple. Otherwise, increase the minimum flame level.


