background image

9

IT

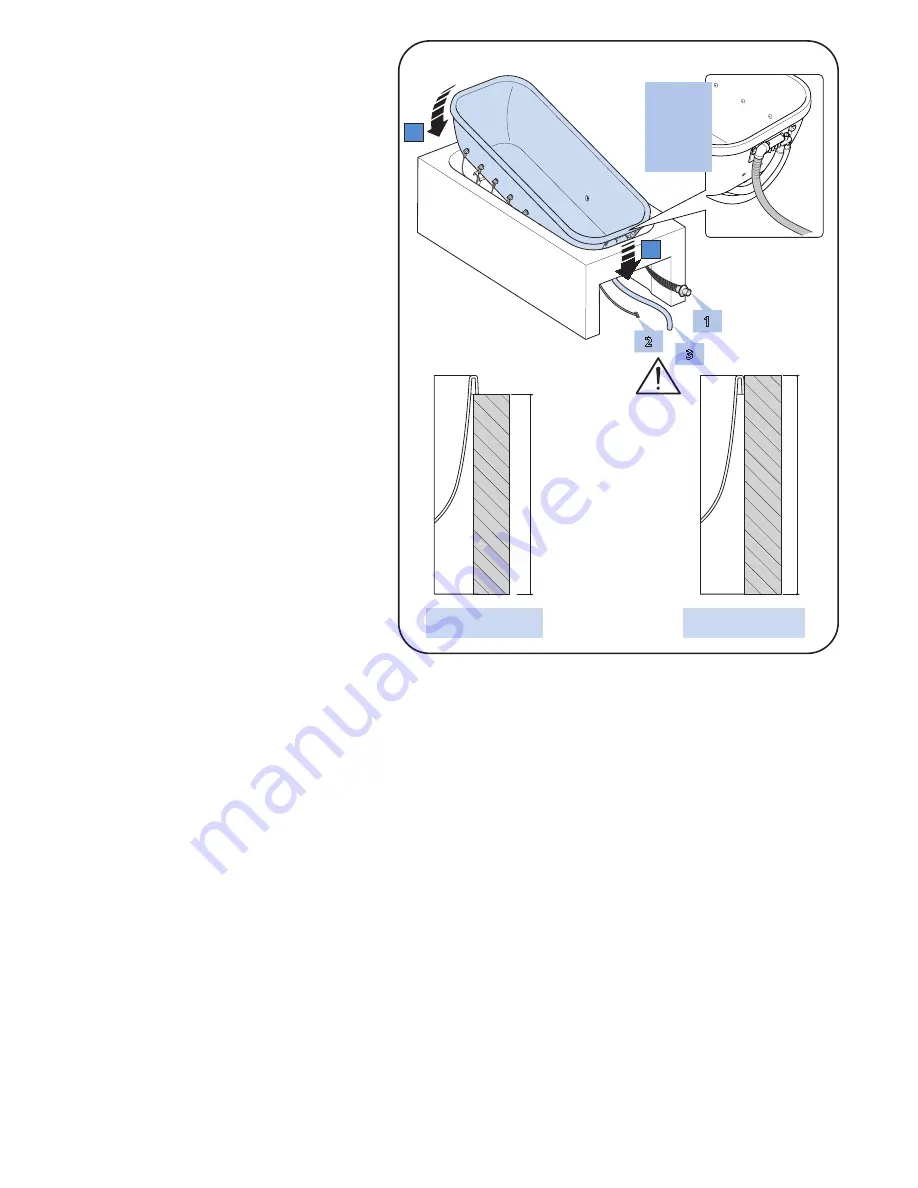
fig.2)   Mettere la vasca in quella che sarà la sua sede definitiva 

avendo cura di infilare nell’incasso per prima il lato 

frontale (A), poi quello posteriore (B).


Fare attenzione di portare fuori dall’incasso i seguenti 

cavetti/tubi (se previsti):  IDROCOLORE (1), cavo  elet-

trico tastiera (2), tubo blower (3).

GB

fig.2)   Put the tub in what will be its final location. Make sure 

that first you insert in the recession the front side (A), 

then the rear (B). 


Make sure to run the following wires/pipes outside 

the recession (if they are included): IDROCOLORE (1), 

keyboard electrical cable(2), blower pipe (3).

FR

fig.2)   Mettre la baignoire dans son logement définitif  en 

prenant soin d’enfiler d’abord le côté frontal lors de 

l’encastrement (A), puis celui arrière (B).  


Faire  attention  à  ne  pas  encastrer  les  câbles/tubes 

suivants (si prévus) : IDROCOLORE (1), câble électrique 

du clavier (2), tube blower (3).

DE

Abb.2) Die Wanne an ihrem endgültigen Aufstellungsort aufstel-

len, dabei ist zu erst die vordere Seite (A), dann die hintere 

Seite (B) im Wandeinschnitt unterzubringen. Darauf ach-

ten, dass die folgenden Kabel/Schläuche (falls vorhan-

den) nicht im Einbau zurückbleiben: IDROCOLORE (1), 

Stromkabel des Tastenfeldes (2), Blowerschlauch (3). 

ES

(fig. 2) Introduzca la bañera en el que será su alojamiento defi-

nitivo asegurándose de introducir en el compartimento 

de encaje primero el lado frontal (A), y después el pos-

terior (B).  Asegúrese de extraer del compartimento de 

encaje los siguientes cables/tubos (si están incluidos): 

IDROCOLORE (1), cable eléctrico del teclado (2), tubo 

del blower (3).

PT

(fig. 2) Colocar a banheira naquele que será o seu alojamento 

definitivo tomando o cuidado de enfiar no encastre 

antes o lado frontal (A), depois o traseiro (B). Prestar 

atenção para colocar fora do encastre os seguintes ca-

bos/tubos (se previstos): HIDROCOR (1), cabo eléctrico 

teclado (2), tubo blower (3).

600

filo piano / flush with base surface 

Plattenbündige Installation

fleur de plan / ras de la superficie  

sopra piano / above base surface

Installation oberhalb der Platte

sur plan / sobre la superficie 

Fig. 

Abb.

2

550

B

A

2

3

1

Lato “A”

Side “A”

Côté “A”

Seite “A”

Lado “A”

Lado “A”

Summary of Contents for GEO 170X70

Page 1: ...EO 180X80 Manuale d installazione Installation Manual Installationsanleitung Manuel d installation Manual de instalacion Manual de instala o IT D FR ES PT GB VASCHE BATHTUBS BADEWANNEN BAGNOIRES BA ER...

Page 2: ...tion zur ckzuf hren sind DE AVANT PROPOS Les instructions relatives l installation doivent tre ex cut es exclusivement par du personnel qualifi et habilit certifier e travail ef fectu dans le respect...

Page 3: ...ineAnsprechempfindlichkeitvon30mAaufweist und die Wanne ein wandfrei mit 230 V 16 A versorgen kann Die Wanne ist mit einem Klemmbrett ausgestattet das folgende Symbole aufweist NOTE PRELIMINARI DI INS...

Page 4: ...V doivent tre inaccessibles pour les personnes se trouvant dans la baignoire La maintenance doit tre assur e par le service apr s vente Kos ou par du personnel sp cialis autoris en utilisant pour les...

Page 5: ...support S Trou d vacuation au ras du sol 40 mm E Alimentation lectrique c ble 3x2 5 mm2 de 2 m tres de longueur A Patas de soporte S Desag e a ras pavimento 40 mm E Alimentaci n el ctrica 2 metros de...

Page 6: ...upport S Trou d vacuation au ras du sol 40 mm E Alimentation lectrique c ble 3x2 5 mm2 de 2 m tres de longueur A Patas de soporte S Desag e a ras pavimento 40 mm E Alimentaci n el ctrica 2 metros de c...

Page 7: ...otection bulles Enlever les vis qui fixent les pieds de la baignoire la palette en bois Faire tr s attention lors de la manutention de la baignoire La saisir seulement par les bords ou le cadre Il est...

Page 8: ...lle el teclado A al anillo B e introduzca a presi n el conjunto en el anillo C Aseg rese de que el cable E procedente del teclado no permanezca dentro del compartimento de encaje sino que salga por el...

Page 9: ...istzuerstdievordereSeite A danndiehintere Seite B imWandeinschnittunterzubringen Daraufach ten dass die folgenden Kabel Schl uche falls vorhan den nicht im Einbau zur ckbleiben IDROCOLORE 1 Stromkabel...

Page 10: ...l eau chaude froide V rifier que le c ble d alimentation de l installation soit suffisamment long pour permettre le raccordement au control box de la baignoire sans interruptions ni jonctions interm d...

Page 11: ...trap by means of a 40 mm diameter PVC pipe FR fig 4 Raccorder le syst me d vacuation de l immeuble au siphon de la baignoire moyennant un tube en PVC de 40 mm de diam tre DE fig 4 Den Wasserabfluss de...

Page 12: ...and green wire to the earth terminal Tighten the cord grip and place the control box cover in position to ensure the prescribed degree of protection The tub is also fitted with a terminal marked with...

Page 13: ...ec fico pasacables el conductor azul neutro se empalmar al terminal N el de color marr n fase al terminal L y el de color amarillo verde al terminal de tierra Apriete el pasacables y coloque en la pos...

Page 14: ...IT fig 6 Sigillare tra il bordo vasca ed il pavimento con silicone trasparente GB fig 6 Seal between the edge of the tub and the floor with transparent silicon FR fig 6 Sceller entre le bord de la bai...

Page 15: ...ent lock ring from the jet on the inside the tub then push with the new fibre and the old fibre will fall inwards IT Le vasche idromassaggio Kos sono equipaggiate con un rivoluzionario sistema per di...

Page 16: ...sind mit einem revolution ren System ausgestattet mit dem farbiges Licht in der Wanne verbreitet wird Mit oder ohne Wasser F r n here Informationen ber die Funktionsweise wird auf das Kapitel Idro col...

Page 17: ...dei sistemi elettrici GB Maintenance of electrical systems DE Wartung der elektronischen Systeme FR Entretien des syst mes lectroniques ES Mantenimiento de los sistemas el ctricos PT Manuten o dos si...

Page 18: ...ectuar las operaciones de mantenimiento que sean necesarias y volver a co locar todo en su lugar efectuando las operaciones antes descritas en sentido contrario PT A GEO 170X70 180X80 uma banheira pre...

Page 19: ...amento GB Wiring diagrams and connection DE Elektrischen Schalt und Anschlu pl ne FR Sch mas lectriques et de branchement ES Diagrama de cableado y conexi n PT Esquemas el ctricos e de liga o 12V SEC...

Page 20: ...FR Sch mas lectriques et de branchement ES Diagrama de cableado y conexi n PT Esquemas el ctricos e de liga o L2 OUT N2 PUMP BOILER POWER SUPPLY X4 X2 01 RU4 RU3 TF2 OUT LIGHT OUT BLOWER L N N_115 N_1...

Page 21: ...ORE Clavier Blower a Vert b Jaune c Blanc d Marron 2 6 7 10 Controllo IDROCOLORE Alimentacion IDROCOLORE Teclado Blower a Verde b Amarillo c Blanco d Marr ne 2 6 7 8 8 8 8 8 8 10 Power Cavo alimentazi...

Page 22: ......

Page 23: ......

Page 24: ...s visant en am liorer la fonctionalit ou le design et ceci sans pr avis DE DerHerstellerbeh ltsichdasRechtvor technische nderungenan den Ger ten und deren Zubeh rteile jederzeit anzubringen ES La soci...

Reviews: