background image

OPERATION 

H550 AE 

Rev.: 001


kortho

 KGJ X18 


8-17 


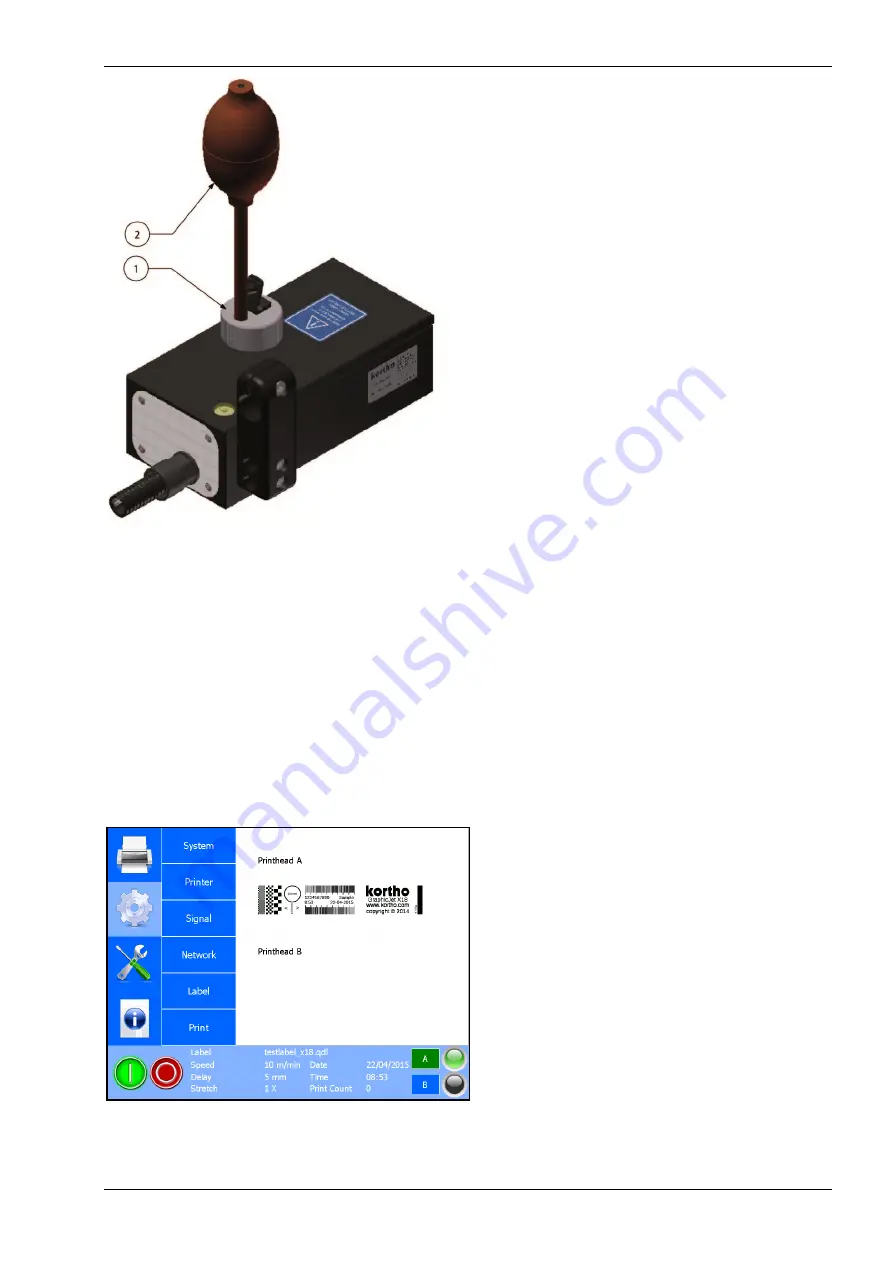
Fig. 8.24  Ink reservoir with prime bulb attached. 

5. 

Hold clean paper tissues or a waste container in front of the printhead to collect ink. 

6. 

Squeeze the prime bulb completely just one time to prime the printhead. Prime in bursts of about 
three to five seconds to remove any air bubbles out of the ink system.  

7. 

Repeat priming until ink squirts from all the nozzles. 

8. 

Remove the prime bulb from the fitting of the ink reservoir to stop priming the printhead. 

9. 

Rotate the printhead housing back to the print position. 

10. 

The printer


is now ready to print. 

8.6  Adjusting printer settings 

1. 

Touch the 

Settings

 icon. The following status screen is shown. 


Fig. 8.25  Settings menu 

1.


Screw cap  

2.


Prime bulb 


Summary of Contents for GraphicJet X Series

Page 1: ...MANUAL GraphicJet X series Edition H550 AE Rev 001 English kortho...

Page 2: ...ts Reserved The kortho logo and the bv Korthofah logo are trademarks of Korthofah BV All other brand and product names in this manual are the trademarks or registered trademarks of their respective ho...

Page 3: ...ventions in this manual The GraphicJet X18 series will be referred to as the printer Any material the printer is used to print on is called substrate The customer is the person or company who is the o...

Page 4: ...the bitmap to print This design file can contain a unique combination of text numeric date time barcode and or graphical items Pixel A pixel is the smallest portion of a bitmap For a printer one pixe...

Page 5: ...2 Coding unit 2 2 2 3 Control unit 2 4 2 4 Sensors 2 5 2 4 1 Photocell 2 5 2 4 2 Encoder 2 5 2 5 Label design 2 6 2 5 1 Integrated label design program 2 6 2 5 2 NiceLabel 2 6 3 PRINT PROCESS DESCRIPT...

Page 6: ...3 2 Ink reservoir 6 4 6 3 3 Ink reservoir orientation 6 5 6 3 4 Printhead rotation 6 5 6 3 5 Radial printhead rotation 6 6 6 3 6 Axial printhead rotation 6 9 6 3 7 Radial and axial printhead rotation...

Page 7: ...1 System settings 8 18 8 6 2 Printer settings 8 21 8 6 3 Signal settings 8 22 8 6 4 Network settings 8 23 8 6 5 Label settings 8 24 8 6 6 Print settings 8 26 9 DIAGNOSTICS TROUBLESHOOTING 9 1 Diagnos...

Page 8: ...are 10 5 11 DISMANTLING DISPOSAL 11 1 Dismantling 11 1 11 1 1 System 11 1 11 1 2 Ink reservoir 11 1 11 1 3 Printhead housing 11 1 11 1 4 Control unit 11 1 11 1 5 Sensor devices 11 1 11 1 6 Ink and sol...

Page 9: ...H550 AE Rev 001 kortho KGJ X18 ix...

Page 10: ......

Page 11: ...r suitable protective clothing as protection against splashing of or contamination with ink or solvent When installing of servicing the equipment Ensure that the host machine is stopped Ensure the con...

Page 12: ...ar and tear of the equipment 1 4 Specifications Only general specifications are described in this section Refer to Appendix A for more detailed specifications 1 4 1 Coding unit Fig 1 1 Coding units gl...

Page 13: ...developed for use in conjunction with the GraphicJet X series printhead to print onto a range of substrates The inks are either oil based used on porous substrates like cardboard or solvent based used...

Page 14: ...port The fonts also need to be installed on the control unit The following fonts are pre installed in the printer Arial Arial Black Arial Narrow Century Gothic Courier New Georgia Liberations Sans Lib...

Page 15: ...ll be accepted in such instances 1 4 6 Electrostatic charge Make sure that the substrate is not able to build up an electrostatic charge near the printhead i e use conductive rolls and bearings for su...

Page 16: ...INTRODUCTION kortho KGJ X18 H550 AE Rev 001 1 6...

Page 17: ...oding unit s Up to two coding units can be connected to one control unit Both coding units will generate a print based on the same speed and printsignal All connections between printer and peripheral...

Page 18: ...oir parts 1 Ink reservoir 2 Printhead housing 3 Support 1 Ink reservoir 2 Fitting for prime bulb 3 Screw cap 4 Refill label 5 Serial number label for Coding Unit 6 Prime bulb with tube 7 Reservoir mou...

Page 19: ...integrate filter This will ensure that the integrated filter will last for the lifetime of the printhead This filter can be replaced The difference between de X18 and X18 is the printhead used and the...

Page 20: ...l unit connections 1 USB connection 2 Capacitive touch screen 1 Print request e g photocell 2 Input Output 3 Printhead A 4 Encoder 5 USB 6 USB 7 USB 8 LAN connector 9 Mains power switch including main...

Page 21: ...used to measure the movement of the product to print on This measurement is used to calculate the correct print speed at which the printer will print Fig 2 9 Encoder 1 Detection indicator 2 Sensitivi...

Page 22: ...fers the most common items and item options used in a label If advanced features are required the label needs to be designed with a label design program that runs on a PC like NiceLabel 2 5 2 NiceLabe...

Page 23: ...d marking as it is a versatile technology able to print on a wide variety of substrates This printing technology uses a ceramic material that deforms when an electric field is applied to it This defor...

Page 24: ...ownwards Upwards printing is not possible due to the very high risk of clogging the nozzles It is important that for any orientation of the printhead the top ink level is at least 3mm below the level...

Page 25: ...d Pause 0 button and the coding units connected to the control unit A and B Fig 3 3 Screen layout 3 5 2 LED indicators on control unit The status screen of the control unit shows a LED indicator indic...

Page 26: ...After the selection has been made the keyboard will be set to the selected language e g Arabic as shown in figure Fig 3 5 Fig 3 5 Arabic keyboard To use the keyboards superscript alphanumerics 1 Touc...

Page 27: ...d keyboard screen will appear Fig 3 7 Second keyboard screen numerics and special characters To use the Commonly used text keyboard For entering commonly used text the third keyboard screen can be use...

Page 28: ...e of the buttons and enter the data to be stored only one line can be stored see Fig 3 9 Fig 3 9 Programming third keyboard screen buttons entering text 4 Touch the OK button to store the text The but...

Page 29: ...ecial functions keyboard To edit text and use cursor controls touch the keyboard button This following screen will appear Fig 3 11 Fourth keyboard screen edit text and use cursor controls To return to...

Page 30: ...o a numeric keyboard available for all numeric items entries see figure Fig 3 12 Fig 3 12 Numeric keyboard 3 5 4 System information The firmware versions installed on the control unit can be displayed...

Page 31: ...h Select label Copy label Management Edit label Create label Preview Select Cancel Copy Paste Cancel Move Paste Cancel Select Cancel Test labels Fonts Test Printer Diagnostics Graphics List graphics D...

Page 32: ...PRINT PROCESS DESCRIPTION kortho KGJ X18 H550 AE Rev 001 3 10...

Page 33: ...ng unit identification label can be found on the side of the coding units inkreservoir 4 1 2 Power supply For safe operation the power cable to the control unit must be connected to a properly grounde...

Page 34: ...nter power up if all these connections are secured 1 The cable conduit X02 X06 between the control unit and the coding unit s 2 The mains power plug X09 3 The print request cable X04 info photocell or...

Page 35: ...d from electrostatic discharges The printhead can be compared with a normal CMOS circuit and must be ESD protected accordingly to avoid later problems caused by discharges The printhead internal prote...

Page 36: ...indicates that when the user is neglecting the procedures the coding unit is at risk of damage Use only the Kortho GJ ink type that is noted on the inkservervoir Fig 4 4 A this because other ink is p...

Page 37: ...refer to label 2 of Fig 5 1 Handle the package with care because the printhead is fragile Refer to label 3 of Fig 5 1 Keep the package upright in all cases refer to label 4 of Fig 5 1 5 1 2 Pre trans...

Page 38: ...vent from the ink reservoir same as instruction 1 but read solvent instead of ink 7 Verify whether the ink reservoir is empty 8 Keep the coding unit upright to avoid leakage of residue fluid from the...

Page 39: ...position in a packaging box to avoid leakage from the ink reservoir through the air release channel 16 Use original or equal packaging for the printer equipment 17 Label the box with keep dry labels l...

Page 40: ...lvents can be used in de the GaphicJet X18 series please refer to the specific Material Safety Datasheet of the ink solvent used for more detailed and accurate information 5 2 2 Transport information...

Page 41: ...s will stop the host machine when the printer reports an error general printer alarm A warning signal input on the host machine warning alarm A busy signal input on the host machine So the host machin...

Page 42: ...king 6 2 1 Coding unit The coding unit consist of three main parts the Inksystem that holds the ink used for printing the printhead that makes the actual print and the support set Fig 6 2 Coding unit...

Page 43: ...e control unit is equipped with a integrated bracket on the back of the control unit The support set is optional Fig 6 3 Control unit TsC20 6 2 3 Encoder Optional The encoder is used for measuring the...

Page 44: ...tance distance A in Fig 6 5 is 5 mm If the situation permits keep the print distance as small as possible for an optimum print quality Take precautions so that the product cannot damage the printhead...

Page 45: ...ng of the printhead the ink level must be kept between the specifications as explained in section 3 3 A quick and simple way to achieve this is the use of the graphs as described in this chapter The d...

Page 46: ...thead clamp Fig 6 9 either clamp down or clamp up clamp y 6 Position the ink reservoir so that the distance between datum A and datum B is equal to the found height AB Use if necessary extra clamps po...

Page 47: ...H550 AE Rev 001 kortho KGJ X18 6 7 Fig 6 11 Printhead radial rotation 45 standard support clamp down reservoir position III Fig 6 12 Printhead radial rotation 90 standard support clamp down reservoir...

Page 48: ...l rotation graph Example Fig 6 10 Radial rotation of 0 printhead clamp down height AB 41 0 mm Example Fig 6 11 Radial rotation of 45 printhead clamp down height AB 57 2 mm Example Fig 6 12 Radial rota...

Page 49: ...C of Fig 6 14 At some angles the reservoir mounting clamp must be fit to reservoir position II or III instead of the standard I position refer to Fig 6 6 because the two pole clamps can be in the way...

Page 50: ...H e i g h t A B m m Y c la m p 2 5 X g a p 1 8 Y c la m p 2 5 X g a p 1 0 Y c la m p 2 5 X g a p 1 8 Y c la m p 2 5 X g a p 1 0 Fig 6 16 Printhead axial rotation graph Example 4 Axial rotation of 0 cl...

Page 51: ...rvoir is levelled This means that datum B lies 13 8 mm above the first bottom nozzle of the printhead The distance between first bottom nozzle and the bottom of the printhead housing is 15 4 mm To rou...

Page 52: ...recautions so that the product cannot damage the photocell 6 4 2 Print safety photocell optional To make sure the printer will only print when the substrate is in front of the printhead an extra photo...

Page 53: ...he product cannot damage the encoder Beware Mount the encoder as close as possible to the location of the printhead This will give the best print results 6 5 Mounting the control unit 1 Find a secure...

Page 54: ...he host machine 6 Connect the interface cable to the interface port X3 7 Connect the print request cable X04 e g photocell 8 Connect the input output cable X103 optional 9 Connect the encoder cable X0...

Page 55: ...unit and wait until the main menu appears The control unit will check whether the software versions of the coding unit and the control unit match If not the software of the coding unit will be automat...

Page 56: ...B for the printhead housing and the ink reservoir is not important for this procedure Fig 7 3 Printhead housing at horizontal position 3 Put on protection gloves and use safety goggles for personal pr...

Page 57: ...it is empty The status of the ink level indicators on the screen of the control unit is now red off and green on CAUTION Fill the ink reservoir with ONE ink bottle 200 ml ONLY filling with more than o...

Page 58: ...ove the prime bulb gently to avoid a pressure wave within the ink tubes from the fitting of the ink reservoir to stop priming the printhead 16 Rotate the printhead housing back to the print position T...

Page 59: ...iagnostics Testlabel menu 8 Touch Load button to load the Test label Note When two printheads are connected Touch A or B in section 4 see subsection 3 5 1 to select Printhead A or B Only the Selected...

Page 60: ...sfully carried out 2 Touch Setting icon 3 Touch the Signal button 4 Set the Use encoder setting to No 5 Touch the Print button 6 Set the Speed to the estimated speed of the substrate 7 Set the Print d...

Page 61: ...test print Fig 7 12 should be made on the sample product ww w kortho com copyright 2002 G r a phic J et X18 kortho 100m m 1234567890 Sample 15 45 23 03 2004 Fig 7 12 Test label printed 10 Check whethe...

Page 62: ...from Normal to 180 degrees or from Mirror to Mirror 180 degrees Note If there are two printheads connected to the control unit one has to perform the steps above for each individual printhead 7 4 3 Se...

Page 63: ...s Spit function Spitting means that the printhead will print pixel columns at predefined intervals Spitting is suppressed while printing a label For the GraphicJet X series installations using oilbase...

Page 64: ...y x x set value seconds The range off the spit interval can be set between2 000 and 20 000 milli seconds The set interval time depends on the type of ink used and ambient circumstances like temperatur...

Page 65: ...3 Set the Low ink level to the desired value high or low As soon as the amount of Low ink prints has been reached the Ink out alarm will be set Setting the Ink out output level 1 Touch the Settings i...

Page 66: ...rection B normal Start paused yes Print missed Error System language English Encoder time out Error Date language English WinOS version Printer firmware version QiC control version WinCE version Fig 7...

Page 67: ...ote When the system parameter Start paused is set to No the printer will start printing as soon as the print engine is powered up and a print request is received The print engine is active before the...

Page 68: ...l to the printer and the printer will make a print 4 To pause the printer touch the Pause print button Note If a print request is received during the pause mode a popup will appear on screen showing w...

Page 69: ...ted and touch the required character s that need s to replace the old character s Alternatively a cursor is indicating the location at which a new character will be inserted Use the keys of the keyboa...

Page 70: ...digit s that need s to be changed 2 Enter the desired new digit s The desired digit s is are inserted at the cursor position 3 Repeat the previous instructions until all the digit s have been edited...

Page 71: ...leted and touch Backspace Alternatively place the cursor behind the digit s that need to be deleted and touch Backspace to remove the text digit by digit 5 Touch Enter to confirm the Operator input 8...

Page 72: ...isplayed and a further two buttons will appear Copy and Cancel Fig 8 7 Copy label menu USB thumbdrive Note The directories that are stored on the USB thumbdrive are shown in green while the directorie...

Page 73: ...e copied an Insufficient memory message appears on screen Copying new labels is only possible when some old labels are deleted or the memory is cleared Refer to the next subsections 8 4 4 13 The syste...

Page 74: ...main Print menu the Move procedure is now finished 8 4 4 Deleting a label There is a Delete function available to make it possible to remove label files and or folders 1 Touch the Print icon 2 Touch...

Page 75: ...diting a label There is a Edit label function available to make it possible to edit a label that is stored in the printers label memory Note Only labels designed on the control unit see 8 4 6 can be e...

Page 76: ...features 6 For interim saving the label touch the save icon 7 Touch the Close icon to exit the label editor 8 The Save label screen will appear Touch No to return to the Edit label screen and store t...

Page 77: ...idth selects the width of the barcode Enter the required number through the keyboard Barcode height selects the height of the barcode Enter the required number through the keyboard c Date Font select...

Page 78: ...r by using the Select next icon b Touch the Edit icon c The entry screen belonging by the label item will appear on screen d Edit the required values and press Ok 6 To rotate the label item a Select t...

Page 79: ...saved the system will return to the Print menu 14 If the latest label changes have not been saved the Save label screen will appear Touch No to return to the Edit label screen and store the changes i...

Page 80: ...rtho GJ inks in 200 ml bottles Fig 8 19 Cut ink bottle open 5 Open the ink reservoir by unscrewing the screw cap Fig 8 20 counter clockwise Put the screw cap aside at a clean place Fig 8 20 Ink reserv...

Page 81: ...ufficient 8 5 1 Purging the printhead This procedure is meant to test the piezo elements of the printhead or to clear the nozzles when the prints show minor flaws 1 Touch the Pause mode button to abor...

Page 82: ...ogged the ink system needs to be primed 1 Touch the Pause mode button to abort the print process 2 Put on protection gloves and use safety goggles for personal protection 3 Rotate if necessary the pri...

Page 83: ...sts of about three to five seconds to remove any air bubbles out of the ink system 7 Repeat priming until ink squirts from all the nozzles 8 Remove the prime bulb from the fitting of the ink reservoir...

Page 84: ...u Time and or Date 1 Touch the blue button that shows Time or Date Fig 8 27 Date and Time menu 2 Touch the item that needs changing e g hours minutes or seconds 3 Touch the arrow up or arrow down to a...

Page 85: ...ig 8 29 System language selection menu 2 Touch a language button to select another language Note When there are more languages than fit on screen on can touch the screen and drag up and downwards to s...

Page 86: ...print process the operator should touch the start print button When No is selected the printer will start in run mode The printer will immediately make a print when the print processor is ready to sta...

Page 87: ...is activated high or low depending on the Print input setting see also subsections 7 4 3 and 8 6 3 The printer will stop printing when the print signal is deactivated Printer ID This is a text or num...

Page 88: ...ing the button a list of choices will appear from which the required setting can be selected Print request input active Select the rising edge High or falling edge Low of the product detection sensor...

Page 89: ...t of the coding unit during the printprocess trigger signal print finished the printer will stop printing If the substrate starts moving again within 30 seconds the printer will finish the print If th...

Page 90: ...Subnet and Gateway 1 Touch the corresponding blue button and the following screen will appear Fig 8 35 Network settings IP address 2 Enter the desired value do not forget to enter the decimal points...

Page 91: ...etting selection 2 Select the required orientation Mirror flips the printed label along the width of the print head 180 rotates the label 180 degrees around the centre of the print head Mirror 180 com...

Page 92: ...the button and the setting will change toggle function or 2 When touching the button a list with choices will appear from which the required setting can be selected Print delay This value sets the De...

Page 93: ...the system will wait after a label has been printed before starting to spit The spit delay can be set to a value between 0 and 20 000 milli seconds When zero is selected the first pixel column will b...

Page 94: ...OPERATION kortho KGJ X18 H550 AE Rev 001 8 28...

Page 95: ...the features in this section only work when the printer is paused Pause the printer by pressing the Pause icon When paused the Pause icon is brightly lit 9 1 1 Test labels For diagnostic reasons and f...

Page 96: ...ed or the system is switched off and on again Make sure another label is selected when starting up the production otherwise the Test label will be printed during production 9 1 2 Fonts Touch the Fonts...

Page 97: ...as fixed text Note The printer comes with a set of internal fonts installed The fonts shown in the picture above are part of the pre installed fonts If fonts are added they will also be shown on scree...

Page 98: ...e If a font is deleted that is used in a label that is selected another font will be used for printing Due to this the label can be printed in another format as the design has shown Add fonts This fun...

Page 99: ...ncel to return to the Service and Diagnostics main menu Note The copied font is registered to Windows so can be used without restarting the system Cancel Touch Cancel to retrun to the Diagnostics menu...

Page 100: ...nk This procedure is meant to test the piezo elements of the printhead or to clear the nozzles when the prints contain minor flaws Beware When performing the Purge procedure a full height black label...

Page 101: ...n to return to the Diagnostics Printer menu Software Touch the Software button to show the installed firmware and software versions Fig 9 13 Software and firmware version screen Firmware the firmware...

Page 102: ...off the error list will be cleared Note To view errors 4 to 10 touch the screen and drag the messages upwards This will scroll them into view Note If an particular error occurs more than once sequent...

Page 103: ...separate service tool General alarm output The General error output is activated for 2 seconds This can be used to test whether the general alarm output is functioning The output can be monitored on t...

Page 104: ...her the Spare 2 output is functioning The output can be monitored on the host machine or a separate service tool The Spare 2 signal is not preprogrammed Ink out output The low ink warning output is ac...

Page 105: ...Delete graphic are you sure 4 Press Yes to confirm the removal of the graphic and to return to the Delete graphics menu 5 Another graphic can be deleted or alternatively touch Cancel to return to the...

Page 106: ...h the Copy button to copy the graphic to the printer 6 If the copy process has been successful the following screen will be shown Fig 9 23 Font copy successful 7 Press Ok to leave the screen and to re...

Page 107: ...ral information screen Model model of the printer connected to the control unit Label the name of the currently loaded label Date system date of the control unit Speed the set speed when using the int...

Page 108: ...of prints that the currently used system has made Touch the Ok button to return to the Information menu 9 2 3 Backup This function backups the labels on the system onto a USB thumbdrive 1 Insert a USB...

Page 109: ...els a timer icon will be shown on screen Fig 9 29 Backup in progress 7 Wait until the message that the backup was successful appears on screen Fig 9 30 Backup finished 8 Touch Ok to confirm and to ret...

Page 110: ...version of the image that is used to flash the user interface hardware IP Address Subnet Gateway the set network address of the control unit Free disk space the space that s still available for savin...

Page 111: ...dt exists a file overwrite message will be displayed Touch Yes and the report files will be overwritten Touch No and the report operation will be cancelled Fig 9 33 Report overwrite 6 While creating t...

Page 112: ...ftware of the system QiC Control Print engine and Printhead To upgrade the software 1 Insert a USB thumbdrive that contains the upgrade file TsC20 CAB located in the root of the drive Note Make sure o...

Page 113: ...mains dark Check whether the mains voltage is present Check whether power cable is properly connected to the control unit Check whether the power cable is not damaged Check whether ON OFF switch is in...

Page 114: ...ot be downloaded to the system The font may be too large Check with your supplier The file on the USB thumb drive may be corrupt Ensure when transferring from a PC the USB thumbdrive is removed proper...

Page 115: ...n Make sure there is enough ink in the ink reservoir only refill when the ink low LED is lit Prime the coding unit to remove the air out of the system Purge the system to see if the printhead is still...

Page 116: ...so remove some ink from the ink system 9 3 3 Print request signal sensor Fault indication Action s Sensor does not detect the passing product In case of a photocell Check whether the lens front side o...

Page 117: ...rtially blocked Clean the frontplate of the printhead by squirting some solvent to the frontplate do not rub against the frontplate this might damage the frontplate and or durt might be pushed into th...

Page 118: ...strate is moving at a stable speed When using the internal encoder The set speed doesn t matches the actual speed and or the actual speed is fluctuating too much Set the speed at the right value and o...

Page 119: ...peed In this section the correct print speed is defined as the speed at which the horizontal print resolution is equal to the printhead resolution The printhead resolution is 185 dpi dots per inch The...

Page 120: ......

Page 121: ...2 Nozzle maintenance 1 Put on protection gloves and use safety goggles for personal protection 2 Purge the printhead Refer to subsection 8 5 1 The nozzle will be cleaned of small particles 3 Spray wit...

Page 122: ...before handling the equipment a grounding wrist strap should be used Do not touch any components on the printhead or PCB s with your hand or any other conductive equipment Do not touch the front plate...

Page 123: ...ways ensure anti static precautions are observed when handling the Printhead PCB or it might get damaged see subsection 10 4 1 1 Open the printhead housing Refer to subsection 10 4 2 Fig 10 3 Replace...

Page 124: ...s ensure anti static precautions are observed when handling a printhead or it might be damaged Replacing the printhead means that also the ink tube connected to the printhead and the filter must be re...

Page 125: ...4 3 25 Prime the excessive air from the system 26 The printer is now ready to print 10 4 6 Replacing the ink filter 1 Open the printhead housing Refer to subsection 10 4 2 2 Disconnect the ink filter...

Page 126: ...MAINTENANCE kortho KGJ X18 H550 AE Rev 001 10 6...

Page 127: ...the supports 5 Separate the supports from the coding unit and the control unit 11 1 2 Ink reservoir 1 Open the reservoir s screw cap 2 Pour the remaining ink in a waste container 3 Let the ink reserv...

Page 128: ...d or solvent 5 Packaging 11 2 2 Waste separation Please deliver the packaging materials to waste recycling companies Printed circuit boards power supplies touch panel net entr e encoders and wirelooms...

Page 129: ...7 10 8 1 8 2 8 5 8 6 8 7 8 8 8 9 8 10 8 15 8 16 8 18 8 19 8 20 8 21 8 22 8 24 8 25 8 26 9 1 9 2 9 3 9 4 9 6 9 7 9 8 9 9 9 10 9 11 9 12 9 13 9 14 9 16 9 17 9 18 H handling 4 3 5 5 5 7 10 2 10 3 10 4 ho...

Page 130: ...6 11 6 12 6 13 7 2 7 4 7 5 7 6 7 7 7 8 7 9 7 10 7 11 8 15 8 16 8 17 8 21 8 26 8 27 9 6 9 7 9 8 9 21 9 22 9 23 9 24 9 25 10 1 10 2 10 3 10 4 10 5 11 1 piezo 3 1 8 15 9 6 10 4 product 2 1 2 5 3 1 4 1 5...

Page 131: ...X H550 AE Rev 001 kortho KGJ X18 III trigger 3 1 6 12 7 8 7 9 8 23 request 2 1 3 1 4 2 6 1 6 12 6 14 7 8 7 9 8 1 8 2 8 20 8 26 8 27 V voltage 1 3 3 1 4 1 4 2 9 7 9 8 9 19 W waste 3 2 5 6 5 7 7 9 8 17...

Page 132: ...5 1 Shipping and handling labels 5 5 Fig 6 1 Typical printer application 6 2 Fig 6 2 Coding unit X18 6 2 Fig 6 3 Control unit TsC20 6 3 Fig 6 4 Encoder with support 6 3 Fig 6 5 Distance between front...

Page 133: ...3 Printhead housing at horizontal position 8 16 Fig 8 24 Ink reservoir with prime bulb attached 8 17 Fig 8 25 Settings menu 8 17 Fig 8 26 System settings menu 8 18 Fig 8 27 Date and Time menu 8 18 Fig...

Page 134: ...Creating report in progress 9 17 Fig 9 35 Report saved 9 18 Fig 9 36 Upgrade files detected screen 9 18 Fig 9 37 Upgrade in progress screen 9 19 Fig 9 38 Upgrade finished screen 9 19 Fig 9 39 Error wa...

Page 135: ...ative humidity 10 90 non condensing Control unit TsC20 Dimensions Height 203 mm Width 258 mm Depth 153 mm Weight 2 8 kg Power supply Input voltage 80 264VAC Frequency 47 63 Hz Power max 40VA Inrush cu...

Page 136: ...lso need to be installed on the control unit The following fonts are pre installed in the printer Arial Arial Black Arial Narrow Century Gothic Courier New Georgia Liberations Sans Liberations Serif L...

Page 137: ...APPENDIX A SPECIFICATIONS H550 AE Rev 001 kortho KGJ X18 A 3 Storage capacity 46MB approximately 445 labels of the maximum label size This memory can be used for storage of d Labels e Graphics f Fonts...

Page 138: ......

Page 139: ...H550 AE Rev 001 kortho KGJ X18 B 1 Appendix B Dimensions Coding unit B 2 Control unit B 3 Standard bracket B 4...

Page 140: ...APPENDIX B DIMENSIONS kortho KGJ X18 H550 AE Rev 001 B 2 Coding unit and Bracket Dimensions are metric mm...

Page 141: ...APPENDIX B DIMENSIONS H550 AE Rev 001 kortho KGJ X18 B 3 Control unit Dimensions are metric mm...

Page 142: ...APPENDIX B DIMENSIONS kortho KGJ X18 H550 AE Rev 001 B 4 Control unit and Bracket Dimensions are metric mm...

Page 143: ...H550 AE Rev 001 kortho KGJ X18 C 1 Appendix C Part lists illustrations Coding unit X18 C 2 Control unit TsC20 X18 C 4 Standardbracket control unit TsC20 C 6...

Page 144: ...filler cap X18 4 164048 Hose socket screw bus filter 15 326352 Cap printhead coding unit X18 5 164315 Libel leverl KGJ 16 326365 Gasket hood X18 6 164331 Level switch X18 17 326381 Gasket printhead X...

Page 145: ...APPENDIX C PART LISTS ILLUSTRATIONS H550 AE Rev 001 kortho KGJ X18 C 3 Coding unit X18...

Page 146: ...3 168264 M cord 1 6 EPDM 70deg shore 12 817991 Powersupply board controller TsC20 X18 4 168277 Touchscreen TsC20 13 818017 Power cable 48VDC TsC20 5 168429 Power supply TsC20 X18 14 818029 Power entr...

Page 147: ...APPENDIX C PART LISTS ILLUSTRATIONS H550 AE Rev 001 kortho KGJ X18 C 5 Control unit TsC20 X18...

Page 148: ...TRATIONS kortho KGJ X18 H550 AE Rev 001 C 6 Standard bracket control unit TsC20 Line Part no Description Line Part no Description 1 326492 Bracket shaft TsC20 2 326505 Base support TsC20 818115 Standa...

Page 149: ...APPENDIX C PART LISTS ILLUSTRATIONS H550 AE Rev 001 kortho KGJ X18 C 7 Standard bracket control unit TsC20...

Page 150: ...APPENDIX C PART LISTS ILLUSTRATIONS kortho KGJ X18 H550 AE Rev 001 C 8...

Page 151: ...KGJ X18 D 1 Appendix D Connections Control unit Connector Plate D 2 X3 Schematic diagram input D 3 X3 Schematic diagram output D 4 X3 Circuit diagram input D 5 X3 Circuit diagram output D 6 X3 Schema...

Page 152: ...cket X06 Printhead B DB 25 ways socket X07 BCD connector DB 15 ways socket X08 Print safety photocell DB 9 ways socket X09 Mains power switch with 2 fuses 2 5A s USB USB USB LAN LAN connector RJ45 soc...

Page 153: ...APPENDIX D CONNECTIONS H550 AE Rev 001 kortho KGJ X18 D 3 X3 Schematic diagram input...

Page 154: ...APPENDIX D CONNECTIONS kortho KGJ X18 H550 AE Rev 001 D 4 X3 Schematic diagram output...

Page 155: ...APPENDIX D CONNECTIONS H550 AE Rev 001 kortho KGJ X18 D 5 X3 Circuit diagram input...

Page 156: ...APPENDIX D CONNECTIONS kortho KGJ X18 H550 AE Rev 001 D 6 X3 Circuit diagram output...

Page 157: ...APPENDIX D CONNECTIONS H550 AE Rev 001 kortho KGJ X18 D 7 X3 Schematics diagram User This Diagram can be used to note the specific user settings...

Page 158: ......

Page 159: ...r E 2 Versions of the driver E 2 Installation of the driver E 3 Configuration of the driver E 6 Summary E 8 Downloading a label through USB E 9 Introduction E 9 Installation of the driver E 9 Download...

Page 160: ...mon Windows systems Most ERP systems are also capable of printing to a Windows driver This means that one could control all Kortho printers in a production plant by using 1 central ERP system SAP Micr...

Page 161: ...s the compatible driver has been downloaded it can be installed on the PC Laptop which is going to control the printer s Beware If the label needs to be downloaded through a USB thumbdrive one should...

Page 162: ...168 1 10 b Optionally enter a Name for the port So that the port is easily recognized for example X18_line c Enter the Port number With a Kortho printer this is always 14322 this is the control unit s...

Page 163: ...sh to close the screen A progress screen will appear installing the driver 11 Open the printer configuration screen in Windows This is found in Windows Start or in Start Configuration screen The print...

Page 164: ...ill print het Windows logo Configuration of the driver In order to more easily work with the printer and set up labels a standard label type can be set 1 Open the printer configuration screen in Windo...

Page 165: ...nter 10 Click New NIeuw again to add another label definition or click OK to close the screen When designing a label in a designing program one can selec t the printer Kortho X18_Line 1 and after that...

Page 166: ...be defined By doing this the driver can communicate the information back to a label desing program like Nicelabel Bartender etc When defining the lay out of a label the program will take the printer s...

Page 167: ...needs to be printed to a Printfile prn It is not possible to download the original label file to the printer Installation of the driver As soon as the compatible driver has been downloaded it can be...

Page 168: ...p 4 Beware To guarantee a good print result it is important that the label is designed for the printer to which one would like to download the label 2 Select the right printer driver configured to pri...

Page 169: ...can be designed with a PC based design tool or they can de designed on the control unit The labels designed with a PC based design tool can be downloaded to the control unit by Ethernet or by USB thum...

Page 170: ...APPENDIX E NICELABEL DRIVER TUTORIALS kortho KGJ X18 H550 AE Rev 001 E 12 6 Select Print and the printer will start printing the selected label...

Page 171: ...APPENDIX E NICELABEL DRIVER TUTORIALS H550 AE Rev 001 kortho KGJ X18 E 13...

Page 172: ......

Page 173: ...e l C o p y la b e l M a n a g e m e n t E d it la b e l C r e a te la b e l P r e v ie w S e le c t C a n c e l C o p y P a s te C a n c e l M o v e P a s te C a n c e l S e le c t C a n c e l T e s...

Page 174: ...APPENDIX F QUICK REFERENCE kortho KGJ X18 H550 AE Rev 001 F 2...

Page 175: ...invalid 20 Time invalid 21 Wrong name or missing variable 24 Access Denied 25 An unknown error occurred Turn the printer off and back on after 10 seconds 26 A problem occurred while generating the lab...

Page 176: ...ng The label was removed 81 Counters Reset 82 Label made for another printer type 84 Print stopped Print quantity has been reached 85 Barcode incorrect characters or codepage 86 Barcode incorrect numb...

Page 177: ...APPENDIX G ERROR LIST H550 AE Rev 001 kortho KGJ X18 G 3...

Page 178: ...bv korthofah P O box 3040 2222 AG Katwijk The Netherlands...

Reviews: