background image


3

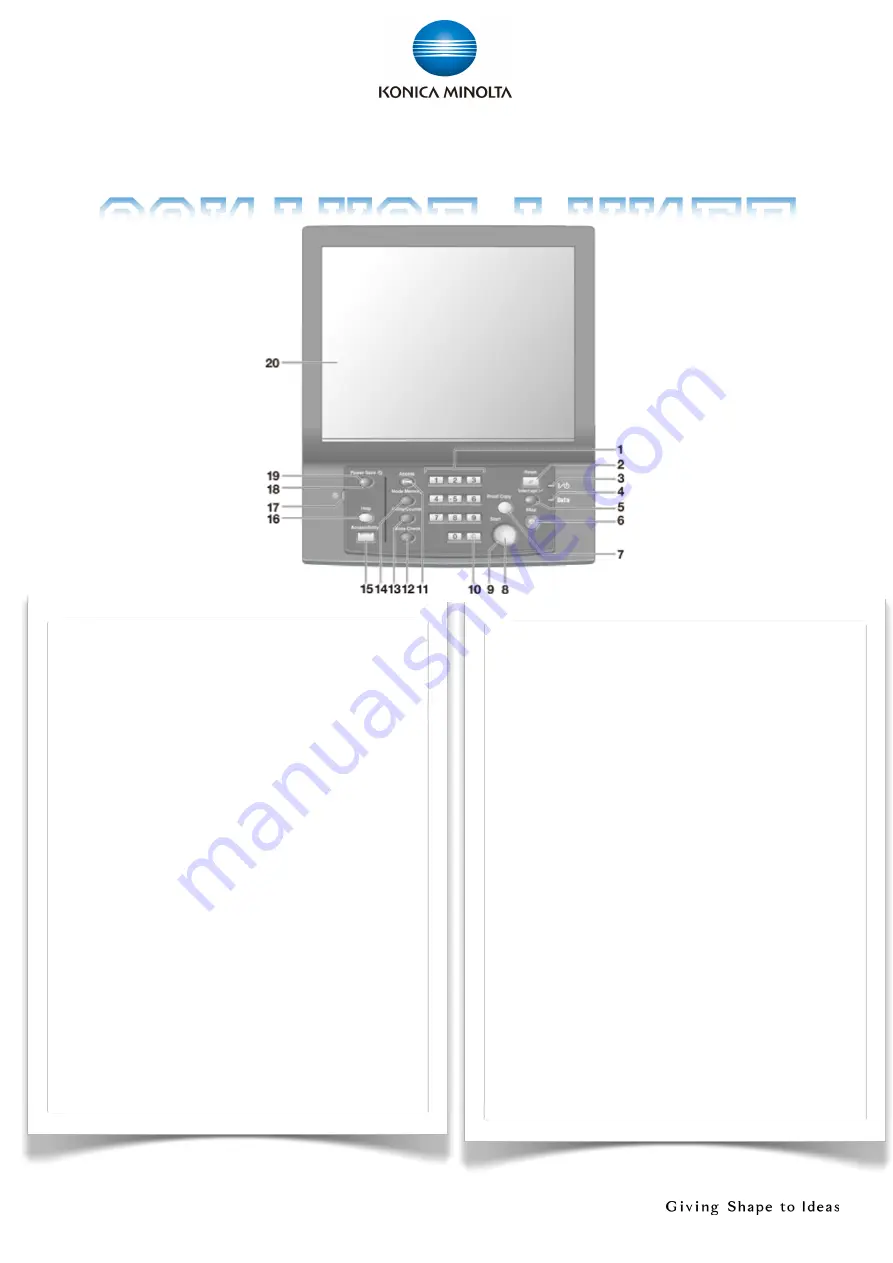
Control Panel

1. Keypad
2. Reset
3. Power  Led
4. Data  LED
5. Interrupt
6. Stop
7. Proof  Copy
8. Start
9. Start  LED
10.C  (Clear)
11.Access
12.Mode  Check
13.Utility/Counter
14.Mode  Memory
15.Accessibility
16.Help
17.Brightness  Adjustment  Dial
18.Power  Save
19.Power  Save  LED
20.Touch  Panel

1. 數字按鍵
2. 重設
3. 電源指示燈
4. 數據指示燈
5.

6. 停止
7. 校對複印
8. 開始
9. 開始指示燈
10.C(

除)

11.登入/登出
12.模式檢

13.設定/計數器
14.模式記憶
15.機身設定
16.求助說明
17.版面光暗調校
18.省電
19.省電指示燈
20.輕觸版面

Summary of Contents for AccurioPress 6120

Page 1: ...Education Newsletter Shortcut Manual For details operations please refer to full set manual https manuals konicaminolta eu AccurioPress 6136 6136P 6120 EN index html AccurioPress 6136...

Page 2: ...2 AccurioPress 6136...

Page 3: ...pt 6 Stop 7 Proof Copy 8 Start 9 Start LED 10 C Clear 11 Access 12 Mode Check 13 Utility Counter 14 Mode Memory 15 Accessibility 16 Help 17 Brightness Adjustment Dial 18 Power Save 19 Power Save LED 2...

Page 4: ...r Setting Specifies the paper conditions 6 Both Sides Adjustments for images printed on the front and back sides 7 Adjustment Adjust the main body and the optional equipment 8 Controller Configures th...

Page 5: ...ed jobs 4 Reserved Job Show and manage the printing suspended or reserved jobs 5 Spool Displays the status of spool jobs such as Receiving print job or Wait for RIP 6 Output Hist A listing of output h...

Page 6: ...er in the HDD root 3 Multi Sel Press before selecting multiple stored jobs 4 All Select Select all the stored jobs on the list 5 Delete Delete the file or folder 6 Recall Recall the stored job Screen...

Page 7: ...ion 2 Quality Adj Adjust copy quality 3 Zoom Specify the zoom ratio 4 Simplex Duplex Select the simplex duplex copy mode 5 Application Advanced copy function 6 Output Setting Change the Sorting Staple...

Page 8: ...8 1 Touch Quality Adj 2 Adjust the density is lightened or darkened 1 2 Copy Function Density c...

Page 9: ...9 1 Touch Zoom A Fixed Zoom Select fixed zoom size B Manual Zoom Input zoom value C Auto Zoom Touch Auto to zoom original image to specified paper in paper tray 1 A B C Copy Function Zoom...

Page 10: ...iii 2 1 or iv 2 2 1 i 1 1 ii 1 2 iii 2 1 iv 2 2 1 2 Single sided Original to Double sided Copy 2 1 Double sided Original to Single sided Copy 2 1 2 2 Double sided Original to Double sided Copy 2 2 Co...

Page 11: ...11 1 Touch Output Setting 2 Select Right Left or Top 1 2 Copy Function Bind Direction...

Page 12: ...12 1 Touch Copy 2 Touch Output Setting 3 Select Staple Optional accessories are required for this function 1 2 3 Copy Function Staple...

Page 13: ...13 1 Touch Copy 2 Touch Output Setting 3 Select Fold Staple or Multi Half Optional accessories are required for this function 1 2 3 Copy Function Half Fold Booklet...

Page 14: ...14 1 Touch Copy 2 Touch Output Setting 3 Touch Multi 3 Fold 4 Touch Outside Print or Inside Print Optional accessories are required for this function 1 2 3 4 Copy Function Tri Fold...

Page 15: ...15 1 Touch Copy 2 Touch Output Setting 3 Touch Punch Optional accessories are required for this function 1 2 3 Copy Function Punch Hole...

Page 16: ...16 1 Touch Output Setting 2 Select i Offset Sort ii Sort ii Offset Group iv Group 1 2 i ii iii iv Copy Function Sort Group Sort Group Offset...

Page 17: ...ith alphabet character 4 Option Setting Display Email option setting screen 5 Main Displays only addresses which were registered as Main address 6 Input Address Input scan destination 7 All Display al...

Page 18: ...tone and contrast 4 Zoom Adjust the zoom ratio 5 Color Select color mode 6 Scan Size Set the scanning size 7 Resolution Change resolution 8 Simple Duplex Select 1 sided or 2 sided scanning 9 File Type...

Page 19: ...19 1 Touch Machine 2 Touch Paper Setting 3 Select tray 4 Touch Change Set 1 2 3 4 Tray Setting Change Tray Setting Part1...

Page 20: ...weight 8 Colored Paper Specify whether or not the colored paper 9 Punch Specify whether or not the punched paper 10 Both Sides Adjust Correct misalignment between the front and back sides 11 Curl Adj...

Page 21: ...Machine 2 Touch Paper Setting 3 Select tray 4 Touch Change Set 5 Touch Paper Size 6 Touch Custom 7 Touch 1 to input width and 2 to input length 8 Touch OK 1 2 3 4 5 6 7 1 2 8 OK Tray Setting Custom S...

Page 22: ...amount in printing position of the back side to the front side 1 Touch Machine and Both Sides 2 Touch Scan Meas 3 Select Tray with A3 paper to print out a background sheet 4 Touch Output background s...

Page 23: ...side adjustment 9 Enter the necessary number of adjustment charts you can output 20 more of the adjustment charts 10 Press Start to print out the adjustment sheet 11 Touch Exit PrintMode 7 8 9 20 10...

Page 24: ...24 12 Touch Scan Adjustment Chart 13 Following the instructions on the screen to scan the adjustment sheets 12 13 Tray Setting Both Side Adjustment Scan Meas Adjustment Part3...

Page 25: ...de based on the image position of the front side 1 Touch Machine and Both Sides 2 Touch Gap 3 Select Tray 4 Touch Print Mode 5 Press Start to print out the test chart 6 Touch Exit PrintMode 1 2 3 4 5...

Page 26: ...nd the blue lines indicate the back side You can enter a value in 0 1mm increments For example when a scale is misaligned upward 1 5mm from the one on the front side as shown in the figure press in or...

Page 27: ...stment data by numeric keys 9 Press Adjustment Start to adjust 10 Press Start to print test chart and check the misalignment and repeat 7 10 until the front and back are aligned 8 a d 9 10 Start 7 10...

Page 28: ...h Exiting PrintMode to return normal screen 6 Touch Exit Utility bhkg_csmeter bhk konicaminolta hk 2565 2128 If Digital Doctor not installed please send the meter report monthly through email bhkg_csm...

Page 29: ...screen will show please add toner If not join Digital Doctor Service to order new toner please email bhkg_csorder bhk konicaminolta hk OR call 2565 2190 bhkg_csorder bhk konicaminolta hk 2565 2190 Ch...

Page 30: ...30 If the waste toner box is full Please replace waste toner box message will display Replacing Waste Toner Box 2 1 3 4 5...

Page 31: ...replacing staple cartridge message will display please follow on screen instructions to replace Replacing Staple Cartridge 1 Touch 2 Touch Consumable Scrap 3 Touch Add Stapler 4 Touch and to switch p...

Page 32: ...aper misfeed occurs in a copy job the machine displays the message Mishandled paper and misfeed area s on the screen Please touch Illustration and follow on screen instructions to remove paper Removin...

Page 33: ...33...

Page 34: ...34...

Page 35: ...35...

Page 36: ...hk Meter Reporting Fax 2565 2128 2856 2008 Email bhkg_csmeter bhk konicaminolta hk Toner Paper Ordering Fax 2565 2128 2856 2008 Email bhkg_csorder bhk konicaminolta hk Sales Enquiry Fax 2565 2111 Emai...

Reviews: