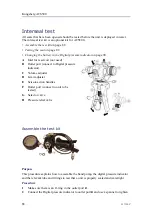
Purpose
This procedure shows how to set up the test system with HiPAP.
Procedure
1
Connect the transducer patch cable.
2
Lower the dunking transducer into water.
Caution
Make sure there are no obstacles between the dunking transducer and
the HiPAP transducer.
3
Operate the system from APOS via the HiPAP transducer using the same test
method as the
on page 70.
397128/C
73
Summary of Contents for ACS500
Page 1: ...INSTRUCTION MANUAL ACS500 Acoustic Control System Gisma testport system...
Page 2: ......
Page 15: ...ACS500 System with interface cables 397128 C 13...
Page 38: ...Kongsberg ACS500 ACU Computer buttons on page 37 User interface on page 38 36 397128 C...
Page 71: ...Simulation and test 397128 C 69...
Page 113: ...Drawing file Dunking transducer unit outline dimensions 397128 C 111...
Page 114: ...Kongsberg ACS500 Acoustic Command Unit outline dimensions 112 397128 C...
Page 115: ...Drawing file Subsea Control Unit outline dimensions 397128 C 113...
Page 116: ...Kongsberg ACS500 Subsea Control Unit arrangement 114 397128 C...
Page 117: ...Drawing file Subsea Control Unit bracket 397128 C 115...
Page 118: ...Kongsberg ACS500 TDR30V 34GT Subsea transducer outline dimensions 116 397128 C...
Page 119: ...Drawing file External quad battery unit for SCU outline dimensions 397128 C 117...
Page 120: ...Kongsberg ACS500 Simulator outline dimensions 118 397128 C...
Page 138: ...Kongsberg ACS500 Appendix A Type approval certificate 136 397128 C...
Page 139: ...Appendix A Type approval certificate 397128 C 137...
Page 140: ...Kongsberg ACS500 138 397128 C...
Page 141: ...Appendix A Type approval certificate 397128 C 139...
Page 142: ...Kongsberg ACS500 140 397128 C...
Page 148: ...2016 Kongsberg Maritime...


