

-5-
Fig.#13
13
Fig.#12
12
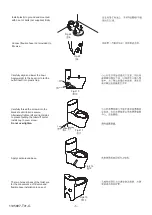
Apply caulk around base.
The two holes at back of the toilet are
for the convenience of fill valve and
flexible hose installation in case of
Carefully align and lower the bowl.
Apply weight to the bowl rim to let the
outlet insert into plastic trap.
Outlet
Plastic Trap
Fig.#10
10
Carefully thread the screws into the
brackets, until toilet is secure.
Alternately tighten left and right sides
to prevent pulling the toilet off center.
Install cap to cover screw.
Do not overtighten.
Cap
Screw
Bushing
Fig.#11
11
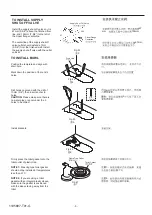
Fig.#8
8
Install plastic to ground and mounted
with 3 set of bolts (not supplied) firmly.
3
(
)
Fig.#9
9
Connect flexible hose (not provided) to
fill valve.
1195897-T01-G