background image

-2-

TOOLS AND MATERIALS REQUIRED
(Not supplied)

·

·

·

·

·

·

·

·

·

·

·

·

254mm (10") adjustable wrench
305mm (12") pipe wrench
Metal file (file cut)
Tape measure
Tubing cutter
Level
Hacksaw
Putty knife
Screwdriver
Toilet gasket (wax seal)
Toilet T-bolts (2), 8mm (5/16") diameter
Toilet supply shut-off valve, 10mm(3/8 ) recommended

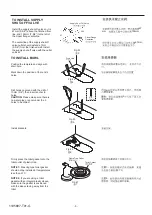
If the existing toilet does not have a supply shut-off

valve below the tank, install one before installing the new
toilet.

"

The 60cm flexible hose(1281283), stop valve and wax ring
are not supplied.

NOTICE:

·

·

·

·

·

·

·

·

·

·

·

·

254mm
305mm

8mm

T

2

10mm

60cm

(1281283)

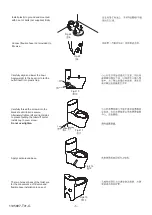
WARNING: Risk of personal injury or product
damage

WARNING: Risk of external leakage

: Handle vitreous china products very carefully.

Vitreous china can break and chip if you overtighten
bolts and nuts.

. The fill valve

nut has been factory-tightened to design specifications.
If re-tightening is required, wrench tighten one turn
past finger tight .

NOTES

·

·

·

·

·

·

·

·

·

·

·

Observe all local plumbing and building codes.
Shut off the water supply.
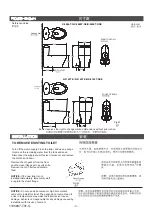
Seat post holes are on 140mm (5-1/2") centers.
51mm (2") passageway.
Water depth from the rim is 160mm.
Ensure that the new drain has the correct roughing-in
dimension. This toilet has a 305/400mm roughing-in
dimension.

.

The flexible hose must be no less than 450mm.
Closet flange must be 305

mm on-center from wall.

Carefully inspect the new fixture for any sign of damage.
For new construction, refer to the dimensions in

for locating the shut-off valve.

This product complies with GB25502-2017. Water
Efficiency Grade 1.

See Fig. #1

Fig. #1

and Fig. #3

/400

·

Fixture dimensions are nominal and conform to tolerances
established by ASME Standards (A112.19.2-2013).

·

·

·

·

·

·

·

·

·

·

·

140mm

51mm

160mm

305/400mm(

1)

450mm

305

mm

1

3

GB25502-2017

1

/400

·

·

ASME

(A112.19.2-

2013)

1195897-T01-G

Summary of Contents for AERODYNE K-3869T-S

Page 1: ...NE 3 3 4 8L CLASS FIVE 1 PC Toilet 305mm K 3869T S Includes Quiet Close Toilet Seat K 4141T 2P AERODYNE 3 3 4 8L CLASS FIVE 1 PC Toilet 400mm K 4165T S Includes Quiet Close Toilet Seat K 4141T 2P AERODYNE 3 3 4 8L CLASS FIVE 1 PC Toilet 305mm K 3869T SE Includes Quiet Close Toilet Seat K 4141T 2P AERODYNE 3 3 4 8L CLASS FIVE 1 PC Toilet 400mm K 4165T SE Includes Quiet Close Toilet Seat K 4141T 2P ...

Page 2: ...ut has been factory tightened to design specifications If re tightening is required wrench tighten one turn past finger tight NOTES Observe all local plumbing and building codes Shut off the water supply Seat post holes are on 140mm 5 1 2 centers 51mm 2 passageway Water depth from the rim is 160mm Ensure that the new drain has the correct roughing in dimension This toilet has a 305 400mm roughing ...

Page 3: ...sponsible for any damage caused by installation with the use of cement Closet Flange TO REMOVE EXISTING TOILET Turn off the water supply Flush the toilet and use a sponge to remove the remaining water from the tank and bowl Disconnect the supply shut off valve if present and remove the old tank and bowl INSTALLATION Kohler reserves the right to change marked dimensions without prior notice Fig 1 1...

Page 4: ...own the position of foot and 5 holes Drain Hole Fig 5 5 3 8 10mm 10mm 5 Drill holes on ground with the drill of 10mm 3 8 then insert anchor to holes CAUTION Please make sure there is no water pipe or spool under the 5 holes to be drilled mm 67mm 67 mm 194 Fig 3 3 TO INSTALL SUPPLY SHUT OFF VALVE Install the supply shut off valve so it is 67mm 2 5 8 above the finished floor line and 194mm 7 5 8 to ...

Page 5: ...let insert into plastic trap Outlet Plastic Trap Fig 10 10 Carefully thread the screws into the brackets until toilet is secure Alternately tighten left and right sides to prevent pulling the toilet off center Install cap to cover screw Do not overtighten Cap Screw Bushing Fig 11 11 Fig 8 8 Install plastic to ground and mounted with 3 set of bolts not supplied firmly 3 Fig 9 9 Connect flexible hos...

Page 6: ...gid connection must be fit with supply line completely to prevent damage shank by forced connection Supply Shank Supply Shut Off Valve Fig 14 14 IMPORTANT Make certain the top is turned to the locked position Valve may not turn on if top is not fully in the locked position Before turning on the supply valve for the first time follow the steps below to clear sand debris and rust from the system Mak...

Page 7: ...ows 7 Toilet does not activate A Reconnect the push button A Push button is not connected to lift rod or flush valve 2 Fill valve continues to run allowing water to enter tank 3 Incorrect water level height A Foreign particles lodged under the float valve seal located under fill valve cap B Fill valve seal located under float valve cap may be cracked or split C Water leaking past flush ball D Flap...

Page 8: ... cleaners or solvents Do not use in tank cleaners Products containing chlorine calcium hypochlorite can seriously damage fittings in the tank This damage can cause leakage and property damage Kohler Company shall not be responsible or liable for any damage to these tank fittings caused by the use of cleaners containing chlorine calcium hypochlorite WARNING Risk of property or product damage 0 C o ...

Reviews: