background image

4 - 4

A-41069     August 1995

Feeding thick documents

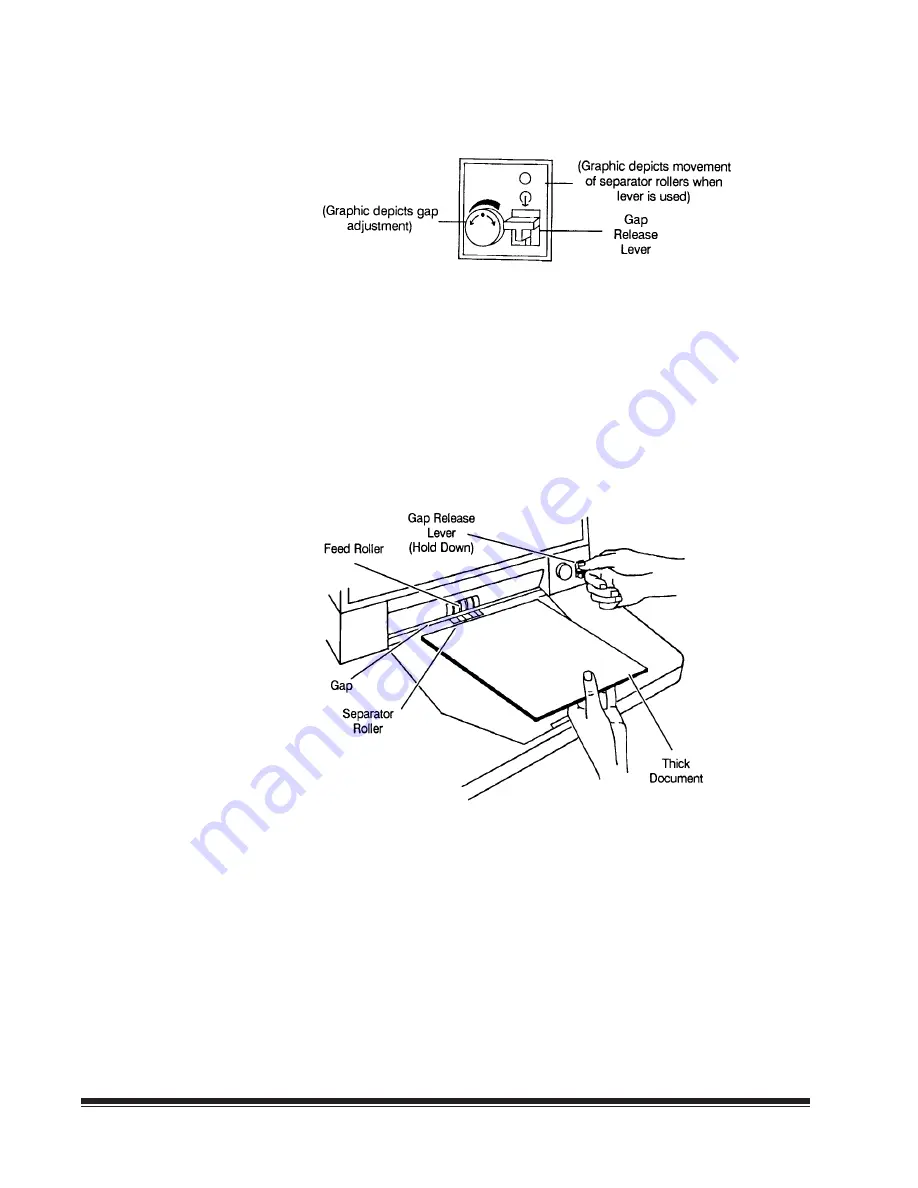
The Gap Release Lever is used to feed thick documents such as card
stock or cover stock.  The lever is located on the front panel of the
Scanner, next to the gap adjustment knob.

1.

Press down and hold the gap release lever.  This opens the gap
between the feed and separator rollers, allowing thick documents to
pass between them.  You will be able to see the gap open as the
lever is pushed down.

2.

Insert the thick document past the rollers until it is taken into the
transport system.

NOTE: If more than one thick document is to be scanned,

feed them into the transport one at a time.

3.

After the thick document(s) have been scanned, release the gap
release lever.  It will return to its original position.  The feed and
separator rollers will return to their previously adjusted positions.

Summary of Contents for IMAGELINK 900

Page 1: ...User s Manual A 41069 Part No 636914 January 1993 BUSINESS IMAGING SYSTEMS KODAK IMAGELINK Scanner 900 and 923 MDRS...

Page 2: ...fset indexing 2 14 Controlling document level changes 2 16 Batching 2 17 Special considerations 2 17 Checking the meters 2 17 Scanning considerations 2 18 Image headers 2 18 Header flags 2 18 3 Gettin...

Page 3: ...ntenance procedures 8 2 Cleaning the imaging guides 8 2 Weekly maintenance procedures 8 4 Vacuuming inside the Scanner 8 4 Cleaning the cabinet 8 6 Cleaning the feed and separator rollers 8 7 Monthly...

Page 4: ...o 20 in 508 mm long and from 2 5 in 64 mm to 12 in 305 mm wide and thicknesses standard documents up to 0 014 inches 0 36 mm even thicker documents may be scanned using the gap release feature Scanner...

Page 5: ...cument level control An endorser for stamping information on documents A choice of ink jet printers for printing information on documents Large and small print fonts available for Document Printer 12...

Page 6: ...eeding of documents of various sizes and textures Feed Tray holds documents prior to feeding Gap Adjustment Knob allows you to manually adjust the space between the feed and separator rollers for docu...

Page 7: ...onfiguring the Scanner and for running diagnostics Computer Interface 2 COIN2 OCR Command Bar Code Interface Used for transferring commands between the Scanner and external devices subsystems Computer...

Page 8: ...cator 0030 05 100 001 MODE 5 Please Wait Operator Message Image Address Mode Name Number Two Line Status Display Scan Mode Simplex Duplex Indicators one sided front two sided front and rear Document L...

Page 9: ...in the Image Address Fixed Field Used to increment values at a slower rate Also used to display additional messages in the Status Display a blinking cursor appears over the arrow in the display as an...

Page 10: ...batch or job to alert the host computer that the batch or job has ended Used to perform specific functions The P Keys have default values any or all of the defaults may be overridden reprogrammed at i...

Page 11: ...of the available functions when used with the numeric keys Used to insert a field separator in an Image Address Used to identify the next document fed into the Scanner as a Level 1 document Used to i...

Page 12: ...clear an operator message from the Status Display Used to turn on the feeder and transport system Allows operator to enter the next document Image Address Used to stop the feeder and transport system...

Page 13: ...ing installation may be overridden using function codes The overrides are temporary unless during installation it is specified that the mode overrides be saved Upon execution of a function which overr...

Page 14: ...three level The Image Address Level 3 field length is two 2 characters the Image Address Level 2 field length is two 2 characters the Image Address Level 1 field length is five 5 characters The Level...

Page 15: ...t Level 1 Its value is incremented whenever a document is assigned Level 1 Field B A numeric field representing document Level 2 Its value is incremented whenever a document is assigned Level 2 Field...

Page 16: ...the changes to the Image Address and return to a normal operating display To set or change the Image Address Fixed Field enter Function Code F92 The number of characters in the Image Address Fixed Fi...

Page 17: ...Only the letter D will appear in the display with the entry cursor appearing in the next character position Press the up or down arrow key to enter alpha entry mode Make sure that the letter E is disp...

Page 18: ...ng zeros format 004 3 2 1 Compress leading zeros format 004 3 2 1 NOTE The format chosen does not affect the Fixed Field of the Image Address it is always displayed and printed in its entirety The pur...

Page 19: ...e that the book has fifty 50 pages The Image Address has been defined Field A has a field length of three 3 characters Field B has zero 0 characters Field C has zero 0 characters Fixed Field has zero...

Page 20: ...Field C Level 3 is defined as having a field length of zero Fixed Field may be defined if desired Let s use the scanning of a book as an example Assume that the book contains two chapters Chapter 1 ha...

Page 21: ...r 1 is assigned Image Address 01 000 The first page of Chapter 1 is assigned Image Address 01 001 The second page of Chapter 1 is assigned Image Address 01 002 and so on through the remainder of Chapt...

Page 22: ...el 3 is defined as having a field length of zero Fixed Field may be defined if desired Let s use the scanning of a book as an example Assume that the book contains two chapters Chapter 1 has forty 40...

Page 23: ...ter 1 is assigned Image Address 01 The remaining pages of Chapter 1 are also assigned Image Address 01 The header page for Chapter 2 is assigned Image Address 02 The remaining pages of Chapter 2 are a...

Page 24: ...ld length greater than zero Fixed Field may be defined if desired Let s use the scanning of a book as an example Assume that the book contains two sections Section One contains two chapters each havin...

Page 25: ...Image Address es 1 01 001 through 1 01 040 The header page for Chapter 2 of the section is assigned Image Address 1 02 000 The pages within the Chapter are assigned Image Address es 1 02 001 through 1...

Page 26: ...having a field length greater than zero Fixed Field may be defined if desired Let s use the scanning of a book as an example Assume that the book contains two distinct sections Section One contains tw...

Page 27: ...signed Image Address 1 02 The remaining pages of Chapter 2 are also assigned Image Address 1 02 The header page for Section 2 is assigned Image Address 2 00 The header page for Chapter 1 of the sectio...

Page 28: ...el will be set automatically based upon the Level Rules i e Level 2 is followed by Level 1 etc defined during installation for each mode The following diagram illustrates how document levels are set o...

Page 29: ...The topics presented in this section apply to the general usage of the Scanner Checking the meters is useful in determining maintenance schedules the length of time required to complete a job To view...

Page 30: ...e document images most often using the Image Address or bar code information stored in the header Header flags are used to alert the host system that the document s fed into the transport are of speci...

Page 31: ...steps are required to power on the Scanner 1 Turn on the Main Power Switch located at the rear of the machine NOTE It is not necessary to turn off the Main Power Switch during normal daily operation 2...

Page 32: ...nd color of the documents to be scanned If you are scanning a variety of colored documents use a white calibration target Wider than the documents you are going to scan i e to scan 8 5 x 11 inch 215 9...

Page 33: ...that there is not a document already in the document path Refer to Troubleshooting Clearing the document path Clean the Imaging Guides Refer to Maintenance Cleaning the imaging guides Calibrate the S...

Page 34: ...ome coated documents photographic paper plastic coated paper If the gap is not adjusted properly More than one document at a time may be drawn into the transport system at the same time not all of the...

Page 35: ...cuments separate repeat the following steps until the documents do not separate a Turn the Gap Adjustment Knob clockwise one half 1 2 turn b Insert the documents again If the documents do not separate...

Page 36: ...ed 100 documents twice through the transport system Verify that the final count reflects the total number of documents that were fed and that the counter shows the same amount each time the documents...

Page 37: ...feed shelf Swing the height adjustment legs out and insert them into the groove on the work shelf To hand feed documents one at a time the feed shelf should be in the down position not shown To lower...

Page 38: ...Shelf Label is visible Center line 2 Center the documents across the feed shelf label Adjust the feeder side guides dependent upon the width of the document Leave approximately 0 0625 1 16 inch 2 mm...

Page 39: ...be stacked properly after processing 1 Adjust the Side Guides on the Exit Hopper to match the adjustment of the Side Guides on the Feed Shelf 2 Adjust the End Stop of the Exit Hopper by determining t...

Page 40: ...and enter the exit hopper Use the short deflector for documents less than 5 inches 13 cm and the long deflector for documents longer than 5 inches 13 cm as well as for mixed sizes 1 Grasp the deflect...

Page 41: ...anner easily Remove any staples rubber bands loose mending tape or paper clips from the documents to be processed Straighten wrinkled edges and tape any torn documents Trim ragged edges When using the...

Page 42: ...r for digital image storage the document Image Level and Image Address The document is scanned The document Image Header is created The host computer initiates transfer of the document Image Header an...

Page 43: ...ffect the output of the Scanner Each mode is programmed to conform to the output requirements of a particular application or group of applications There may be instances however when a particular appl...

Page 44: ...the stack of documents so that the leading edge of the top document will engage the feed separator rollers first refer to the illustration above 5 Place the stack of fanned documents into the feeder...

Page 45: ...arator rollers allowing thick documents to pass between them You will be able to see the gap open as the lever is pushed down 2 Insert the thick document past the rollers until it is taken into the tr...

Page 46: ...n ON or Press the number zero 0 key to turn the option OFF Press the Enter key If the function requires numeric input Press the number key s required Press the Enter key If the function is used to inc...

Page 47: ...e F15 Change Date F22 Change Time F21 Display Contrast F18 Display Language F19 Measurement System F20 Operator ID F34 Scanner Calibration F37 Mode Select Mode F01 Select Linked Mode F91 Counting Only...

Page 48: ...Printer 1 On Off F41 Secondary Document Printer 1 On Off F42 Document Printer 12 On Off F43 Omit Printing on Next Document F44 Print Position F46 Print Test F45 Printer Character Shift F39 Printer Ope...

Page 49: ...rrent application mode to its default status as it was defined at installation provided that mode overrides are not saved FFF 003 002 001 Mode 10 A normal operating display will appear F04 Counting On...

Page 50: ...a normal operating display The accessories appear in the order listed Endorser Endorser Mode Document Printer 1 Document Printer 2 Document Printer 12 Patch Reader 1 Patch Reader 2 End Fed Patches Pat...

Page 51: ...Total Document Count Allows you to display the total number of documents processed FFF 003 002 001 Mode 10 Total Document Count 123456789 Press the Clear key to return to a normal operating display F...

Page 52: ...001 Mode 10 Level 3 Count 123456789 Press the Clear key to return to a normal operating display F14 Reset Level Counts Allows you to reset all counters to zero Level 0 Counter Level 1 Counter Level 2...

Page 53: ...able document count is displayed FFF 003 002 001 Mode 10 Meter A 10 Press the right arrow key to view all four time meters Meter A shows the number of motor on hours Meter B shows the number of transp...

Page 54: ...stem Allows you to choose the measurement system in which lengths are displayed There are two available options ENGLISH or METRIC FFF 003 002 001 Mode 10 Measurement Units Displayed ENGLISH Press any...

Page 55: ...allows you to change the operator ID number FFF 003 002 001 Mode 10 Operator ID 0 01 Enter a new operator ID up to three 3 digits Press the Enter key F37 Scanner Calibration Allows you to initiate th...

Page 56: ...jets or Enter the number 2 to select the center set of ink jets or Enter the number 3 to select the right set of ink jets Press the Enter key F40 All Document Printers On Off Allows you to turn all do...

Page 57: ...ment Printer 1 OFF 1 ON Enter the number one 1 to turn the primary document printer 1 ON Press the Enter key F42 Secondary Document Printer 1 On Off Allows you to turn the secondary document printer 1...

Page 58: ...he document printer 12 ON Press the Enter key F44 Omit Printing on Next Document Allows you to omit printing by all document printers Document Printer 1 primary Document Printer 1 secondary and Docume...

Page 59: ...far from the leading edge of the document fed into the transport first all document printers Document Printer 1 primary Document Printer 1 secondary and Document Printer 12 will print information The...

Page 60: ...lows you to specify how often in terms of the number of documents fed into the transport a priming ink spurt is initiated FFF 003 002 001 Mode 10 Purge Frequency Enter the number of documents the maxi...

Page 61: ...001 Mode 10 Patch Reader 2 OFF 1 ON Enter the number one 1 to turn the secondary patch reader ON Press the Enter key F52 End Fed Patch Reading On Off Allows you to turn end fed patch reading on or of...

Page 62: ...ument Allows you to omit patch reading on the next document only FFF 003 002 001 Mode 10 Omit Patch Read on Next Doc OFF 1 ON Enter the number one 1 to omit patch reading on the next document only Pre...

Page 63: ...1 ON Enter the number one 1 to turn the endorser ON Press the Enter key F58 Endorser Mode Allows you to display the current endorser mode Also allows you to change the endorser mode There are two avai...

Page 64: ...to decrement the starting print position by one 1 inch 25 mm or Press the right arrow key to increment the starting print position by one eigth 0 125 inch 3 mm or Press the left arrow key to decremen...

Page 65: ...Press the Enter key FFF 003 002 001 Mode 10 Bar Patch Confirmation Tone OFF 1 ON Enter the number one 1 to turn the bar code patch reading confirmation tone ON Press the Enter key F63 Bar Code Reading...

Page 66: ...0 Omit Bar Code Read on Next Doc ON 0 OFF Enter the number zero 0 to read bar codes on the next document Press the Enter key F65 Bar Code Test Allows you to perform a bar code test to verify the opera...

Page 67: ...al bar code reading ON Press the Enter key FFF 003 002 001 Mode 10 Partial Bar Code Reading ON 0 OFF Enter the number zero 0 to turn partial bar code reading OFF Press the Enter key F70 Length Checkin...

Page 68: ...s the Enter key FFF 003 002 001 Mode 10 Omit Length Checking on Next Doc ON 0 OFF Enter the number zero 0 to perform length checking on the next document Press the Enter key F72 Skew Detection NOTE Th...

Page 69: ...he status display until the latched flag is turned off FFF 003 002 001 Mode 10 User Definable Flag ON 0 OFF Enter the number zero 0 to turn the latched scanning flag OFF Press the Enter key F74 Moment...

Page 70: ...confirmation tone OFF Press the Enter key FFF 003 002 001 Mode 10 Foot Switch Confirmation Tone OFF 1 ON Enter the number one 1 to turn the footswitch confirmation tone ON Press the Enter key F76 OCR...

Page 71: ...de you wish to select one or two digits Press the Enter key F92 Fixed Field Allows you to enter a new fixed field value containing alphanumeric characters For each character You may enter a numeric ch...

Page 72: ...e two available options Press the Enter key F94 Level 1 Allows you to assign Level 1 to the next document fed into the transport FFF 003 002 001 Mode 10 A normal operating display will appear F95 Leve...

Page 73: ...1 Mode 10 Next Image Address F FF 003 002 001 Enter the next Image Address Press the Enter key F98 Stop Allows you to stop the transport FFF 003 002 001 Mode 10 A normal operating display will appear...

Page 74: ...you should be contacted by the operator The following action s should be taken Determine whether or not the error can be addressed from the hosT system If the error cannot be addressed from the host s...

Page 75: ...owed Refeed the document E107 Warning skewed document Refeed the document E110 Upper lamp warning press RUN Press the Run key to continue Change the lamps when the current set of documents has been pr...

Page 76: ...ted E127 Feeder waiting for host system System is busy No action required Wait for message to clear E128 Feeder adjustment warning Check and adjust feed and separator roller gap E130 OCR not installed...

Page 77: ...EXT key to enter correct Image Address E214 Document length error refeed Press the Clear key Use the NEXT key to enter the correct Image Address and refeed document s E219 Clear error and refeed last...

Page 78: ...alid The P Key End of Batch etc definition made during installation is invalid Correct the definition using the Mode Setup Software E240 Enter correct level of IA refeed Set or change the document ima...

Page 79: ...machine has been disabled due to an error Determine the cause of the error via the host system Enable the machine Press the Run key to continue E293 Host recovery required Contact your System Administ...

Page 80: ...E503 E512 E513 E550 E551 E552 E553 E562 E563 E504 Display communications error Press the Jog key to clear all documents E505 from the transport E506 Press the Run key and refeed the document s E507 E5...

Page 81: ...10 seconds Turn the main power switch on Turn the side panel switch on If the error repeats or if additional errors are received call service E800 various messages Turn the side panel switch off thro...

Page 82: ...ed shelf position The feed shelf side guides not Refer to Section 3 Adjust the properly adjusted feed shelf side guides Exit hopper side guides not properly Refer to Section 3 Adjust the adjusted exit...

Page 83: ...er to Section 3 Perform performed correctly calibration using instructions provided Lamps are dirty or not properly Refer to Section 8 Check the installed lamps for proper installation Check for dirt...

Page 84: ...removed from documents Imaging guides are not seated properly or are not installed Transport system baffle plates are not firmly closed The document path can be cleared easily because No tools are ne...

Page 85: ...d and all baffle plates are locked into place Press and hold down the JOG key to clear any remaining documents Collect the documents located in the transport system Put them back into their original o...

Page 86: ...roller cover toward the back of the machine 4 Press down and hold the gap release lever 5 Remove any documents or document pieces found between the rollers 6 Press the roller cover release lever towar...

Page 87: ...e upper imaging guide 3 Locate and remove the upper lamp housing assembly 4 Remove any documents or document pieces 5 Reinsert the upper lamp housing assembly 6 Reinsert the upper imaging guide 7 Clos...

Page 88: ...the machine 5 Remove any documents or document pieces IMPORTANT Do not slide the lower roller assembly back into place without first removing the image guides Failure to remove them first can cause m...

Page 89: ...unlatch the baffle plate Pull the baffle plate to the right until it stops 4 Remove any documents or document pieces 5 Turn the baffle handle to release the baffle plate Raise the plate into its orig...

Page 90: ...r 2 Locate and grasp the upper turn handle 3 Push the upper turn handle down and pull the baffle toward the back of the machine until it stops 4 Remove any documents or document pieces 5 Pull the baff...

Page 91: ...panel switch 2 Open the top cover 3 Locate and grasp the exit handle 4 Raise the exit baffle to expose any documents 5 Remove any documents or document pieces IMPORTANT Be careful not to damage the st...

Page 92: ...nner Cleaning the feed and separator rollers Cleaning the cabinet Replacing the air filter Replacing the Document Scanning Array lamp if installed Replacing the exposure lamps Materials needed to perf...

Page 93: ...ly or between each roll of film whichever comes first IMPORTANT Do not use any abrasive materials when cleaning the imaging guides This includes abrasive cleansers commercial solvents paper towels or...

Page 94: ...lamp housing assembly using a soft bristle brush 8 Reinstall the upper lamp housing assembly Repeat steps 6 8 for the lower lamp housing assembly 9 Grasp and hold the lower imaging guide by the edges...

Page 95: ...ry which is available only when using a Scanner 923 If your Scanner does not have a DSA proceed to the next section The Document Scanning Array DSA should be cleaned daily 1 Turn the side panel switch...

Page 96: ...he DSA window lens and transport window Use a clean dry lint free cloth 9 Lift the DSA assembly straight up from the transport area 10 Rotate the DSA assembly toward you The mounting brackets should b...

Page 97: ...eek Refer to the instructions and illustrations provided in the Troubleshooting section to assist in accessing the sensor locations The following illustrations show the location of the sensors once th...

Page 98: ...the lower roller assembly back into place without first removing the imaging guides Failure to remove them first can cause misalignment and or damage to the machine 5 Remove the imaging guides 6 Repl...

Page 99: ...Replace the lower lamp housing Repeat steps 4 through 8 for the upper lamp housing 5 Close the right side access door The exposure lamp housings Lower Lamp Housing Upper Lamp Housing The air filter T...

Page 100: ...achine 3 Grasp and rotate the roller cover toward the back of the machine exposing the feed and separator rollers 4 Clean the feed and separator rollers with a clean lint free cloth slightly dampened...

Page 101: ...1993 Cleaning the cabinet Clean the exterior of the Scanner the feed shelf and the hopper area with a soft cloth Remove any fingerprints stains or stubborn dirt with a cloth dampened with water or a...

Page 102: ...g the air filter The air filter should be checked at least once a month and changed as needed 1 Remove the air filter cover by pressing in on the top of the cover to release the catch 2 Examine the fi...

Page 103: ...ner without an air filter installed The imaging apparatus will quickly become contaminated with dust and dirt impairing image quality 1 Remove the air filter cover by pressing in on the top of the cov...

Page 104: ...ate the release handles outward to release the DSA assembly NOTE The Document Scanning Array is an optional accessory which is available only when using a Scanner 923 If your Scanner does not have a D...

Page 105: ...DSA assembly down using the mounting brackets for support 8 Grasp the quarter turn screws and turn each counterclockwise one quarter turn to loosen the DSA window panel 9 Remove the DSA window panel...

Page 106: ...ow panel turning the quarter turn screws clockwise one quarter turn to secure the panel 16 Lift the DSA assembly straight up from the transport area 17 Rotate the DSA assembly toward you The mounting...

Page 107: ...ve the image quality or when requested to do so via an operator message Always replace both lamps in a housing at the same time or exposures may appear inconsistent Always use the recommended lamps or...

Page 108: ...p housing Insert the opposite end of the lamp into the other socket WARNING The exposure lamps are fragile Never apply pressure to the center of the lamp press down only on the ends of the lamp Gently...

Page 109: ...mit on next document function code 5 21 on off function code 5 19 partial 1 2 function code 5 22 patch reading confirmation tone function code 5 20 test function code 5 21 Basic concepts 2 1 Batching...

Page 110: ...ion code 5 8 Enabling disabling an option 5 1 Enabling the Scanner 4 1 End fed patch reading on off function code 5 16 End stop exit hopper 3 1 3 9 End fed patches 1 2 Endorser 1 2 function codes 5 3...

Page 111: ...guide area 7 3 7 6 8 2 8 16 clearing 7 3 7 6 7 7 Imaging guides 7 3 7 6 7 7 8 1 8 7 8 16 cleaning 8 2 Index format 2 1 Index Image address function codes 5 2 Indexing schemes 2 6 Indicators 1 5 applic...

Page 112: ...ing on next document function code 5 21 Omit length checking on next document function code 5 23 Omit patch reading on next document function code 5 17 Omit printing on next document function code 5 1...

Page 113: ...12 Select mode function code 4 2 5 4 linked 5 26 Selecting a mode 4 2 the language display 3 1 Separator roller 1 3 3 1 3 4 8 1 8 9 Sequential ID number 2 18 4 1 Setup function codes 5 2 Side guides...

Page 114: ...ration 3 3 Up arrow key 1 6 2 4 2 5 5 1 Upper imaging guide 7 3 7 6 7 7 8 1 8 7 8 16 cleaning 8 2 lamp housing 8 8 8 16 8 17 turn area 7 3 7 9 turn handle 7 9 Users 6 1 Using function codes 5 1 V Vacu...

Reviews: