ENGLISH
2.6. ADJUST THE HANDLE
Make sure all the belts position is right and they have not become twisted. Also check that the cover is not impeding the movement or fit of the belt
webbing in any way.
To release your baby car seat following the above instructions in reverse order.
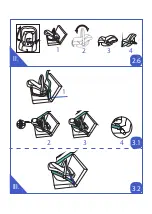
The handle for the baby car seat can be snapped into 4 stable positions. To adjust the handle, please press the red buttons of the handle on both side at
the same time. Now it can be rotated.
Position 1. Rearward facing installed in the car. This position (only this position) is suitable for the baby car seat installed on the vehicle seat.
Position 2. Straight up for carrying.
Position 3. Handle clicked back to initiate the rocking feature.
Position 4 Down to support baby for feeding and play. Ensure that the handle is locked in a position , the harness is correctly fitted and the buckle
fastened before carrying your car seat.
III. FITTING THE CHILD RESTRAINT
Please read the operating handbook in your vehicle to inform your self about the basics concerning children 's seats in vehicles.
DO NOT PLACE THIS BABY SEAT ON SEATS WITH FRONT AIRBAGS. THIS BABY CAR SEAT CAN ONLY BE INSTALLED USING A THREE-POINT VEHICLE BELT.
THE BABY CAR SEAT MUST BE INSTALLED REARWARD FACING(IN THE DIRECTION OPPOSITE THE ONE IN WHICH YOU ARE TRAVELING).
3.1. FITTING THE CHILD RESTRAINT WITH BASE IN USE
1. Put the car seat on the vehicle seat. Slide the lap belt of the vehicle's 3-point seat belt through both lap belt guides. Let the tongue plate snap in the
belt lock with a clearly audible “click”. Pull the shoulder belt in narrow direction to tighten the lap belt. Check to make sure the tongue plate is locked by
pulling on the belt. Figure 1
2. Put the diagonal belt through the guide hook behind the child seat. Figure 2
3. Tighten the vehicle's 3-point seat belt by pulling hard on the positions showed in Figure 3.
4. The satisfactory position of the adult safety-belt buckle car seat relative to the child restraints is as the Figure 4. You can contact the child car seat
manufacturer if in doubt about this point.
3.2. MAIN LOADING POINT
Be sure the distance between main loading and Cr must be more than 150 mm. Please contact the child restraint manufacturer if in doubt about
this point. Figure5
CLEANING AND MAINTENANCE
REMOVE THE COVER
1. Release the harness, open the buckle. 2. Pull out the buckle tongues and the harness straps from the slots of the harness. 3. Take off the buckle.
4. Take off the comfort pad and headrest pad. 5. Take off the cover.
1. In the daily using, you need to check the wear and tear situation of the child seat.
2. The child seat should be kept in a dry, ventilated and cool place when it is not used.
3. If the child seat is dirty, you can use the wet sponge to clean the Y-shaped straps, buckle or cover.
4. Washing instructions are listed as below:
• Simply blot the desired area with a mild soap solution using a damp sponge and cool water, if necessary can be hand washed.
• Clean up your car seat shell with mild solution soap and cool water. Never use„household detergents": they can weaken plastic.
• Harness straps are only surface washable with mild soap and damp cloth.
• Don't use machine washing.
• Don't use hot water to wash.
Summary of Contents for ALVI/ VIVO
Page 2: ...1 2 3 4 5 6 7 8 9 10 11 12 13 I...
Page 3: ...II 2 1 2 2 A B C...
Page 4: ...1 II 2 3 2 4 2 5 1 2 3...
Page 5: ...3 3 4 4 1 1 II III 3 1 3 2 2 6 2 2...
Page 8: ...I 1 2 3 4 5 6 7 8 9 10 11 12 13 II 2 1 3 16 ECE 2 2 2 3 2 4 5 5 2 5 1cm...
Page 9: ...2 6 4 1 2 3 4 III 3 1 1 3 1 2 2 3 3 3 4 4 3 2 Cr 150mm 5 1 2 3 4 5 1 2 3 Y 4...
Page 24: ...SRPSKI I 1 2 3 4 5 6 7 8 9 10 11 12 13 II 2 1 16 2 2 2 3 2 4 5 5 2 5 1...
Page 25: ...SRPSKI 2 6 4 1 2 3 4 3 1 1 1 2 2 3 3 3 4 4 3 2 150 5 1 2 3 4 5 1 2 3 4...
Page 26: ...I 1 2 3 4 5 6 7 8 9 10 11 12 13 II 2 1 3 ECE 16 2 2 2 3 2 4 5 5 2 5 1 Ird...
Page 27: ...2 6 NOT 4 1 2 3 4 III A UST 3 1 1 3 1 2 2 3 3 3 4 4 3 2 Cr 150mm Firura5 1 2 3 4 5 1 2 3 Y 4...
Page 28: ...I 1 2 3 4 5 6 7 8 9 10 11 12 13 II 2 1 3 16 2 2 2 3 2 4 5 5 2 5 1...
Page 29: ...2 6 4 1 2 3 4 III 3 1 1 1 2 2 3 3 3 4 4 3 2 Cr 150 Firura5 1 2 3 4 5 1 2 3 Y 4...
Page 30: ...UA I 1 2 3 4 5 6 7 8 9 10 11 12 13 II 2 1 3 16 2 2 2 3 2 4 5 5 2 5 1...
Page 31: ...UA 2 6 4 1 2 3 4 3 1 1 3 1 2 2 3 3 3 4 4 3 2 Cr 150 5 1 2 3 4 5 1 2 3 4...
Page 40: ...1 2 3 4 5 6 7 8 9 10 11 12 13 2 1 3 16 2 2 2 3 2 4 BUCKLE 5 5 2 5 1cm...
Page 41: ...2 6 4 1 2 3 4 III 3 1 1 3 1 2 2 3 3 3 4 4 3 2 Cr 150mm 5 1 2 3 4 5 1 2 3 4...
Page 44: ...AR...
Page 45: ...AR...


