INSTALLATION
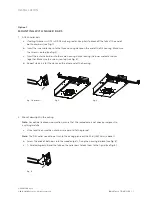
fig. 12
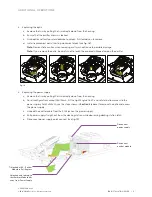
fig. 13
2. Applying trim to flanged downlight
If your ceiling’s substrate is thicker than 0.625–1 in (15.875–25.4 mm), adjust the springs on either side
of your trim:
a. Using a #1 screwdriver, loosen the screw holding the spring in place.
b. Raise the spring as high (as far from the bottom of the trim) as it will go.
c. Re-tighten the screw (see
fig. 12
).
REVISIONS
REV.
ECO
DESCRIPTION
DATE
APPROVED
01
INITIAL RELEASE
D
C
B
A
A
B
C
D
1
2
3
4
5
6
7
8
8
7
6
5
4
3
2
1
THE INFORMATION CONTAINED IN THIS
DRAWING IS THE SOLE PROPERTY OF
KETRA, INC. ANY REPRODUCTION
IN PART OR AS A WHOLE WITHOUT THE
WRITTEN PERMISSION OF KETRA, INC.
IS PROHIBITED.
DIMENSIONS ARE IN MILLIMETERS
INTERPRET GEOMETRIC
TOLERANCING PER:
ASME Y14.5 - 2009
DESCRIPTION
SIZE
REV
SCALE:
UNLESS OTHERWISE SPECIFIED:
01
TRIM, SQUARE, BEVEL
SHEET
860-000067-XX
DWG. NO.
PROPRIETARY AND CONFIDENTIAL
B
3815 S. CAPITAL OF TEXAS HIGHWAY SUITE 100
AUSTIN, TEXAS 78704 (512) 347-1100
DRAWN BY
Vendor
DATE
Vendor PN
THIRD ANGLE
PROJECTION
TOLERANCES:
ANGLE
+/- 1°
DECIMAL
.X +/- 0.5MM
.XX +/- 0.25MM
.XXX +/- 0.125MM
STEVE COAKLEY
2/21/2016
Ketra Format REV-08
1
1
OF
1:1
DO NOT SCALE DRAWING
WEIGHT
79.14 g
DEVELOPMENT
PHASE
VERSION
NOTES:
1) CIRCLED DIMENSIONS ARE CRITICAL AND SUBJECT TO INSPECTION
2) MATERIAL:
3) FINISH:
4) COLOR:
5) ANY DEVIATIONS OR SUBSTITUTIONS MUST FIRST BE APPROVED BY A KETRA ENGINEER
6) PARTS TO BE CLEAN AND FREE FROM MACHINE OIL, REMOVE ALL BURRS AND BREAK SHARP EDGES
3. Compress the springs and push into the downlight aperture until the trim is flush to the ceiling.
Ensure that the springs are properly compressed and are going into the collar, not around the collar
(see
fig. 13
).
4. Snap the trim into the collar.
Trim Installation and Removal
D3
INSTALLATION GUIDE | 15
P/N 3662360 Rev C
© 2019-2020 Ketra, Inc. All rights reserved.

