INSTALLATION
Part 4b: Flangeless Millwork Trim Retainer Installation
(Wood/Stone Ceilings)
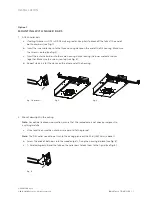
1. Install both height adjusters on opposite sides of the trim retainer using a 0.05 in (1.3 mm) hex head Allen key
and the M2 flat head screws provided with the assembly.
2. Hold the height adjuster inside the housing to determine the length needed. If the slots on the strap do not
line up with the holes in the housing (see "incorrect" image below), remove the height adjuster from the trim
retainer, vertically rotate the adjuster 180° (see "correct" image below), re-attach the adjuster to the trim
retainer and ensure that the holes are aligned.
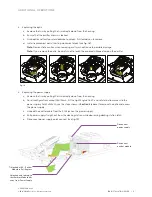
3. After determining the appropriate length needed on the height adjuster, break the unwanted portion of the
strap while still retaining a barrier for the current screw slot. Ensure that the height adjuster is broken at a
location that does not interfere with the screw slot. If the adjuster is broken too close to the screw slot, discard
and replace with the spare adjuster.
CAUTION: Cut Hazard. Broken edges may be sharp. Handle with care to avoid cuts or abrasions.
4. Screw in the height adjuster. Use a 0.05 in (1.3 mm) hex head Allen key for the trim retainer screw.
Use a 5/64 in (2 mm) Allen key for the housing screw.
5. Review the installation and ensure that the retainer is firmly installed before proceeding.
6. Continue to Part 6 of the install guide.
incorrect
correct
D3
INSTALLATION GUIDE | 13
P/N 3662360 Rev C
© 2019-2020 Ketra, Inc. All rights reserved.

