NXR-800H
116
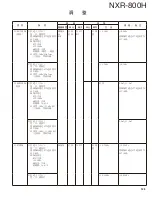
ADJUSTMENT
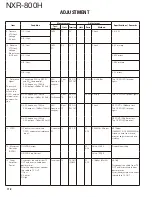
Alignment
Item
Condition
Measurement
Adjustment
Specifi cations / Remarks
Test-
equipment
Unit
Terminal
Unit
Parts
Method
1. Setting
1) Connect the DC power output to the rear panel DC terminal (13.2V).
2) Connect the front panel COM port (D-sub 9 connector) to the PC serial port with a cross-wired cable.
3) Activate the FPU to go to the test mode.
2. Temperature
Sensor
1) Receive unit (Celsius or
Fahrenheit)
Ther-
mometer
Room
temper-
ature
RX
PC
ADJ
Measuring room
temperature, write
the value with PC.
2) Transmit unit (Celsius or
Fahrenheit)
TX
3. Driver
Amplifi er
Power
(Pre ADJ)
1) Low
2) High
PC
ADJ
Value: 1
Fixed value writing
4. RF Power
Down
Detection
1) High
2) Low
PC
ADJ
Value: 1
Fixed value writing
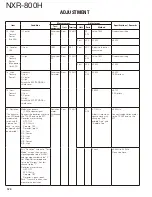
5. VCO Lock
Voltage
1) REF Low
SSG frequency: 10MHz
–10ppm (9.99999MHz)
SSG output: 0dBm
SSG
DVM
TX
REF IN
REF CV
(CN401)
Check
1.5V or more
2) REF High
SSG frequency: 10MHz
+10ppm (10.00001MHz)
SSG output: 0dBm
3.5V or less
3) MOD Low
SSG frequency: 10MHz
–10ppm (9.99999MHz)
SSG output: 0dBm
REF IN
MB_CV1
(CN303)
1.5V or more
4) MOD High
SSG frequency: 10MHz
+10ppm (10.00001MHz)
SSG output: 0dBm
3.5V or less
6. Transmit
VCO Lock
Voltage
(Adjustment)
1) A: Low
DVM
TX
CV
TX
L128
Adjust the interval of
the L128.
1.35~1.55V
2) B: Low
L108
Adjust the interval of
the L108.
1.35~1.55V
7. Receive
VCO Lock
Voltage
(Adjustment)
Pre ADJ
1) A: Low
DVM
RX
CV1
RX
L28
Adjust the interval of
the L28.
1.55~1.60V
Make the adjustments after
inserting the insulating tube
in the L28 and L30 coils and
applying the high frequency
varnish.
2) B: Low
L30
Adjust the interval of
the L30.
1.85~1.90V
8. Fixation of
Oscillation
Coil
1) Apply the high-frequency varnish to the adjusted Transmit VCO coil (L128, L108) and cover it with a shield cover.
2) Apply the high-frequency varnish to the adjusted Receive VCO coil (L28, L30) and cover it with a shield cover.
Summary of Contents for NXR-800H
Page 180: ...1 E CN300 RX_IF_VN 168 ...


