background image

55

Using P

o

w

erT

ouch

How Do I Operate Devices?

Tape Deck

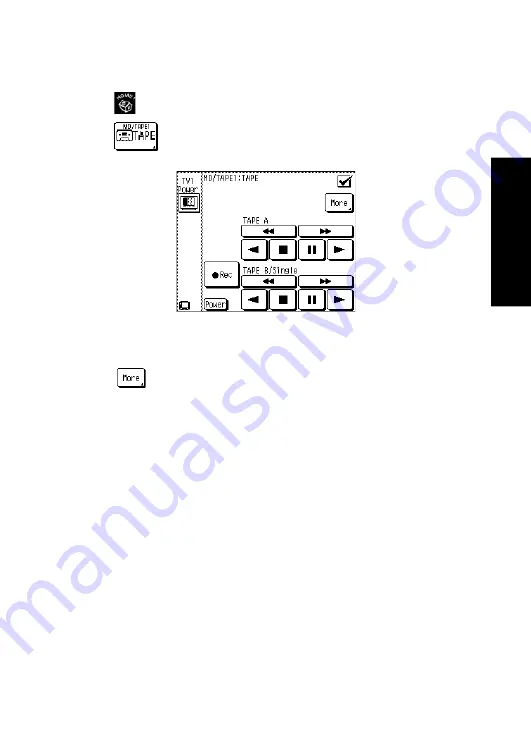
To operate Tape Deck:

1. Touch 

 (HOME1) on the Quick Access menu.

2. Touch 

. This accesses the tape deck controls:

3. Use this screen as your tape deck remote. The available buttons may

vary depending on the setup code you assigned to this icon.

Touch 

 (More) to access any customized commands you have

taught PowerTouch for this device and to access this device’s macros.
Touch the command or macro name to use it. (See “Operation on the
More menu” on page 69 of this manual.)

For more information on teaching commands to PowerTouch, see
“To Customize the PowerTouch Screen” on page 43 of the 

Connections

and Setup Guide

.  For more information on device macros, see “How

Do I Perform Several Actions at Once?” on page 76 of this manual.

See your tape deck instruction manual for more information.

Summary of Contents for KRF-X9995D

Page 1: ...B60 5018 00 01 CH T M X 0011 KRF X9995D OC ...

Page 2: ... a graphical user interface without having to use your TV The KRF X9995D adds dual zone dual source operation letting you play two different A V sources independently in two different rooms For a match made in dual zone heaven add Kenwood s dual transport DPF J9030 DPF J9020 or DPF J9010 200 Disc CD Changer to the KRF X9995D NetFront by Access Co Ltd is adopted for this product Copyright 1996 1997...

Page 3: ...se PowerTouch 6 How Do I Move Around 7 How Do I Enter Text 8 Chapter Two Using PowerTouch 9 How Do I Adjust the Sound 10 Turning the Speakers On 10 Adjusting the Volume 11 Adjusting the Loudness Only in STEREO mode with THX mode Off 11 Adjusting the Tone Only in STEREO mode with THX mode Off 12 Adjusting Speaker Levels 13 Muting Sound 15 Midnight Theater Function Dolby Digital DTS and DTS ES only ...

Page 4: ... Music Modes 29 Applying Digital Signal Processor DSP Effects 30 HDCD and D R I V E Effects 33 Headphone Operation 34 How Do I Operate Devices 35 Controlling a device without altering the receiver s input selection Operations using the SHIFT button 36 HOME1 HOME2 Devices 37 Playback of the device connected to the CD2 TAPE2 MONITOR 39 CD player 40 Kenwood System Connected 200 Disc CD Changer 40 To ...

Page 5: ...Do I Turn the Beeping On or Off 74 Using PowerTouch to Dim or Brighten the Receiver s Front Panel 75 How Do I Perform Several Actions at Once 76 Creating Macros 77 To check a Macro 78 Modifying a macro 78 Using Macros 80 How Do I Control Home Automation Equipment for U K only 82 To switch on or switch off the RELAY CONTROL output using PowerTouch 82 To switch the video and audio outputs to Zone A ...

Page 6: ... not output only when a 96k fs compatible disc is played 97 The 96k fs indicator does not light while a 96k fs compatible disc is being played 97 I can t hear sound from one or more of the speakers or the sound is abnormally low 98 I can t hear sound from my surround or center speakers 98 I can hear sound only from the center speaker when Dolby Pro Logic is selected 98 A DTS ES encoded source is p...

Page 7: ...00 All I hear is loud static when I play DTS discs 101 I hear a hum when I select the PHONO input 101 Sound is intermittent 101 I can t hear any sound in Zone B 101 Video 102 I can t see the program I m playing on the TV There wasn t any video output to my VCR when I recorded 102 PowerTouch 102 I don t see icons for all my devices 102 I don t see icons for all the devices I set up 102 When I selec...

Page 8: ...ashing 104 The sound is distorted and the CLIP indicator on the receiver s front panel flashes red continually or stays red for more than 1 second at a time 105 I can t access any RDS Radio Data System functions for U K only 106 I can t receive a radio station 106 I m getting a lot of static interference 107 When I press a button to tune to a preset station the receiver does not respond 107 Macro ...

Page 9: ... front of the receiver and on the PowerTouch The chapter also includes an explanation of how to navigate the convenient graphical display on your new PowerTouch It includes the following sections What s on the Front Panel of Your Kenwood Audio Video Receiver page 2 What s on PowerTouch page 3 How is PowerTouch Powered page 5 How Do I Use PowerTouch page 6 ...

Page 10: ...L Up Down buttons 12 P CALL Up Down buttons 13 MEMORY button 14 AUTO button 15 BAND button 16 AV AUX input jacks 17 DOOR OPEN CLOSE button 18 VOLUME CONTROL knob 19 INPUT SELECTOR buttons 20 Indicators SURROUND BACK 96kfs CD2 TAPE2 MONITOR CLIP INDICATOR 21 Indicators THX DTS D R I V E DOLBY DIGITAL MPEG HDCD 22 Display 23 2 way communication indicator 24 Infrared remote sensor 25 Indicators DTS E...

Page 11: ...OWER CONTRAST BACKLIGHT CONFIRM 1 2 3 4 5 6 7 10 9 8 1 Joystick see page 7 2 CONFIRM button 3 MUTE button see page 15 4 VOLUME UP DOWN button see page 11 5 CONTRAST button 6 SYS POWER button 7 BACKLIGHT button see page 73 8 Quick Access menu 9 Touch screen display 10 Stylus stored on top edge ...

Page 12: ...ice control buttons EDIT button Customize button communication indicator etc SETUP button An example of HOME1 menu The Quick Access Menu The buttons in the Quick Access Menu are always available regardless of what else is displayed on the touch screen Touch these buttons for in stant access to Home1 Home2 Music and movie device controls such as CD play ers the radio tuner or VCRs Editing features ...

Page 13: ...g it easier for you to access features You get all the advantage of on screen graphical display without having to use a TV screen For more information on using these icons see How Do I Use PowerTouch on page 6 How is PowerTouch Powered Your new PowerTouch uses six AA LR6 alkaline batteries and operates in the following range STANDBY POWER ON STANDBY ON OFF VOLUME CONTROL ENTER V O L U ME UP DOWN C...

Page 14: ...w Do I Use PowerTouch Use your new PowerTouch to control your new receiver and most devices attached to it PowerTouch appears and functions a little differently from traditional remotes Because it can control so many different devices it displays a separate set of controls for each device on an LCD screen Only devices you have identified and connected to the receiver appear as buttons on the touch...

Page 15: ...makes the following operations possible 1 Customization of the PowerTouch screen The buttons on the screen of PowerTouch can be moved or resized Refer to To Customize the PowerTouch Screen on page 43 of the Connection and Setup Guide 2 Contrast adjustment of the PowerTouch screen For details see To adjust the contrast on page 74 Also use the joystick when using the OSD On Screen Display of the DVD...

Page 16: ...tem name you want to change You have accessed the appropriate screen if or appears on the screen 2 Touch or Use the stylus to select characters from the keyboard Touch to access other characters Touch or to move back and forth between the characters Touch to clear the last character you entered Touch to de lete all the characters in the line Touch to insert a space Touch to feed a line The button ...

Page 17: ...l hundreds of devices and is the first of its kind to offer infra red compatibility with X 10 Lutron lighting and Makita drapery control systems making it perfect for con trolling even the most elaborate home theater system for U K only This chapter contains the following sections How Do I Adjust the Sound page 10 How Do I Adjust the Surround Modes page 17 How Do I Operate Devices page 35 HOME1 HO...

Page 18: ...r of the receiver s front panel To turn on the speakers B press the SPEAKERS B button inside the door Å or ı displayed If you select SPEAKERS B Zone B while listening to a surround mode in Zone A the sound in Zone A will automatically revert to stereo While SPEAKERS B is on surround mode cannot be selected If you use speakers connected to amplifiers via the PRE OUT jacks choose SPEAKERS A L SPEAKE...

Page 19: ...ay the human ear hears sound at quiet vol umes retaining music s fullness and sparkle 1 Touch Sound on the Quick Access menu to open the Sound menu If the opened menu is not the Sound menu touch 2 Touch to turn the loudness setting on or off 3 Touch to return to the previous menu or touch one of the Quick Access menu buttons to proceed to the next operation Operation on the receiver 1 Press the SO...

Page 20: ...tting bass and treble tone adjustment values you can completely bypass the tone control circuitry for a purer sound 1 Touch Sound on the Quick Access menu to open the Sound menu 2 Touch to open the Tone menu 3 Touch to turn the tone settings on or off 4 If you selected On in the above touch the left or right arrow next to a tone setting Treble or Bass to adjust it A readout between the arrows show...

Page 21: ...ONTROL fi button 5 Press the SOUND button 6 When the TREBLE setting menu appears adjust the treble in the same way as above To exit from setting press the SOUND button repeatedly until SOUND FIXED is displayed Adjusting Speaker Levels You can use the Sound menu to temporarily adjust the speaker levels of your center speaker surround speakers surround back speakers and subwoofer For example if a par...

Page 22: ...ou have selected a speaker when its button darkens The two surround speakers SL and SR or the two surround back speakers SBL and SBR cannot be adjusted independently between each other 4 Touch the up or down arrow to adjust the volume of the speaker s you chose 5 Touch to return to the previous menu or touch any Quick Access menu button to access that menu The subwoofer level can be adjusted betwe...

Page 23: ...gs automatically return to the level you adjust on Chapter Two of Connection and Setup Guide whenever you select a different source device or turn the receiver s power off Muting Sound Use following method to temporarily mute the sound Press MUTE button on PowerTouch A Mute On message appears on the LCD screen for 3 seconds then disappears The MUTE indicator on the receiver s front panel blinks du...

Page 24: ... ES program that has been encoded with special compres sion data To balance volume extremes 1 Touch Sound on the Quick Access menu to open the Sound menu If the opened menu is not the Sound menu touch 2 Touch until the balancing sounds right to you Off for normal balancing 1 for quieter balancing 2 for quietest balancing the least difference between the loudest and quietest sound 3 Touch to return...

Page 25: ...y added after the decoded signal Movies which have been encoded in Dolby Digital DTS MPEG Dolby Pro Logic Stereo and Mono can all benefit from activating the THX technologies THX should be activated only when watching movies which were mixed for playback in large movie theater environments THX need not be activated for music movies that were made espe cially for television or shows such as sports ...

Page 26: ...heaters Meanwhile Dolby Pro Logic II decodes a signal encoded in 2 channels into 5 channel signals composed of the left right front signals center signal and sur round left right signals If no surround speaker is Setup the surround signal is sent to front left and right speakers Dolby 3 stereo Dolby Pro Logic II is an advanced version of the decoding technology used with Dolby Pro Logic It inputs ...

Page 27: ...another or entirely surround you Like Dolby Digital DTS has much improved clarity surround and sound movement capability compared with Dolby Pro Logic This listen mode is available on CD LD and DVD media DTS is a strictly digital format that can be sup plied only by a CD LD or DVD player that supports DTS sound If you attempt to listen to DTS encoded media through the analog con nections to your n...

Page 28: ... playback MPEG MPEG which stands for Moving Pictures Experts Group is an international standard of digital video and audio compression and decompression in media It is the most efficient encoding method for compressed multi channel audio which provides the highest sound quality to deliver the best movie theater sound into the home DSP Digital Signal Processing DSP allows you to create your own cus...

Page 29: ...ck of Dolby Digital MPEG or DTS signal the surround identification signal in the input is identified and displayed by means of the L C R SR SB SL S and LFE icons L Front left channel C Center channel R Front right channel SR Surround right channel SL Surround left channel SB Surround back channel LFE Low frequency effect channel S Surround channel 3 Touch to return to the previous menu or touch on...

Page 30: ...put The inputs are fixed at the analog 6 channel inputs This mode can be selected only when the DVD in put is selected with the input selector You cannot select the Input Analog mode if you are playing DTS encoded media When you use Full Auto mode with certain DVD and LD players performing operations such as Skip or Stop may momentarily interrupt the output This could switch the Listen Mode automa...

Page 31: ...DIO discs played on a compatible DVD player you must set the receiver s input to 6ch Input To do so select When you are finished listening to analog media set the receiver s input back to digital To do so select the Operation on the receiver Press the INPUT MODE button in the door repeatedly until FULL AUTO DIGITAL MANUAL ANALOG or 6CH INPUT is displayed See Chapter Three Using PowerTouch in Multi...

Page 32: ...ff When the surround back speakers are set to Lrg Nml THX or Yes When the surround back speakers are set to Off or No 1 THX On 2 THX Off Operation on the receiver Press the THX button inside the door repeatedly until the desired THX mode is displayed 1 THX Sur EX ON 2 THX Sur EX AUTO 3 THX ON 4 THX OFF When the surround back speakers are set to Lrg Nml THX or Yes When the surround back speakers ar...

Page 33: ...ed To play Dolby Digital Surround EX encoded software in 6 1 channels it is required to set the THX Surround EX mode to On or Auto Note that some of Dolby Digital Surround EX encoded software does not contain the identification signal In this case set the THX Sur round EX mode to On Set the THX mode to Off when DTS ES decoding is required The THX operation is not activated with the 96k fs PCM sign...

Page 34: ... mode returns to the previ ous display The available listen modes may be restricted depending on the input signal and speaker setup When the input mode is set to Full Auto if the incoming signal is not Dolby Digital DTS DTS ES or MPEG the listen mode reverts to the last listen mode you selected for that input When the speakers A are set to Off or speakers B are set to On the listen mode is switche...

Page 35: ...g Dolby Surround encoding The listen mode is switched automatically to Pro Logic Pro Logic II Movie Pro Logic Pro Logic II Music Movie can be selected only when the input is 2 channel signals DTS DTS Stereo DTS ES Matrix 6 1 DTS DTS ES Matrix 6 1 Stereo DTS ES Matrix 6 1 can be selected only when THX mode is Off DTS ES Discrete 6 1 DTS DTS ES Discrete 6 1 Stereo DTS ES Discrete 6 1 can be selected...

Page 36: ...here x is a figure may be displayed on the receiver s display This is dis played when the source being played outputs a Dolby Digital signal with a higher or lower level than the standard level For example when OFFSET 4dB is displayed the source contains an audio sig nal with a 4 dB higher level than the standard level dB is the unit of sound amplitude Selecting the Pro Logic Mode with PowerTouch ...

Page 37: ...olby Pro Logic II Music Mode Panorama mode Expands the image of front channel stereo to the surround speakers to create a sound environment that fills your surroundings Dimension This controls the balance between the Front and Rear in 3 steps on the front and 3 steps on the rear Set this parameter to one of the Front steps if the surround effect is too strong or to one of the Back steps if it is t...

Page 38: ...urce These modes are particularly effective when used with stereo pro gram sources like CD television and FM radio You might enjoy trying the Stadium 1 2 Arena or Concert hall mode the next time you watch a sporting event or concert You can adjust the following elements to create a customized environment The Wall type parameter lets you adjust the brightness of the sonic environment according to y...

Page 39: ...31 Using PowerTouch How Do I Adjust the Surround Modes To set a DSP effect 1 Touch Listen Mode on the Quick Access menu to open the Lis ten Mode menu 2 Touch 3 Touch a desired DSP mode icon button ...

Page 40: ...touch one of the Quick Access menu buttons to proceed to the next operation Operation on the receiver Press the LISTEN MODE button inside the door repeatedly until the listen mode to be set is displayed The DSP can be set to ARENA JAZZ CLUB CATHEDRAL CONCERT HALL STADIUM 1 STADIUM 2 THEATER 1 or THEATER 2 Fine adjusting the DSP effects on the receiver 1 Press the SOUND button inside the door to se...

Page 41: ...ver reached The D R I V E indicator lights when the D R I V E circuit is activated The HDCD indicator lights when the HDCD circuit is activated and an HDCD is played HDCD and D R I V E are designed to be activated automatically to select the optimum circuit path HDCD High Definition Compatible Digital and Pacific MicrosonicsTM are either registered trademarks or trademarks of Pacific Microsonics I...

Page 42: ...perate Devices Headphone Operation Insert the headphone plug into the receiver s PHONES jack and adjust the listening level STANDBY POWER ON STANDBY ON OFF VOLUME CONTROL When listening through headphones set SPEAKERS A and B to OFF ...

Page 43: ...so follow the instructions under Identifying De vices For PowerTouch Control on page 40 of the Connections and Setup Guide before reading any further in this manual If you do not you will not see controls for any device except for the factory defined devices such as the tuner and the home automation devices As you use PowerTouch remember that this manual only gives instruc tions for operating Powe...

Page 44: ...s it pos sible for example to turn the VCR ON while listening to a CD Procedure 1 Touch HOME1 or HOME2 in the Quick Access menu to display the HOME1 or HOME2 menu 2 Touch button 3 Touch the desired operation button within 3 seconds after above By touching the button and executing an operation any de vice can be controlled without sending the command signal to the receiver The above operation is no...

Page 45: ...ustomization function you can place buttons in the Home1 screen on then Home2 screen and vice versa Refer to To Customize the PowerTouch Screen on page 43 of the Connection and Setup Guide This menu controls the following note which device you have connected to the jack in the space provided Icons assigned to the Home1 screen by default The operation of the CD2 TAPE2 icon is different from other i...

Page 46: ...38 Using PowerTouch How Do I Operate Devices I should use this icon to control this device use this space to note your devices Icons assigned to the Home2 screen by default ...

Page 47: ...between ON and OFF After completing playback of the device connected to the CD2 TAPE2 MONITOR be sure to set this condition to OFF 3 Touch The commands appear for the device you connected to this jack set and identified to PowerTouch 4 Use the available commands as your CD player or tape deck remote Touch More to access any customized commands you have taught PowerTouch for this device Touch the c...

Page 48: ...ger Kenwood 200 Disc CD Changers have many different features that make them ideal complements to your Kenwood receiver Some changer mod els can store disc and track titles for all loaded discs and then download this information to your receiver for display on PowerTouch s screen Others can play 2 different CDs in 2 different rooms at the same time with the KRF X9995D You can easily activate all t...

Page 49: ... more information on operating a CD player from another Zone see Chapter Three Using PowerTouch in Multiple Zones Displaying Disc and Track Titles Kenwood 200 Disc CD Changers allow you to easily search for and select a particular CD or song by title from any disc you ve loaded into the unit PowerTouch can display these disc and track titles on its LCD display allowing you to choose discs and song...

Page 50: ...reading data This process may take some time depending on how many CDs you have loaded When the IR light on the receiver goes out the receiver is done sending the information to PowerTouch and you may move PowerTouch again PowerTouch s memory now contains the disc titles of every CD in the changer with title information 6 Touch to return to the CD controls To read the loaded track titles and store...

Page 51: ... move PowerTouch while it is reading data This process may take some time depending on how many tracks CD has you have loaded You will see the track titles on the PowerTouch when it is finished reading data 11 Touch to return to the CD controls Entering Disc and Track Titles You can also use PowerTouch to enter disc or track titles if they are not already stored on the changer The titles you add a...

Page 52: ...ck controls Touch it again to return to the CD controls If you rearrange or add new CDs to the changer you will need to repeat both the disc and track read process Otherwise disc information is stored in PowerTouch permanently The track title information is not stored permanently in PowerTouch Each time you select a CD to play you have to download its track title informa tion Title reading by Powe...

Page 53: ...scroll through the discs numeri cally then touch the disc title you want to play 6 If you want to play the disc from the beginning touch 7 Optional Touch The track titles for that disc are displayed in numerical order 8 If you want to play the disc starting from a particular track use the up or down arrow to scroll through the track titles then touch the track title 9 When you ve highlighted the t...

Page 54: ...ands to PowerTouch see To Customize the PowerTouch Screen on page43 of the Connections and Setup Guide For more information on device macros see How Do I Perform Several Actions at Once on page 76 of this manual For more information on operating a CD player from another Zone see Chapter Three Using PowerTouch in Multiple Zones Displaying Disc and Track Titles Kenwood 200 Disc CD Changers allow you...

Page 55: ...t already done so on the CD changer touch This reads all of the disc and track title information into the CD changer s memory 5 Set PowerTouch down so that its IR transmitter window is aiming at the CD changer s IR transmitter window Select Do not move PowerTouch while it is reading data This process may take some time depending on how many CDs you have loaded When the IR light on the receiver goe...

Page 56: ... CD changer s memory Touch to return to the CD controls 6 Touch to select the disc you want to play 7 Use the up or down arrow to scroll through the disc titles 8 Touch to play a disc and then touch to stop playback 9 Touch 10 Set PowerTouch down so that its IR transmitter window is aiming at the CD changer s IR transmitter window Touch Do not move PowerTouch while it is reading data This process ...

Page 57: ...c 5 Touch the disc or track name you want to change 6 Touch See How Do I Enter Text on page 8 for more infor mation on changing names 7 Press 8 Repeat steps 5 to 7 for each title you want to store 9 Touch to return to the disc or track controls Touch it again to return to the CD controls If you rearrange or add new CDs to the changer you will need to repeat both the disc and track read process Oth...

Page 58: ...oll through the discs numeri cally then touch the disc title you want to play 6 If you want to play the disc from the beginning touch 7 Optional Touch The track titles for that disc are displayed in numerical order 8 If you want to play the disc starting from a particular track use the up or down arrow to scroll through the track titles then touch the track title 9 When you ve highlighted the trac...

Page 59: ...r this device and to access this device s macros Touch the command or macro name to use it See Operation on the More menu on page 69 of this manual For more information on teaching commands to PowerTouch see To Customize the PowerTouch Screen on page 43 of the Connections and Setup Guide For more information on device macros see How Do I Perform Several Actions at Once on page 76 of this manual An...

Page 60: ...ecorder To operate CD R Recorder 1 Touch HOME1 on the Quick Access menu 2 Touch This accesses the CD R Recorder controls 3 Use this screen as your CD R Recorder remote The available buttons may vary depending on the setup code you assigned to this icon ...

Page 61: ...to this icon Touch More to access any customized commands you have taught PowerTouch for this device and to access this device s macros Touch the command or macro name to use it See Operation on the More menu on page 69 of this manual For more information on teaching commands to PowerTouch see To Customize the PowerTouch Screen on page 43 of the Connec tions and Setup Guide For more information on...

Page 62: ...f Connection and Setup Guide To enter disc or track titles 1 Touch HOME1 on the main or Quick Access menu 2 Touch 3 Stop playing an MD if it is playing 4 Touch 5 See How Do I Enter Text on page 8 and enter a title 6 Touch 7 While watching the MD recorder s display use or on the Mini Disc Title menu to select where you want to enter the title to either disc title or track title If you want to enter...

Page 63: ... any customized commands you have taught PowerTouch for this device and to access this device s macros Touch the command or macro name to use it See Operation on the More menu on page 69 of this manual For more information on teaching commands to PowerTouch see To Customize the PowerTouch Screen on page 43 of the Connections and Setup Guide For more information on device macros see How Do I Perfor...

Page 64: ...ecord player 1 Touch HOME1 on the Quick Access menu 2 Touch to set the turntable as the speaker source You will re main at the HOME1 menu 3 Play your records as normal Please note that you cannot control the turntable with PowerTouch you must still operate the turntable manu ally ...

Page 65: ...ct Manual if you experience interference due to weak radio signals Stations are received in mono during manual tuning In Auto tuning mode the stereo mode is activated automatically when a stereo station is tuned in FM band only Touch the left or right arrow to tune in a station Touch and enter the broadcast frequency using the 10key pad e g To select FM 87 5 MHz enter 8 7 5 0 and Select the left o...

Page 66: ...n on the receiver Press the INPUT SELECTOR or button Each press switches the selected input Press the MULTI CONTROL fi button to start Auto tuning until the desired station is tuned in If the radio wave from the station is weak and hard to tune in press the AUTO button to select Manual tuning In this mode each press of the MULTI CONTROL button varies the tuning frequency by one step Press the P CAL...

Page 67: ...type using Program Type Identifica tion Search PTY search Search for a station automatically when you select the station name PS Read View information about a station the station name any text data transmitted by the station Automatically select stations providing RDS and FM broadcasting and store them in the preset memory up to 40 stations can be preset For more information about storing stations...

Page 68: ... through the program types until the type you want appears The program types cycle in the order shown in the table below 6 Touch If the tuner cannot find the program type you want NO PRO GRAM appears on the receiver display The display returns to its original screen after several seconds If the tuner locates a station playing the program type you want reception begins The display changes to show t...

Page 69: ...ren s programmes CHILDREN Social affaires SOCIAL Religion RELIGION Phone in PHONE IN Travel TRAVEL Leisure LEISURE Jazz Music JAZZ Country Music COUNTRY National Music NATION M Oldies Music OLDIES Folk Music FOLK M Documentary DUCUMENT News NEWS Current Affairs AFFAIRS Information INFO Sports SPORT Education EDUCATE Drama DRAMA Cultures CULTURE Science SCIENCE Varied Speech VARIED Receiver Display...

Page 70: ...ouch for this device and to access this device s macros Touch the command or macro name to use it See Operation on the More menu on page 69 of this manual For more information on teaching commands to PowerTouch see To Customize the PowerTouch Screen on page 43 of the Connections and Setup Guide For more information on device macros see How Do I Perform Several Actions at Once on page 76 of this ma...

Page 71: ...s may vary depending on the setup code you assigned to this icon Touch More to access any customized commands you have taught PowerTouch for this device and to access this device s macros Touch the command or macro name to use it See Operation on the More menu on page 69 of this manual For more information on teaching commands to PowerTouch see To Customize the PowerTouch Screen on page 43 of the ...

Page 72: ...epending on the setup code you assigned to this icon Touch More to access any customized commands you have taught PowerTouch for this device and to access this device s macros Touch the command or macro name to use it See Operation on the More menu on page 69 of this manual For more information on teaching commands to PowerTouch see To Customize the PowerTouch Screen on page43 of the Connections a...

Page 73: ...setup code you assigned to this icon Touch More to access any customized commands you have taught PowerTouch for this device and to access this device s macros Touch the command or macro name to use it See Operation on the More menu on page 69 of this manual For more information on teaching commands to PowerTouch see To Customize the PowerTouch Screen on page 43 of the Connections and Setup Guide ...

Page 74: ...g on the setup code you assigned to this icon Touch More to access any customized commands you have taught PowerTouch for this device and to access this device s macros Touch the command or macro name to use it See Operation on the More menu on page 69 of this manual For more information on teaching commands to PowerTouch see To Customize the PowerTouch Screen on page 43 of the Connections and Set...

Page 75: ...r this device and to access this device s macros Touch the command or macro name to use it See Operation on the More menu on page 69 of this manual For more information on teaching commands to PowerTouch see To Customize the PowerTouch Screen on page 43 of the Connections and Setup Guide For more information on device macros see How Do I Perform Several Actions at Once on page 76 of this manual If...

Page 76: ...ng on the setup code you assigned to this icon Touch More to access any customized commands you have taught PowerTouch for this device and to access this device s macros Touch the command or macro name to use it See Operation on the More menu on page 69 of this manual For more information on teaching commands to PowerTouch see To Customize the PowerTouch Screen on page 43 of the Connections and Se...

Page 77: ...t possible to record a device control proce dure in each of the six Macro buttons numbered 1 to 6 by default at the bottom of the screen How to use the Power ON or Power OFF button When you want to record a device power ON or OFF step in a macro use the Power ON or Power OFF button in this menu When the macro is executed with recording of the operation of this button PowerTouch checks whether powe...

Page 78: ...g procedure that lets you quickly and easily specify the source and destination devices To record 1 Touch EDIT on the Quick Access menu to open the Edit menu 2 Touch a source device This will be the device you are recording from like a DVD or CD player PowerTouch displays the destinations able to record from that source ...

Page 79: ...to the source device and touch the play control 5 Touch any Quick Access button to change to that menu For more information on recording with any connected device see the device s instruction manual If you re recording from a digital source any action other than adjust ing the volume may cause the sound to clip on the recording You cannot record from the component you are using to record For examp...

Page 80: ...nals are automatically converted into analog stereo signals When REC MODE is set to MANUAL only a specific signal among the digital signals can be converted into analog stereo signals When REC MODE is switched to MANUAL in the middle of reproduc tion of a digital audio program only the digital signal of the type being reproduced will be converted into analog stereo signals When REC MODE is switche...

Page 81: ...ing navigation easier if you need to operate PowerTouch in dim or nonexistent light To use PowerTouch in the dark press BACKLIGHT BACKLIGHT To turn off the light and return to normal display press BACKLIGHT BACK LIGHT again Backlight is automatically turned off when PowerTouch goes to sleep you will need to turn it on again when you reactivate PowerTouch Keep the Backlight turned off during normal...

Page 82: ...isplayed move the joystick up or down to increase or decrease the contrast until you are satisfied 3 Touch to save the contrast setting and return to the control screen How Do I Turn the Beeping On or Off PowerTouch emits beeps under various circumstances for example to confirm your entry You can turn these sounds off if you don t want to hear them To turn the beeps off 1 Touch SETUP on the Quick ...

Page 83: ...mmer button switches the above as shown below 1 Display bright Indicators enabled 2 Display dim Indicators enabled 3 Display dim Indicators disabled Changing the Front Panel Display Mode 1 Touch SETUP on the Quick Access menu 2 Touch A Connected Device Input Mode DVD AUTO B Input Terminal Connected Device VIDEO4 DVD C Listen Mode DOLBY DIGITAL Input Mode is displayed only when a selector with digi...

Page 84: ...e including home automation devices such as Lutron X 10 and Makita command can be included in a macro These macros enable you to group multiple actions onto a single button For example You could create a macro to access a specific TV station such as CNN or TV Land like setting a button on the radio in your car You would most likely choose a macro associated with your TV or one with the jack set to...

Page 85: ...step 2 Touch SETUP on the Quick Access menu then touch 3 Figure out what device you will be using when you want to run the macro and select a macro line associated with that device 4 Touch Enter a name for the macro See How Do I Enter Text on page 8 for more information on entering names 5 Touch to save the name in the Macro 6 Touch to record the Macro 7 Perform the control operations of the devic...

Page 86: ...the macro line you want to modify To check a Macro 1 Touch SETUP on the Quick Access menu then touch 2 Select the macro line you want to check 3 Touch The selected macro line will be executed You can modify the macro as required see below If some of the functions did not occur you need to insert delay before these functions up to 30 steps ...

Page 87: ...r 3 Touch To delete a function 1 Touch a macro function line you want to delete 2 Verify that this is the correct function Touch To insert a function 1 Touch a macro function line where you want to insert a function then touch The function line will be inserted before the selected line 2 Touch a device then touch an available function 3 Touch the icon to complete the macro recording ...

Page 88: ...e macro Perfect Macro will keep it on To turn the device power ON or OFF with the macro function it is re quired that the receiver is turned ON For example if a macro attempts to turn the receiver OFF then turn a device OFF the device cannot be turned OFF by executing such a macro For more information about using a TV power sensing device see Chap ter Four of the Connections and Setup Guide There ...

Page 89: ...ccess the Macro menu 2 Touch a macro line If the macro you want is not displayed use the up or down arrow to scroll through the list until you see it To run a macro from a device s More screen 1 Follow the steps under the device name in this chapter to access the controls for that device 2 Touch button 3 Choose the macro from the macro buttons on the screen ...

Page 90: ...eens specially de signed to emulate the operation of X 10 Lutron or Makita equipment remotes These features require no setup to work with the compatible products listed Simply aim PowerTouch at the device you want to control then touch the icon buttons and settings for the tasks you want to perform Do not aim PowerTouch at your Kenwood receiver none of the home automa tion devices are connected to...

Page 91: ...ion see the manual for the particular device you want to control To switch the video and audio outputs to Zone A or Zone B while Zone A or Zone B is selected 1 Access either the HOME1 or HOME2 menu and touch to open the Home Automation menu 2 Touch or or to switch Zone A Zone B on or off The non selected zone is grayed out and cannot be switched on or off When the Zone B Off button is pressed whil...

Page 92: ... 10 commands 3 Touch the numbered button that corresponds to the X 10 module you want to control For more information see your X 10 manual brightens lamp modules dims lamp modules means Select Use this button to move back and forth be tween this group of buttons and the next eight buttons 9 16 on PowerTouch To change the name of a button refer to To Customize the PowerTouch Screen on page 43 of th...

Page 93: ...0 com Lutron Your PowerTouch can dim or brighten indoor lighting using the Lutron Spacer System or Lutron GRAFIK Eye devices which are sold separately For more information see your Lutron manual To operate your Lutron controls using PowerTouch 1 Access either the HOME1 or HOME2 menu and touch to open the Home Automation menu 2 Touch to access Lutron commands Touch to access ei ther the Spacer show...

Page 94: ...ation menu 5 Touch any Quick Access menu to change to that menu Lutron models SP HT WH GRX IT and GRX 8IT are compatible with your PowerTouch Contact Lutron at Lutron Electronics Co Inc 7200 Suter Road Coopersburg PA 18036 1299 800 523 9466 www lutron com Makita You can use your PowerTouch to open drapes or blinds in your home Your PowerTouch completely replaces these Makita Automatic Drapery Open...

Page 95: ...ote If you want to control more than 1 Makita device touch to cycle through the additional screens You can control up to 6 Makita devices Refer to your Makita manual for more information on these commands To change the name of a button refer to To Customize the PowerTouch Screen on page 43 of the Connection and Setup Guide 4 Touch to return to the Home Automation menu 5 Touch any Quick Access menu...

Page 96: ...ies Control PowerTouch includes 8 additional buttons for controlling virtually any device that accepts IR codes You can use these buttons to control these devices in two possible ways You can teach the preset IR code to the device You can teach the device s IR code to PowerTouch Regardless of whether you teach the accessory PowerTouch s code or teach PowerTouch the accessory s code these commands ...

Page 97: ...er accessory the new assignment will overwrite the old one To change the name of a button refer to To Customize the PowerTouch Screen on page 43 of the Connection and Setup Guide To operate devices assigned to the accessory codes 1 Access either the HOME1 or HOME2 menu and touch to open the Accessories menu 2 Touch the button corresponding to the code that you taught PowerTouch for the device you ...

Page 98: ... X9995D s capabilities No additional amplifier for Zone B You can use the KRF X9995D s Speaker B output for Zone B This allows you to listen to full surround sound in Zone A only or in stereo in Zone A when Zone B is active The sound in Zone B will always be in stereo Stereo amplifier for Zone B You use an additional stereo amplifier for Zone B connected to the KRF X9995D s Second Zone Preouts Thi...

Page 99: ...always set up for Zone A operation and another PowerTouch in Zone B that is always set up for Zone B operation Some system control features are not available when the PowerTouch is set up for multi zone control To switch control modes for Zone A or Zone B 1 Touch SETUP on the Quick Access menu to access the Setup menu 2 Touch to access multi zone commands 3 Touch to highlight it 4 Touch for Zone A...

Page 100: ...Touch its icon button will appear blank the buttons will be there but it will not contain an icon For more information on identifying devices to the PowerTouch see How Do I Identify Devices on page 40 of the Con nection and Setup Guide When you switch zones only devices you can control in that zone will show up as icons on PowerTouch Devices connected via digital jacks only cannot be listened to i...

Page 101: ...players one can play in Zone A while the other is playing simultaneously in Zone B Use CD1 to control the changer for Zone A and CD2 to control the changer for Zone B Operating Devices in Zone B If you are using the receiver s Speaker B outputs to power the speakers in Zone B press the button for SPEAKERS B on the front panel of the re ceiver to activate the speakers in Zone B The Listen Mode in Z...

Page 102: ... setting of the PowerTouch to Zone B then press the SYS POWER button on the PowerTouch To output the video and audio to Zone A set the Zone setting of the PowerTouch to Zone A then press the SYS POWER button on the PowerTouch 4 When the video and audio are output to both Zone A and Zone B To turn the receiver OFF STANDBY mode set the Zone setting of the PowerTouch to Zone A then press the SYS POWE...

Page 103: ... problem occurs This is the most important step in troubleshooting Whether you fix it yourself or have to describe it to a technician you are much more likely to really solve the problem if you know the exact circumstances sur rounding the problem For example if you don t hear anything through the speakers it s useful to know if it only happens when you are listen ing to CDs Knowing that eliminate...

Page 104: ...ad more frequently than de vices do Always suspect the cable before its device For one thing it s easier to test simply swap the cable with one connected to a device you know is working If the problem device works now it was the cable You can generally purchase new cables at most home electronics stores or via the Internet 5 User error is more likely than device failure You probably don t want to ...

Page 105: ...it See What s on the Front Panel of Your Kenwood Audio Video Receiver on page 2 of this manual The input mode matches the input signal e g analog vs digital that has been set See To set the Input Mode manually on page 23 of this manual The correct Input Mode e g FULL AUTO has been set for the digital input See Input Modes on page 22 The correct speakers have been activated See Turning the Speakers...

Page 106: ...of this manual The correct listen mode has been selected See What are Listen Modes on page 18 of this manual I can t hear sound from my surround or center speakers Check that The proper surround play mode Dolby Pro Logic Dolby Pro Logic II DSP MPEG DTS NEO 6 DTS DTS ES or Dolby Digital has been selected See What are Listen Modes on page 18 of this manual All of the speaker wires are connected tigh...

Page 107: ...encoding identification signal To reproduce such sources in 6 1 chan nel audio set THX Surround EX to ON See To Set the THX Mode on page 24 of this manual Sound from one or more of my devices is abnormally loud or soft Adjust the analog input level for that device 1 Select the icon for the device For CD1 DVD MD Tape CD R VIDEO2 VIDEO3 and VIDEO4 also select the Input Analog icon 2 Touch SETUP on t...

Page 108: ...gital DTS or MPEG need to be downmixed into two channels for recording to analog media such as VHS or audio tape See Digital to Analog Recording on page 72 The initial sound is intermittent or non existent when I start to play from a Dolby Digital DTS DTS ES or MPEG source Some DVD players simply have intermittent start up sound Check that the correct digital cable is being used The cable must be ...

Page 109: ...nd Setup Guide Sound is intermittent Attach the provided protective cap to the unused OPTICAL inputs If the light from a fluorescent lamp or direct sunlight enters through this con nector the played audio will be intermittent I can t hear any sound in Zone B Check that Multiple Zones is activated The volume in Zone B is turned up See How Do I Switch Control Modes on page 91 of this manual The Zone...

Page 110: ... See All My Devices on page 92 of this manual When I select a device icon I don t see any commands When you start PowerTouch for the very first time all the possible icons appear If you select any of them there will be no commands in the command area You must set up PowerTouch before you can be gin controlling devices See Chapter Two of the Connections and Setup Guide Re enter the setup code for t...

Page 111: ...tion is On If this function is Off you cannot control Zone B from PowerTouch Number Tone Meaning 1 high Confirms your most recent button push or touch 1 low Indicates that your most recent button push or touch could not be performed 2 high Confirms learning or copying 2 low Indicates that learning or copying was not successful PowerTouch does not learn new commands or functions Check that the dist...

Page 112: ...e shorted wire and replace it 1 Turn off the receiver disconnect the positive and negative speaker wires of the RIGHT FRONT speaker from the receiver and turn the receiver back on 2 If the STANDBY indicator stops flashing replace this wire 3 If the STANDBY indicator does not stop flashing turn off the re ceiver reconnect the speaker wires and repeat the first step for the next speaker 4 Continue u...

Page 113: ... settings see Chapter Two of the Connections and Setup Guide Reset the cleared settings before operating the receiver again The sound is distorted and the CLIP indicator on the receiver s front panel flashes red continually or stays red for more than 1 second at a time Lower the analog input level for the source device you re listening to Setting the proper input level eliminates distortion that o...

Page 114: ... Setup menu I can t access any RDS Radio Data System functions for U K only Confirm that the radio station is broadcasting RDS Make sure you use the Auto Memory function to store RDS stations in memory See Storing RDS Stations Automatically on page 41 of the Connections and Setup Guide I can t receive a radio station Check that The appropriate antenna is connected See Chapter One of the Con nectio...

Page 115: ...ree days If it has your settings were cleared from the receiver s memory See My re ceiver won t turn on and the STANDBY indicator is flashing on page 104 of this manual The Tuner input is selected See Tuner on page 57 of this manual Macro is not running as I programmed Because PowerTouch can only transmit one command at a time stag ger the timings of the various macro settings so that the commands...

Page 116: ...cator light 2 CD R Recorder operating 52 changing front panel display 75 confirm button 3 7 custom macros creating 77 operating 80 D devices checklist 37 38 identifying to Powertouch 35 operating 35 93 devices controlling from each zone 93 Digital Signal Processor DSP effects 20 30 digital to analog recording 72 digital to digital recording 72 dimming receiver front panel 75 display panel 2 displa...

Page 117: ...ulti ch Music 20 multiple zones operating devices 93 sound scenarios 90 switching control modes 91 mute button 3 muting sound 15 O operating devices 35 home automation equipment 82 macros 80 range 5 R radio stations 57 RDS Radio Data System definition 59 features 59 searching for radio stations using PowerTouch 60 reading and storing CD titles 42 47 receiver changing display mode 75 dimming front ...

Page 118: ... 56 TV operating 62 U using joystick to move around 7 macros 80 PowerTouch in multiple zones 91 PowerTouch in the dark 73 PowerTouch s interface 6 V VCR PVR operating 66 volume adjusting 11 control knob 2 X X 10 Home Automation System contact information 85 operating 84 Z zone A operating CD player 93 operating devices 93 setting up PowerTouch 91 sound scenarios 90 speakers operating 10 speakers s...

Reviews: