background image

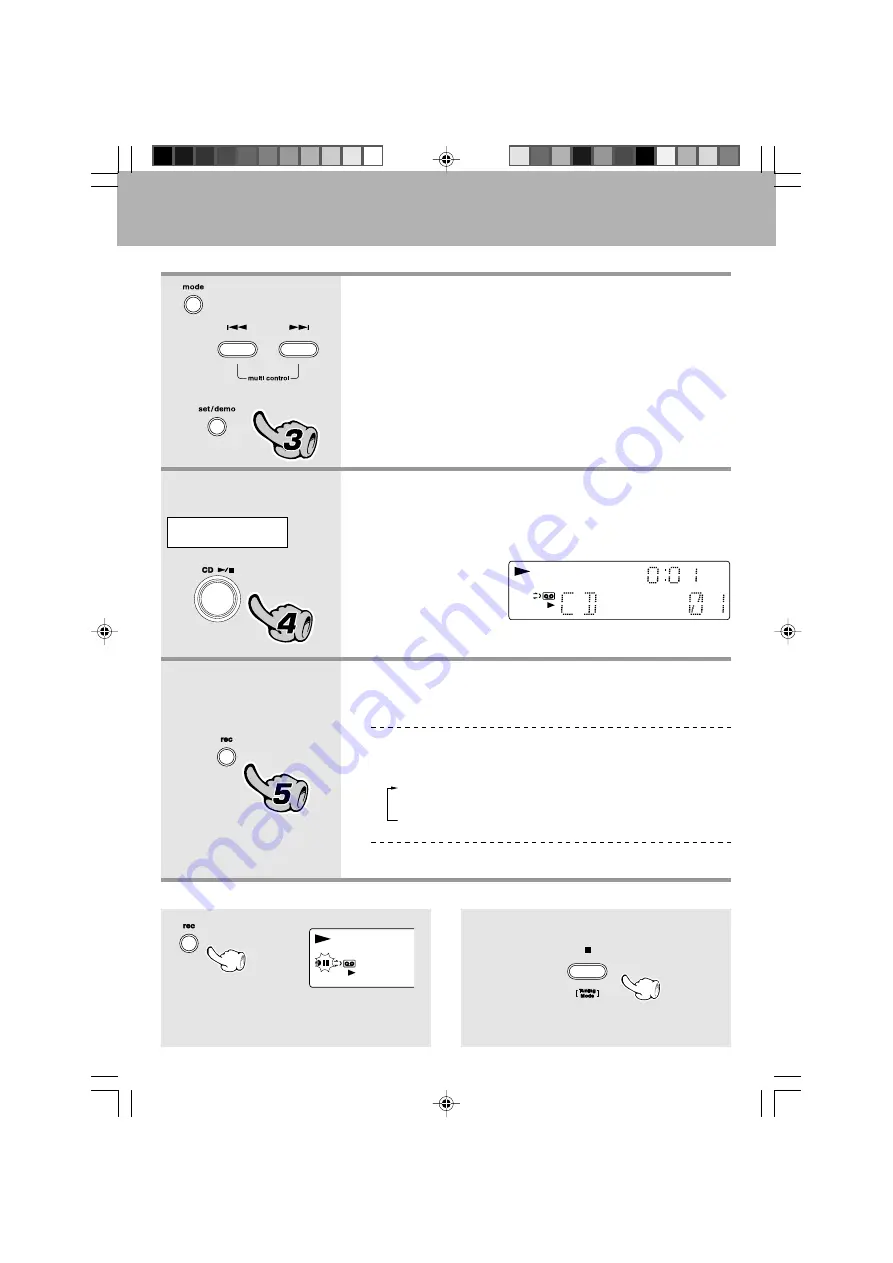
Recording on TAPE

27

 EN

5.

Start recording.

4.

Select the source to be recorded.

Select an input source other than
"TAPE"

1

Press the rec key.

2

Play (or tune) the input source to be recorded.

÷

Recording stops automatically when the tape side (s) to be recorded have
been fully recorded.

CD

TUNER (Broadcasts)

AUX (External input) [

Adjusting the AUX input level 

]

÷

If a CD has already

been loaded, it starts to

play now. Press the 

7

key to stop it.

Pause the recording

÷

Press the 

rec

 key during recording. It pause after

leaving a non-recorded blank of 4 seconds. (Press

the key again to resume recording.)

Lights

Stop the recording

Select the reverse mode.

(

3.

Set the recording condition.

÷

Check the tape transport direction before starting recording. If it is set to

the reverse direction, only one side of tape can be recorded regardless of

the reverse mode setting made here.

÷

The tape equalizer is defeated during recording.

The character information display shows the re-
cording input source.

\

\

\

\

Example:
To select the CD input

1

"BEAT CANCEL ON" :

(Beat Cancel is activated)

2

"BEAT CANCEL OFF" :

(Beat Cancel is deactivated)

Each press switches the modes as follows.

While recording from tuner input, beat sound can be minimised by
pressing the set/demo key.

5377/26-28/EN

03.4.24, 3:16 PM

27

Summary of Contents for HM-636

Page 1: ...COMPACT HI FI COMPONENT SYSTEM HM 636 INSTRUCTION MANUAL KENWOOD CORPORATION B60 5377 00 00 MA M X E KW 0303 5377 01 05 EN 03 4 24 3 33 PM 1 ...

Page 2: ... VOLTAGE WITHIN THE PRODUCT S ENCLOSURE THAT MAY BE OF SUFFICIENT MAGNITUDE TO CONSTITUTE A RISK OF ELECTRIC SHOCK TO PERSONS THE EXCLAMATION POINT WITHIN AN EQUILATERAL TRIANGLE IS INTENDED TO ALERT THE USER TO THE PRESENCE OF IMPORTANT OPERATING AND MAINTENANCE SERVICING INSTRUC TIONS IN THE LITERATURE ACCOMPANYING THE APPLIANCE CAUTION Beforeapplyingpower Caution Read this page carefully to ens...

Page 3: ...rd to demonstration DEMO ON To execute demonstration After turning power ON press and hold the set demo key for more than 2 seconds DEMO OFF To cancel demonstration Press the set demo key during demonstration Convenient recording features Versatile recording features are provided allowing the user to select the desired one for each purpose One touch recording Pressing a single key starts the recor...

Page 4: ...fy your shipper immediately Kenwood recommends that you retain the original carton and packing materials in case you need to move or ship the unit in the future Keep this manual handy for future reference FM indoor antenna 1 AM loop antenna 1 Remote control unit 1 Batteries R6 AA 2 AC plug adaptor 1 Use to adapt the plug on the power cord to the shape of the wall outlet Accessory only for regions ...

Page 5: ... preset 22 RDS Radio Data System For Europe 23 Searching for a desired program type PTY search 24 Recording on TAPE 26 Caution Read the pages marked carefully to ensure safe operation Various CD playback features 29 Listening to the desired sequence program playback 29 Repeated playback 31 Playing tracks in a random order random playback 32 Convenient recording methods 33 One touch edit recording ...

Page 6: ...nd speaker cords If the and polarity are inverted the sound will be unnatural with unclear positioning of musical instru ments etc Be sure to insert all connection cords securely If their connections are imperfect the sound may not be produced or noise may interfere Before plugging or unplugging a connection cord be sure to unplug the power cord from the wall AC outlet If connection cords are plug...

Page 7: ...or antenna Speaker cord FM indoor antenna Speaker Left POWER cord TO WALL AC OUTLET 1 Connect the antenna to the antenna terminal 2 Locate the position providing good recep tion condition 3 Fix the antenna 1 2 3 How to connect speaker cords to the main unit Malfunction of microcomputer If operation is not possible or erroneous display appears even though all connections have been made properly res...

Page 8: ...ommercially Available Parts Leadthe75ΩcoaxialcableconnectedtotheFMout door antenna into the room and connect it to the FM 75Ω terminal Please remove the indoor an tennaafteranoutdoorantennahasbeeninstalled Connect the components as shown in the dia gram Only plug the power cord into a power outlet once connections are completed CAUTION Note on Connection Audio cord Audio output VCR Analog turntabl...

Page 9: ...dness indicator 0 O T E One Touch Edit indicator Tape related indicators 1 Select APS AUTO POWER SAVE function When the unit is ON and the unit is left for 30 minutes with CD or TAPE not operating the unit is switched off automatically by this function This is convenient when you forgot to switch off the unit This function can be activated or deactivated by the following operation When the TUNER o...

Page 10: ...o reset the function of the 4 and keys to normal mode 7 set demo key 39 Press to set or enter an item selected with the 4 and keys This key is also used for switching demonstration on off and the beat cancel function on while recording the radio broadcast 8 Headphone jack Connect headphone with a stereo mini plug optionally available About the one touch operation function This unit incorporates th...

Page 11: ... key CD TAPE Press to stop a disc or tape operation TUNER Press to switch between the AUTO auto tuning stereo reception and MONO manual tuning monaural reception modes Standby mode Press to display the clock CD open close key Press to open or close the CD tray Display panel Basic operation keys AUX key fl Press to reproduce the external source component connected to the AUX analog auxiliary input j...

Page 12: ...ys CD Used to skip CD tracks TAPE Used to fast forward or rewind tape TUNER Used to receive a preset radio station 1 TUNING keys CD TAPE Used to fast forward or fast reverse the played audio TUNER Used to select a radio station AUX key fl Press to reproduce the external source component connected to the AUX analog auxiliary input jacks ENTER key Press to enter a radio station in the preset memory o...

Page 13: ...tion may occur In such a case change the installation position to avoid malfunction Operating range approx Remote sensor Loading batteries 1 Remove the cover 2 Insert batteries 3 Close the cover Insert two R6 AA size batteries following the polarity indications 6 m Controls and indicators RANDOM key CD Press for setting playback of tracks in a random order 6 VOLUME keys Press to adjust the volume ...

Page 14: ...NER band CD 6 TAPE 2 3 or AUX key also turns power on and starts playback reception of the corresponding input One touch operation When the CD or TAPE input is selected while the corresponding disc or tape has been loaded it immediately starts to play 2 Selectingthedesiredoutput Pressing the TUNER band CD 6 TAPE 2 3 or AUX key se lects the correspond ing input CD TAPE TUNER Broadcasts AUX External...

Page 15: ... into the headphone jack The lowest and highest frequency bands can be adjusted independently Tone adjustment The levels of both BASS and TREBLE can be ad justed in 2 steps in the range between 8 and 8 Adjusting the tone while the LOUD or EX BASS indicator is lit turns it off and cancels the sound en hancement mode To adjust the other frequency band repeat steps 1 and 2 for it Adjusting the tone w...

Page 16: ...is placed into the CD player in advance the unit will be switched on automatically by pressing the CD 6 key and playback will start Skipping tracks Playback from desired track Skipping tracks To stop playback To stop playback Start playback To pause playback To fast forward and backward Do not touch the played side of disc Be sure to place a disc horizontally Placing it with an inclination will re...

Page 17: ...ck No 23 10 X 2 3 To select track No 40 10 X 4 0 Playback from desired track Select the desired track No To stop playback Eject the CD The CD tray will open Pressing the key again closes the CD tray Playback of CD EachpressoftheTIMEDISPLAYkeychangesthe displayed contents 1 Elapsed time of track being played 2 Remaining time of track being played REMAIN lights up 3 Elapsed time of entire disc TOTAL...

Page 18: ...the deck is loaded with a tape Reverse mode indication Transport direction indicators Tape counter Do not use a cassette with more than 90 minute recording time for the tape used with such a cassette is very thin and tends to cause troubles such as entanglement around the pinch roller or cutting off tape Transport direction indicators Indicates the tape transport direction during playback or recor...

Page 19: ...elpful as a reference for locating the same posi tion when continuing the recording playback the next time The tape counter figure decreases dur ing recording or playback of the back side while the 2 tape transport indicator is lit To set the tape counter to 0000 open the cassette holder once Then the counter will be reset A tip for use of the tape counter 1 Select TAPE RVS 2 Select 3 Set it 1 ONE...

Page 20: ...m the remote use the 4 P CALL key or numeric keys The TUNED indicator lights when a station is received Collective presetting of stations One by one presetting Manual preset A station can also be tuned even when it is not preset For details read Tuning to a non preset radio station Auto tuning Manual tuning Once the stations are stored by auto presetting you are not required to repeat this procedu...

Page 21: ...e setting does not match the setting in the area where the system is to be used for instance when you move from area 1 or area 2 shown in the following table or vice versa proper reception of AM FM broadcasts cannot be expected In this case change the channel space setting in accordance with your area by referring to the following table CHANNEL Space Frequency Area 1 2 USA Canada and South America...

Page 22: ...rnates the mode 1 AUTO Stereo reception AUTO lit 2 MANUAL Monaural reception AUTO not lit 1 Perform the procedure in Tuning to a non preset radio station Auto tuning Manual tuning to receive the station to be preset 2 Press the ENTER key during reception 3 Select one of the preset numbers from 1 to 30 4 Press the ENTER key again In MANUAL mode FM stations are received in mon aural Normally use the...

Page 23: ...atically searches for a station which is currently broadcasting a specified program type genre PS Program Service Name Display When an RDS broadcast is received the station name is automatically displayed The RDS indicator lights up when an RDS broad cast signal is received Some functions may not be provided or be given dif ferent names depending on countries or areas RDS RadioDataSystem For Europ...

Page 24: ...Music Rock Music Easy Listening Music Light Classical Serious Classical Other Music News Current Affairs Information Sport Education Drama Culture Science Varied Weather Finance Children s programs Social Affairs Religion Phone In Travel Leisure Jazz Music Country Music National Music Oldies Music Folk Music Documentary Use program type table on the right for your convenience POP M ROCK M EASY M L...

Page 25: ...played then after several seconds the display returns to the original display If a program of the desired type is found that program is received and the program type name display changes to the station name display When searching for a Rock Music broadcast Display while the tuner is searching When a station is received Goes off Program type name display Station name display TIMEDISPLAY PTY 5377 18...

Page 26: ...ng RecordingonTAPE Do not use a cassette with more than 90 minute recording time for the tape used with such a cassette is very thin and tends to cause troubles such as entanglement around the pinch roller or cutting off tape The tape deck of the unit can record signals only on Normal Type tapes It cannot record on High Type and Metal Type tapes When there is a tape slack wind the tape before load...

Page 27: ...nk of 4 seconds Press the key again to resume recording Lights Stop the recording Select the reverse mode 3 Settherecordingcondition Check the tape transport direction before starting recording If it is set to the reverse direction only one side of tape can be recorded regardless of the reverse mode setting made here The tape equalizer is defeated during recording The character information display...

Page 28: ...rack 3 Put the cassette deck in Record pause mode Press rec key twice 4 Start playing the CD Recording starts Points in CD recording When recording CD tracks onto a tape if you leavethecassettedeckinrecord pausemodebe forehand the cassette deck recording can be started when the CD starts to be played To stop recording press the 7 key 5377 26 28 EN 03 4 24 3 16 PM 28 ...

Page 29: ...k No 23 10 X 2 3 To select track No 40 10 X 4 0 VariousCDplaybackfeatures Use the following procedure to program desired tracks in a desired order up to 32 tracks 1 2 3 Program position of the track to be selected next Toselectmorethanonetrack repeatsteps1and 2 for each track Tracks will be played in the order they were pro gramed following the program numbers When the 4 key is pressed once during...

Page 30: ...d of the existing program To clear a programed track To clear the entire program Each time the key is pressed the last track in the pro gram is cleared Goes off Press the numeric keys as shown below To select track No 23 10 X 2 3 To select track No 40 10 X 4 0 The program mode is canceled when the unit is turned off or the programed disc is ejected The set program is cleared entirely at this time ...

Page 31: ...dicator is lit turn it off by pressing the PGM key in stop mode to cancel the program mode Setup for repeating all tracks in a disc 1 Confirm that the PGM indicator is not lit 2 Select 3 Start playback If the PGM indicator is lit turn it off by pressing the PGM key in stop mode to cancel the program mode Confirm that this is not lit Confirm that this is not lit Repeatedplayback Each press switches...

Page 32: ...e modes as follows 1 RDM on Random playback 2 RDM off Normal playback If the PGM indicator is lit turn it off by pressing the PGM key in stop mode to cancel the program mode To select another track in the middle of playing one To cancel random playback The RDM indicator goes off and the playback in order of the tracks starts from the track being played Playback stops after each track has been play...

Page 33: ... CD TAPE fi With recording onto tape the track will be interrupted for the part of the guide tape at the tape reversal where recording is not possible Please use single side recording if this is to be avoided Recording of programed tracks in the programed order Convenient for recording only the desired CD tracks in the desired order Convenientrecordingmethods The tape deck of the unit can record si...

Page 34: ...desired CD track and play it If it is in play mode stop it All track recording Single track recording When step 3 is performed in the middle of CD play back the current track will be recorded from the begin ning Start recording 3 When either playback or recording stops the other op eration is stopped automatically To record other tracks repeat steps 2 and 3 for each track To interrupt a recording ...

Page 35: ...ntire editing contents will be erased º Tracks programed beyond the available tape recording time will be interrupted in the middle Start recording 3 To interrupt a recording Recording and playback will be stopped At the end of the recording Cassette deck Stop is executed after an unre cordedportionofabout4sec has been produced Recording starts from the first track in the program and ends after ha...

Page 36: ...g the input level control also varies the record ing level from the input source connected to the AUX input jacks Select AUX external input Play the connected equipment Adjust the volume 1 2 3 Input level Each press switches the display contents TAPE RVS INPUT TIMER TIME ADJUST APS Adjusting the AUX Input Level 1 Press the AUX key 2 Select INPUT 3 Adjust the input level 4 Set it The level increase...

Page 37: ...ntered and the minute display starts to blink Adjust the minute 1 Select the figure of minute 2 Set it 3 If you make a mistake restart from the beginning When the time of day has been set by pressing the set demo key the display shows COMPLETE After a power failure or the power cord has been un plugged the time set will be erased You have to set the time again when unit is switched on When the 7 k...

Page 38: ...eep timer 10 20 30 70 80 90 Cancel 10 20 Connect the related equipment under reference to System connection 6 8 Press the SLEEP key while the sleep timer is activated to check the remaining time Timeroperation Sleep timer SLEEP The unit is turned OFF automatically after the specified period has elapsed Timer playback timer recording PROG 1 PROG 2 Playback of the selected input source or recording ...

Page 39: ...ess the set demo key When a timer setting has already been made in the selected timer the setting will be overwritten by the new setting 1 Select TIMER 2 Select PROG 1 or PROG 2 3 Set it Press the set demo key while the mark is blinking Adjust the clock before setting the timer Connect the related equipment under reference to System connection 6 8 1 2 Playing the auxiliary input source To listen t...

Page 40: ... is executed every day 4 1 Select ONETIME or EVERYDAY 2 Set it Set the ON time then the OFF time In other areas than Europe the clock shows the time of the day in the 12 hour system For each of the ON time and OFF time enter the figure of hour by performing steps 1 and 2 then enter the figure of minute in the same manner If you make a mistake press the mode key and restart from step 2 5 1 Adjust t...

Page 41: ...t it 1 TUNER Broadcasts 2 CD 3 TAPE 4 AUX External input video etc Continued on next page Continued on next page 2 Adjust the volume level 1 Adjust 2 Set it 3 Select the input source 1 Select what is to be recorded 2 Set it 1 PLAY 2 REC 3 AI PLAY 1 TUNER Broadcasts 2 AUX External input video etc When PLAY is selected the timer playback will start at the set volume level When AI PLAY is selected th...

Page 42: ...nly when TUNER is selected above 1 Select the preset station No 2 Set it Put the unit in standby mode 7 When the unit enters the Standby mode the standby timer indicator lights in green If there is a power failure or the power cord is un plugged after the timer reservation has been activated the standby timer indicator blinks in green In this case the clock setting should be restarted from the be ...

Page 43: ...ion in a following circumstances When this unit is carried from one place to another across a large difference in temperature when the humidity in the room where this unit is installed increases etc Caution on condensation Memory backup function Stored contents which are cleared immediately when power plug is unplugged from power outlet Clock display Stored contents which will back up after power ...

Page 44: ... off Storage When a disc is not to be played for a long period of time remove it from the player and store it in its case WARNING NOTICE In most cases it is an infringement of copyright to make copies of tapes or discs without the permission of the copyright owners Anyone wishing to copy commercially available tapes or disc should contact the mechanical copyright protection society limited or the ...

Page 45: ...hout changing the figures Timer operation is not possible Connect properly referring to System connections 6 Adjust to a required volume Switch MUTE OFF Unplug the headphone plug A speaker cord is short circuited Turn power off and re connect the speaker cord Adjust the present time again Set the timer ON OFF time properly Insert correctly Adjust to a required volume Connect properly referring to ...

Page 46: ...erly when the AUX input is recorded Adjust the AUX input level fl Demagnetize the head referring to Maintenance e Install the system at a distance from other electric appliances and TV Set the TAPE EQ to on Clean the head referring to Maintenance e Wind the tape again by fast forwarding rewinding or playing from an end to the other Use a cassette with an unbroken recording protect tab or block the ...

Page 47: ...DE An attempt is made to start random playback in the program mode Exit from the program mode before random playback º PROTECT The cassette in use is protected by breaking the erasure protection tab r RDM MODE An attempt is made to perform O T E recording while the unit is in the CD random play mode Exit from the random play mode In case of difficulty 5377 43 48 EN 03 4 24 3 28 PM 47 ...

Page 48: ...AC bias system Frequency 105 kHz Heads Playback recording head 1 Erasing head 1 Wow and flutter 0 2 W R M S Main unit RXD M66 Enclosure Bass reflex type Speaker configuration Woofer 120 mm cone type Tweeter 25 mm dome type Impedance 6 Ω Maximum input level 50 W Dimensions W 152 mm 6 H 255 mm 10 1 16 D 213 mm 8 3 8 Weight net 2 7 kg 6 0 lb 1 piece KENWOOD follows a policy of continuous ad vancement...

Reviews: