background image

51

Application section

MD Edit Functions

1

TITLE

INPUT

SET

P.CALL

TITLE INPUT


......

DI

S

C

TITLE INPUT

  .......

0

0 1

Assigning a title to a disc or track

When titles are assigned to a disc and its tracks,
the titles cannot only be displayed during play-
back but title search (searching a track by the
title) is also made possible. The assigned titles
can be changed or deleted with the same proce-
dure.

Execute operation in stopped condition or during playback.

Activate the title input mode.

1

Press the TITLE INPUT key.

2

Select whether the disc title or track
title input.

( To abort operation, press the TITLE INPUT key

again.)

To advance

To return

3

Set the selection.

List of registered symbols (ASCII codes):

! “ # $ % & ’( ) * + , - . / : ; < = > ` ? @ _ ˆ

Total number of title characters

Up to 1792 characters can be input per disc and up
to 80 characters can be input per track.
A space (blank character) also require the same
amount of data as alphanumeric characters. To erase
the title, do not enter a space but delete each char-
acter using the CLEAR/DELETE key.

R

Disc titles can be assigned in stop mode.
When the MD

6

 key pressed before

step 

1

-

3

 while assigning a title to a

track, the title can be entered while lis-
tening to that track.

÷

It takes a while because data should be read out of the
disc.

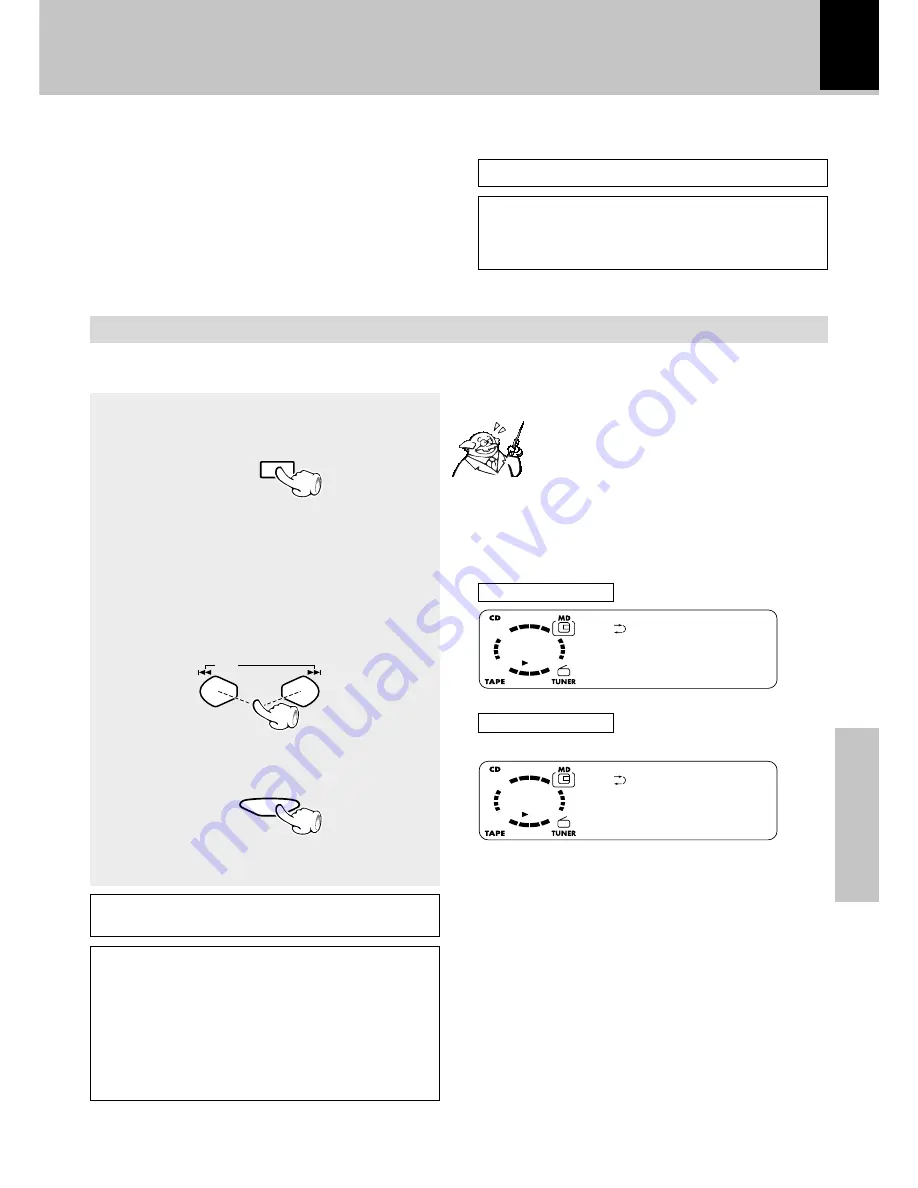
In case of disc title

In case of track title

Select the desired track No.

Continued on next page

Always eject the MD after title entry or editing.

Do not turn power off or apply shock or impact while
"WRITING" is displayed. If the power cord is un-
plugged before "WRITING" disappears, the recorded
or edited data will be lost.

÷

To cancel title editing in the middle, press the 

TITLE

INPUT

 key.

Summary of Contents for HM-382MD

Page 1: ...MICRO HI FI COMPONENT SYSTEM INSTRUCTION MANUAL KENWOOD CORPORATION B60 4719 08 EN HM 382MD TEXT DIGITAL AUDIO COMPACT ...

Page 2: ...ral Brown Live Do not connect those leads to the earth terminal of a three pin plug Other countries AC 110 120 220 240 V switchable AC voltage selection The AC voltage selector switch on the rear panel is set to the voltage that prevails in the area to which the unit is shipped Before connecting the power cord to your AC outlet make sure that the setting position of this switch matches your line v...

Page 3: ...ram recording CD MD CD TAPE TWIN REC 43 Program recording MD TAPE 44 MD Edit Functions 45 Selecting the editing function type 45 Moving a single track TRACK MOVE 46 Dividing a track TRACK DIVIDE 48 Combining two tracks TRACK COMBINE 49 Erasing a single track TRACK ERASE or erasing all tracks on a disc ALL ERASE 50 Assigning a title to a disc or track 51 Changing or deleting a title 54 Erasing all ...

Page 4: ...O OFF To cancel demonstration Press the set demo key when DEMO is ON DEMO ON To execute demonstration After turning power ON press and hold the set demo key for more than 2 seconds In regard to demonstration This unit is equipped with a demonstration func tion only display The demonstration consists of sequential change of display and indicators show ing the operations but the audio itself does no...

Page 5: ...pping company without delay Only the consignee the person or company receiving the unit can file a claim against the carrier for shipping damage We recommend that you retain the original carton and packing materials for use should you transport or ship the unit in the future Keep this manual handy for future reference Accessories Please confirm that the following accessories are present FM indoor ...

Page 6: ...the best recep tion Speaker Right Main Unit CAUTION Note on Connection Connect the components as shown in the dia gram Only plug the power cord into a power outlet once connections are completed 1 2 3 4 1 Never short circuit the and speaker cords 2 If the and polarity are inverted the sound will be unnatural with unclear positioning of musical instruments etc 3 Be sure to insert all connection cor...

Page 7: ...ix the antenna Speaker Left Speaker cord POWERcord Connect correctly to and to TO WALL AC OUTLET FM indoor antenna CAUTION Be sure to adhere followings Or proper venti lation will be blocked causing damage or fire hazard Do not place any objects impairing heat ra diation onto the top of unit Leave a space around the unit from the larg est outside dimension including projection equal or greater tha...

Page 8: ...able with built in RIAAequalizer optionalP 110 etc CAUTION Note on Connection Connect the components as shown in the diagram Only plug the power cord into a power outlet once connections are completed 1 In case an associated system component is connected also read the instruction manual of the component 2 Be sure to insert all connection cords securely If their connections are imperfect the sound ...

Page 9: ...eft for 30 min utes with CD MD and TAPE not operating the unit is switched off automatically by this function This is convenient when you forgot to switch off the unit This function can be activated or deactivated by the following operation menu down volume multi control up down volume multi control up menu down volume multi control up down volume multi control up set demo set demo set demo 1 Sele...

Page 10: ...p AUX sound 4 menu set demo TEXT TEXT DIGITAL AUDIO DIGITAL AUDIO COMPACT COMPACT Main unit Controls and indicators About the one touch operation function This unit incorporates the one touch operation function for the user s convenience With this function pressing any key enclosed in while the unit is in standby mode immediately start playback or reception 1 2 3 4 5 6 7 8 9 0 ...

Page 11: ... and start MD playback Press during MD playback to let it pause temporarily Press during MD recording to let it pause temporarily phones jack Headphones with a stereo mini plug optional can be con nected Cassette holder Press the TAPE0 key to open or close menu key Press to switch the function of the volume multi control knob This key is also used when setting the time of the day O set demo key Pr...

Page 12: ...arching an MD title TITLE INPUT key Q This is used in MD title input operation RDS related keys Only some areas PTY key fl Used at the time of program type detection 6 MUTE key This is used to suppress the sound temporarily 7 POWER key The system is switched ON and STANDBY 8 Keys related to CD and MD Common keys for CD and MD function for CD or MD according to the input selection TRACK EDIT key y ...

Page 13: ...ed to execute an MD editing operation or to enter an input title uR It is also used to enter the preset station memory in the tuner 7STOP key 0 TAPE 23 key MD6 key CD6 key TUNER band key TAPE O T E key MD O T E key q These keys are used for recording of a CD onto tape or MD with a one touch operation Press either key during CD playback to record the currently played track onto tape or MD Press in ...

Page 14: ... turns power on and starts playback reception of the corresponding input One touch operation When the CD MD or TAPE input is selected while the corresponding disc or tape has been loaded it immediately starts to play 2 Selecting the desired output CD MD TAPE TUNER Broadcasts AUX External input I Adjusting the AUX input level I Pressing the CD 6 MD 6 AUX TAPE 23 or TUNER band key selects the corres...

Page 15: ...des as follows 1 EX BASS lights The lowest and highest frequencies are en hanced regardless of the current volume level 2 LOUD Loudness lights The lowest and highest frequencies are en hancedaccordingtothecurrentvolumelevel Effective during low volume listening 3 Both indicators off Canceled Adjusting the tone while the LOUD or EX BASS indicator is lit turns it off and cancels the sound enhancemen...

Page 16: ...use playback To stop playback To stop playback Skipping tracks 1 Load a disc 1 Press the CD 0 key 2 Place a disc 3 Press the CD 0 key The label side must be on top 2 Start playback 0 CD 1 1 In regard to CD TEXT When discs conforming to CD TEXT are played with this unit the text information recorded on the CD disc name or titles is displayed automatically Some CDs conforming to CD TEXT may not disp...

Page 17: ...orward and backward Remote control unit only Playback starts from the position where the key is released Backward search Forward search Do not touch the played side of disc Be sure to place a disc horizontally Placing it with an inclination will result in malfunction Titles are displayed for discs conforming to CD TEXT After a few seconds play starts from track No 1 Time display on CD player Remot...

Page 18: ...yback To pause playback 1 Load a Mini Disc Insert the minidisc correctly into the slot of this unit When a title has been recorded for the disc the title is displayed In the direction of the arrow 2 Start playback If the MD being played contains recording of track titles the track title is displayed at the beginning of each track during playback CAUTION The MD cannot be loaded or ejected while the...

Page 19: ...ys the MD alternately Elapsed time of track being played The display changes Disc title Track title Playback from desired track Remote control unit only Time display on MD recorder Remote control unit only Each press of the TIME SPACE key changes the displayed contents Remaining time of track being played Elapsed time of entire disc Elapsedtimeoftrackbeingplayed Remaining time on entire disc This ...

Page 20: ...ed Q Goesoff When the PGM indicatior is lit press the PGM AUTO MONO key on the remote control unit to switch it off To smaller track No To larger track No With a track to which no title has been assigned the track number and are displayed Track selection is possible with the 4 or key of the main unit To abort operation press the TITLE SEARCH key again Track title Blinks Playback of Mini Disc 1 Sel...

Page 21: ...d With a CD TEXT or MD disc Pressing the key during stop scrolls the disc title Pressing the key during playback scrolls the track title When no track name track title and no disc name disc title has been recorded is displayed BLANK DISC is displayed when not even one track has been recorded When there is a disc title the disc title will be displayed Each press switches the information 1 Available...

Page 22: ...Start playback To wind tape at high speed To stop playback 1 Load a cassette tape 1 Press the TAPE 0 key 2 Insert a tape 3 Press the TAPE 0 key Start playback 2 Start playback During playback the tape running direction changes each time the key is pressed Indicates the tape transport direction during playback or recording by lighting of 2 or 3 This direction is the direction stored in memory when ...

Page 23: ...PE RVS 2 Select 3 Set it A tip for use of the tape counter The tape counter is set to 0000 when a cassette tape is loaded By writing down the counter reading in case you want to interrupt recording playback in the middle of the tape the memo will be helpful as a reference for lo cating the same position when continuing the recording playback the next time The tape counter figure decre ments during...

Page 24: ...ations in sequence When is pressed 1 2 3 38 39 40 1 When 4 is pressed 40 39 38 3 2 1 40 Auto tuning The next broadcasting station will be received automatically each time this key is pressed Manual tuning Press the 1TUNING key repeatedly until a station is received Or hold either key and release it when the frequency of the desired station is received 3 Tuning Preset Call Once stations are stored ...

Page 25: ...eset stations will be skipped at an interval of about 0 5 second Preset stations can be called using the number keys on the remote control unit Reception band indication Frequency display Lights during stereo reception The TUNED indicator lights when a station is received Lights at the time of auto matic station selection A maximum of 40 stations of the band presently being received will be preset...

Page 26: ...etting does not match the setting in the area where the system is to be used for instance when you move from area 1 or area 2 shown in the following table or vice versa proper reception of AM FM broadcasts cannot be expected In this case change the channel space setting in accordance with your area by referring to the following table CHANNEL Space Frequency Area 1 2 USA Canada and South American c...

Page 27: ...27 Basic section ...

Page 28: ...orded Select an input source other than MD CD Only digital recording TAPE Only analog recording TUNER Broadcasts Only analog recording AUX External input Only analog recording Adjusting the AUX input level I Pause the recording Stop the recording CAUTION The MD cannot be loaded or ejected while the unit is in standby mode Do not force load a MD in standby mode otherwise malfunction will result Exa...

Page 29: ...cks for programming etc With digital recording from a CD the track number is increased when the track changes Note Note Note At the time of recording from a CD the track number may be incremented when CD playback starts This occurs because of a signal included in the digital signal from the CD Delete unwanted tracknumbersunderreferenceto TRACKERASE or ALL ERASE p Do not turn power off or apply sho...

Page 30: ...mal TYPE and high TYPE tape is set automatically Remove tape slack before loading 2 Select the tape transport direction Whenrecordingisstarted thetapeistransportedinthedirectionselectedinthis step Check the tape transport direction indicator Wind the tape to the position where recording is to be started 1 Press the play key 2 Press the play key again 3 Stop playback To reverse the transport direct...

Page 31: ...ame procedure as above Select an input source other than TAPE CD MD TUNER Broadcasts AUX External input Adjusting the AUX input level I Thecharacterinformationdisplay showstherecordinginputsource 4 Select the source to be recorded If a CD or MD has already been loaded it starts to play now Press the 7STOP key to stop it 5 Start recording 1 Press the TAPE rec key 2 Play or tune the input source to ...

Page 32: ...ain When a track No is entered the track will be added to the end of the existing program is displayed when the total programmed period has attained 100 minutes or more Press the numeric keys as shown below To select track No 23 003 To select track No 40 0000 To select track No 213 03 To select more than one track repeat steps 1 and 2 for each track Start playback Tracks will be played in the orde...

Page 33: ...epeat track No 3 select REPEAT in the middle of its playback or during pause on it Setup for repeating all tracks in a disc 1 Confirm that the PGM indi cator is not lit Lights Each press switches the repeat mode 1 REPEAT 2 REPEAT ALL 3 Off Repeat deactivated Confirm that this is not lit 2 Select REPEAT ALL Lights When the MD input is selected 2 Play the track to be repeated PGM AUTO MONO CD MD or ...

Page 34: ...T ALL 1 Program the track sequence according to steps1 to 2 of Listening in the desired se quence To stop repeated playback Press the REPEAT key repeatedly until the repeat mode is switched off The REPEAT ALL indicator turns off and playback according to the current CD player or MD recorder mode 3 Start playback Playback stops after each title has been played once The random playback can also be r...

Page 35: ...ification Search fl The tuner automatically searches for a station which is currently broadcasting a specified program type genre PS Program Service Name Display When an RDS broadcast is received the station name is automatically displayed The RDS indicator lights up when an RDS broad cast signal is received Some functions may not be provided or be given different names depending on countries or a...

Page 36: ...UP Program type table Pop Music Rock Music Easy listening music Light Classical Serious Classical Other Music News Current Affairs Information Sport Education Drama Culture Science Varied Weather Finance Children s programs Social affairs Religion Phone in Travel Leisure Jazz music Country music National music Oldies music Folk music Documentary A Selection with the 4or key B Selection with the nu...

Page 37: ...No sound is heard while PTY is blinking If a program of the desired type cannot be found NO PROG is displayed then after several seconds the display returns to the original display If a program of the desired type is found that program is received and the program type name display changes temporarily to the station name display Station name display R D S Radio Data System Except for some areas TIT...

Page 38: ...38 Application section ...

Page 39: ...tracks from a disc being heard for the first time Simultaneous recording of an entire CD onto an MD and tape Simultaneous recording of the CD track being played onto an MD and tape This is convenient for recording of desired tracks from a disc being heard for the first time Recording of programmed tracks in the pro grammed order Convenient for recording only the desired CD or MD tracks in the desi...

Page 40: ...ng and playback will be stopped To interrupt a recording One high speed recording starts it is not permitted to record the same disc with high speed recording for 74 minutes after the start of recording If you want to record the same disc immediately use one touch edit recording recording at normal speed q Time period until high speed recording of the same disc is permitted Turning the knob switch...

Page 41: ...f it is in play mode stop it Select the desired CD track and play it To record other tracks repeat steps 2 and 3 for each track To interrupt a recording Recording and playback will be stopped At the end of the recording MD recorder Stop Cassette deck Stop is executed after an unre corded portion of about 4 sec has been produced When the MD O T E or TAPE O T E key is pressed for Single track record...

Page 42: ...rd other tracks using Single track twin re cording repeat steps 2 and 3 for each track If it is in play mode stop it 1 Select REC MODE then TWIN REC 2 Start recording To interrupt a recording Recording and playback will be stopped At the end of the recording MD recorder Stop Cassette deck Stop is executed after an unre corded portion of about 4 sec has been produced With single track simultaneous ...

Page 43: ...ontents the entire editing contents will be erased Tracks programmed beyond the available MD or tape recording time will be interrupted in the middle To interrupt a recording Recording and playback will be stopped 1 Select REC MODE then TWIN REC 2 Start recording At the end of the recording MD recorder Stop Cassette deck Stop is executed after an unre corded portion of about 4 sec has been produce...

Page 44: ...sed to cancel the edited contents the entire editing contents will be erased Tracks programmed in excess of the tape recording time will be cut off Press twice Make the preparations for recording Start recording To interrupt a recording At the end of the recording Cassette deck Stop is executed after an unre corded portion of about 4 sec has been produced Press twice Tape recording starts at the s...

Page 45: ... contents as the title of another disc or track Y Title input is possible simply by selecting one char acter after another from the characters shown on the display As the entered title is compatible be tween models it will be displayed also when the disc is set into a different MD recorder player The title compatibility is limited partly according to the character types which can be displayed the ...

Page 46: ...execute operation in stopped condition Always eject the MD after title entry or editing Select MOVE 2 Select MOVE 3 Set it 1 Press the TRACK EDIT key Each press switches the operation To initiate TRACK MOVE dur ing playback go to step 3 To increase track No To decrease track No 1 Select a track number 2 Set it Track to be moved Track to be moved Track to be moved Select the track to be moved 1 MOV...

Page 47: ...ination track No 1 Select a track number Execute track move 2 Set it After editing eject and remove the mini disc P CALL To increase track No To decrease track No Do not turn power off or apply shock or impact while WRITING is displayed If the power cord is un pluggedbefore WRITING disappears therecorded or edited data will be lost ...

Page 48: ...rm the operations in the following procedure while the display is blinking Pressing the key during play back initiates pause 2 Select DIVIDE 1 Press the TRACK EDIT key 3 Set it 4 ENTER COMPLETE Each press switches the operation 1 DIVIDE 2 COMBINE 3 ERASE 4 MOVE After editing eject and remove the mini disc Execute the track divide operation There is no blank space left between the two tracks When t...

Page 49: ...n stop mode Each press switches the operation When pressed in play mode 1 DIVIDE 2 COMBINE 3 ERASE 4 MOVE Select the track to be combined 1 Select the track number 4 ENTER COMPLETE Track No and title of the second track are cleared Track No and title of the first track are left Execute the track combine operation After editing eject and remove the mini disc 2 Set it Perform the operations in the f...

Page 50: ...ack to be erased 1 Select ERASE 2 Set it Execute the erase operation After editing eject and remove the mini disc A track can also be erased by selecting the track number with the 4 or key 3 Set it Execute the erase operation After editing eject and remove the mini disc Select ERASE Select ALL ERASE Erasing a single track Erasing all tracks on a disc 1 Select ERASE 2 Set it ALL ERASE is displayed ...

Page 51: ...itle characters Up to 1792 characters can be input per disc and up to 80 characters can be input per track A space blank character also require the same amount of data as alphanumeric characters To erase the title do not enter a space but delete each char acter using the CLEAR DELETE key R Disc titles can be assigned in stop mode When the MD6 key pressed before step 1 3 while assigning a title to ...

Page 52: ...input of the next character Title editing character list The following uppercase and lowercase alphabets and symbols can be used in title editing Pressing a key more than once changes the character input with it Example When the ABC key is pressed Each press changes the character which can be input A B C a b c Press the 1 or key to move the input location cursor to the left or right If you made a ...

Page 53: ...aracter to be entered 2 Press the 4 or key to move the selection cursor on the desired charac ter Holding the 4 or key scrolls the display so any character in the same character group can be selected Press the 1 or key to move the input location cursor to the left or right The cursor moves and waits for input of the next character In the Skip key mode for character entry a title memo or the title ...

Page 54: ...on Changing or deleting a title If power is switched off to STANDBY mode or the TITLE INPUT key is pressed to cancel setting before the ENTER key is pressed here theinputsmadeuntilthenwillbecleared Do not turn power off or apply shock or impact while WRITING is displayed If the power cord is un pluggedbefore WRITING disappears therecorded or edited data will be lost 3 Press the CLEAR DELETE key to...

Page 55: ...p mode 4 Select the title group 123 containing the copy source title 5 Select the disc or track title to be cop ied 6 Save it in the save destination title memo 7 Press the TITLE INPUT key to complete editing To cancel TITLE COPY in the middle press the TITLE INPUT key on the remote Press the DISPLAY CHARAC key repeatedly until title memo selection menu appears To copy other titles in other title ...

Page 56: ...y on the remote To enter characters in other title memos repeat steps 2 to 4 for each character set Copying title memo contents as the title of another disc or track Step 2 Select a disc or track title as the des tination in place of the title memo Step 5 Select a title memo 1 to 3 as the copy source This editing operation is available by exchang ing the parties copy destination and copy source in...

Page 57: ... mode Balance adjustment Adjust for the desired left right balance Adjusts the balance of left and right volume Main unit operation only Select BALANCE Press the set demo key while the mark is blinking The levels of both BASS and TREBLE can be adjusted in 2 steps in the range between 8 and 8 Adjusting the tone while the LOUD or EX BASS indicator is lit turns it off and cancels the sound enhance me...

Page 58: ...ontrol up Listening to an AUX input source 1 Select AUX INPUT down volume multi control up set demo 2 Adjust the input level The level decreases The level increases Adjust the input level while AUX INPUT is displayed Adjustment is possible over the range from 4 to 3 Adjusting the input level control also varies the recording level from the input source connected to the AUX input jacks 3 Set it L I...

Page 59: ... set demo key The hour is entered and the minute display starts to blink 1 Enter the figure of minute Enter the figure of minute 2 Set it To decrease minute To increase minute Example Adjustment to 8 07 If you make a mistake restart from the beginning When the time of day has been set by pressing the set demo key the display shows COMPLETE After a power failure or the power cord has been un plugge...

Page 60: ...lect TIMER SET 3 Press the set demo key 4 Rotate the volume multi control knob to select O T T SET 5 Press the set demo key to set O T T SET 6 Rotate the volume multi control knob to select the time of the day to start playback or tuning ON time 7 Press the set demo key to set the ON time 8 Reserve the timer operation 9 Press the POWER key to turn power off STANDBY The standby timer indicator ligh...

Page 61: ...ed to the AUX input jacks Set a tape into Insert a disc Programplaybackisnotpossible The station should be preset prior to the above Load a disc Programplaybackisnotpossible Select the timer number Press the set demo key while the mark is blinking 1Select TIMER SET 2 Select PROG 1 SET or PROG 2 SET Press during display of the pro gram contents The selected timer number lights If the selected timer...

Page 62: ...en TUNER is selected above 1 Select the preset sta tion No 2 Enter it 1 PLAY Timer play 2 REC 3 AI PLAY Timer play with gradu ally increasing volume For timer recording 1 Select the mode 1 Select REC 2 Enter it 1 PLAY 2 REC 3 AI PLAY 3 Select the broadcast sta tion only when TUNER is selected above 1 Select the preset station No 2 Enter it 4 Select the broadcast sta tion only when TUNER is selecte...

Page 63: ...OFF Set the time Turn the unit OFF or press the SLEEP key until the sleep time is cancelled To cancel The unit is turned OFF automatically after the set time has elapsed Each press increases the timer period by 10 minutes The sleep timer can be set up to 90 minutes 10 20 30 70 80 90 Cancel 10 20 Duration for sleep timer Lights Thestandby timerindicatorlightsinamberinthestandby mode After the timer...

Page 64: ... data still images etc have been recorded Otherwise the Clip data may be lost US and foreign patents licensed from Dolby Laborato ries Note related to transportation and movement Before transporting or moving this unit carry out the following operations 1 Remove the CD or MD from the unit 2 Press the MD 6 key 3 Press the CD 6 key 4 Wait for some time and verify that the display becomes as shown in...

Page 65: ...the disc with a soft cotton cloth or similar from the center of the disc outwards in a radial manner Handling Hold the discs so that you do not touch the playing surface Discs which can be played with this unit CD 12 cm 8 cm and the audio part of CDV CD G CD EG and CD EXTRA Use discs that comply with the IEC standard for example a disc carrying the DIGITAL AUDIO DIGITAL AUDIO COMPACT COMPACT marki...

Page 66: ...cassette with more than 90 minute recording time for the tape used with such a cassette is very thin and tends to cause troubles such as entanglement around the pinch roller or cutting of tape Copy using analog input Copy using analog input Digital copy cannot be repeated Copy using digital input Copy using digital input Copy using analog input Copy using digital input Copy using digital input Ref...

Page 67: ...rn power off and re connect the speaker cord Adjust the present time again Insert correctly Adjust to an required volume Connect properly referring to System connection Adjust the optimum left and right balance Adjust the present time again Adjust the present time referring to Clock adjust ment Set the timer ON time and OFF time Press the TIMER key to set up the execution Sound is not produced sta...

Page 68: ...cording to different formats This is not a malfunction The title recording area is used in units of 7 characters so that input of 1792 characters may not be possible Cause DISC FULL is displayed while the disc still has a remaining recordable time The possible recording time does not increase even when a short track is erased Tracks can not be connected The time which has been recorded on the MD a...

Page 69: ...kind of signal Use another recordable disc More than 256 tracks cannot be recorded per disc There may be also cases in which recording is impossible while the track number is less than 256 Refer to Total number of title characters When playback is required use a recorded disc The disc can be used for recording without any problem This is a normal operation This is a normal operation Perform ALL ER...

Page 70: ...ew seconds after closing the cassette holder Change the tape transport direction or reverse the tape insertion orientation Press in stop mode Clean the head referring to Maintenance Try another tape Adjust the AUXinput level Demagnetize the head referring to Maintenance Install the system at a distance from other electric appliances and TV Set the TAPE EQ to on Clean the head referring to Maintena...

Page 71: ... 1 Bit Wow flutter Less than unmeasurable limit CD player section Laser Semiconductor laser D A Conversion 1 Bit Wow and flutter Less than unmeasurable limit Cassette deck section Track 4 track 2 channel stereo Recording system AC bias system Frequency 65 kHz Heads Playback recording head 1 Erasing head 1 Motors 1 Wow and flutter 0 2 W R M S Fast winding time Approx 100 seconds C 60 tape General P...

Page 72: ...rd the serial number found on the back of the unit in the spaces designated on the warranty card and in the space provided below Refer to the model and serial numbers whenever you call upon your dealer for informa tion or service on this product Model Serial Number ...

Reviews: