background image


USE AND CARE  

WARNING: Many areas of an outdoor gas grill generate extreme heat. We have taken 


every precaution to protect you from the contact areas. However, it is impossible to  
isolate all high-temperature areas. Therefore, use good judgment and caution when  
grilling on this product. We suggest a covered, protected hand during operation of grill. Do 
not move your grill when it is in operation or hot to the touch. Wait until your unit is turned 
off and properly cooled down before moving it. Failure to follow this warning  
could result in personal injury. 


Do not operate the gas grill indoors or in any enclosed area. If the gas grill is not in use, the gas must 
be turned off at the supply tank. If the grill is to be stored indoors, disconnect the gas supply hose.  

When checking for gas leaks, do not use an open flame. Use a soapy water solution and  
apply it to the pipe joints and fittings with a brush and check for bubbles. Check flexible hoses  
for cuts and wear that may affect the safe operation of the grill. Only use original equipment  
replacement hoses. Use only replacement hose assemblies specified by manufacturer.  

Checking Gas Leaks  

Before operating your grill, after refueling, check carefully to be certain that all connections are 
tight and there are no gas leaks.  
1. Make 2-3 ounces of leak solution by mixing liquid dishwashing soap with water.  
2. Make certain all control knobs are in the “OFF” position.  
3. Brush small amounts of the leak solution on all the fittings and turn the gas on.  
4. If bubbles appear, there is a leak. Proceed to step 5.  
5. Turn the gas off and tighten all connections.  
6. Go back to step 1 to retest the fittings.  
7. If bubbles continue to appear, turn the gas off. Contact customer service.  

WARNING: Never use a match or open flame for leak detection. Use of an open flame 
could result in a fire, explosion and bodily harm.  
IMPORTANT: When connecting or replacing any gas pipe or fittings, all joints must be 
sealed with approved leak-proof sealing compound or plumber's tape.  

Never store a spare tank under or near your grill.  
IMPORTANT: When connecting or replacing gas pipe or fittings, all joints must be  
sealed with approved leak-proof sealing compound or plumber's tape. After making  
connections, check all joints for leaks using a soapy water solution and a brush.  

WARNING: Never use an open flame to test for gas leaks. Use of an open flame could 
result in a fire, explosion and bodily harm.  


12 

Summary of Contents for 34562

Page 1: ...ñol Kenmore Elite Natural Gas Conversion Kit Paquete de conversion a gas natural Model Modelo 34562 Item Articulo 500 06277531 7 P N 30800339B Sears Brands Management Corporation Hoffman Estates IL 60179 U S A www kenmore com www sears com www kmart com ...

Page 2: ... not attempt to convert Contact customer service for replacement parts at 1 844 553 6667 CALIFORNIA PROPOSITION 65 Place the grill on a flat level surface before starting the conversion We strongly recommend that you hire a professionally trained technician to install this Natural Gas Conversion Kit Incorrect installation may result in explosion and serious injury 1 Combustion by products produced...

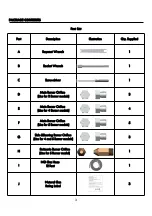
Page 3: ...ver 1 D Main Burner Orifice Use for 3 Burner models 3 E Main Burner Orifice Use for 4 Burner models 4 F Main Burner Orifice Use for 5 Burner models 5 G Side Searing Burner Orifice Use for 4 and 5 Burner models 3 H Rotisserie Burner Orifice Use for 5 Burner model 1 I 1 J Natural Gas Rating Label 3 3 NG Gas Hose 12 Feet ...

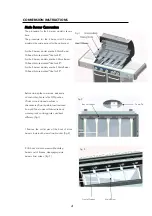
Page 4: ... 4 burner and 3 burner models is the same except for the parts used For the 5 burner model use the 5 Main Burner Orifices that are marked Use for 5B For the 4 burner models use the 4 Main Burner Orifices that are marked Use for 4B For the 3 burner models use the 3 Main Burner Orifices that are marked Use for 3B 1 Remove the cotter pins at the back of main burners to detach burners from bracket Fig...

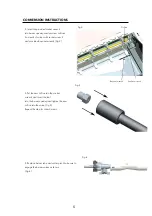
Page 5: ...ovided bayonet wrench Fig 4 Fig 4 Socket wrench Orifice 4 Put the new orifice into the socket wrench and insert the tool into the burner opening and tighten the new orifice into the valve Fig 5 Repeat this step for other burners Fig 5 5 Replace burner tube and cotter pins Make sure to engage the burner valves as shown Fig 6 Fig 6 5 Bayonet wrench ...

Page 6: ...ner opening and unscrew orifice from end of valve with socket wrench and provided bayonet wrench Fig 8 Fig 8 6 4 Put the new orifice into the socket wrench and insert the tool into the burner opening and tighten the new orifice into the valve Fig 9 5 Replace side burner and screws Side Burner Conversion use for 4B 5B For the 4 and 5 burner models use 1 of the 3 Side Searing Burner Orifices that ar...

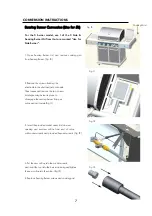
Page 7: ...r from gas valve and set it aside Fig 11 4 Put the new orifice into the socket wrench and insert the tool into the burner opening and tighten the new orifice into the valve Fig 13 5 Replace Searing Burner screws and cooking grid 7 Searing Burner Conversion Use for 5B For the 5 burner model use 1 of the 3 Side Searing Burner Orifices that are marked Use for Side Burner 3 Insert the provided socket ...

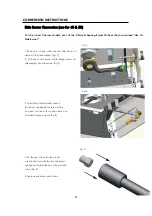
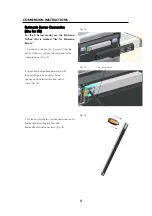
Page 8: ...crews from the back of firebox to remove the rear panel of the rotisserie burner Fig 14 2 Insert the provided bayonet wrench with the end of bigger opening into burner opening and unscrew orifice from end of valve Fig 15 Fig 15 Fig 14 3 Put the new orifice into the bayonet wrench and tighten the new orifice into the valve Replace Rear Panel and screws Fig 16 8 Fig 16 Bayonet wrench ...

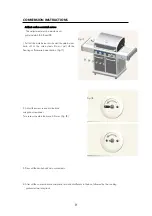
Page 9: ...es and warming rack Adjust valve control screw This adjustment must be made on all grill models 5B 4B and 3B 1 Pull all the main burner knobs and the side burner knob off of the valve stems Do not pull off the Searing or Rotisserie burner knobs Fig 17 2 Adjust the screw in each valve hole using the screwdriver Turn screw counterclockwise 2 3 turns Fig 18 Fig 18 Fig 17 9 ...

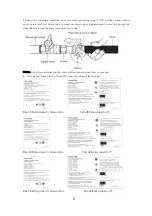
Page 10: ... cart as shown Tighten it to the fitting on the L shaped bracket where the regulator hose was removed From House to Grill Distance Tubing Size Up to 25 ft 3 8 in diameter 26 ft 50 ft 1 2 in diameter 51 ft 100 ft 2 3 of run 3 4 in 1 3 of run 1 2 in 3 If desired the fuel gauge can be removed from the grill by removing the 4 screws that hold it in place 4 Coat pipe nipple with gas resistant teflon ta...

Page 11: ... sure to leak test these connections prior to use Notice Also follow any instructions that came with the natural gas line that you are using 6 Paste the new Rating Label for Natural Gas near the original LP Rating Label Elite 3B Rating Label for Natural Gas Elite 3B Rating Label for LP Elite 4B Rating Label for Natural Gas Elite 4B Rating Label for LP Elite 5B Rating Label for Natural Gas Elite 5B...

Page 12: ...y manufacturer Checking Gas Leaks Before operating your grill after refueling check carefully to be certain that all connections are tight and there are no gas leaks 1 Make 2 3 ounces of leak solution by mixing liquid dishwashing soap with water 2 Make certain all control knobs are in the OFF position 3 Brush small amounts of the leak solution on all the fittings and turn the gas on 4 If bubbles a...

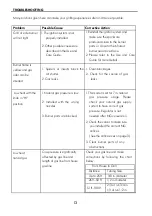
Page 13: ...2 Check for the source of gas leaks Low heat with the knob in HI position 1 Natural gas pressure is low 2 Installed with the wrong nozzles 3 Burner ports are blocked 1 This model is set for 7 in natural gas pressure usage Please check your natural gas supply system to have correct gas pressure Regulator is not needed after NG conversion 2 Check the valves to make sure you installed the correct NG ...

Page 14: ... to all supplied instructions WITH PROOF OF SALE return a defective product to the retailer from which it was purchased for free replacement This warranty is void if this product is ever used for other than private household purposes This warranty gives you specific legal rights and you may also have other rights which vary from state to state Sears Brands Management Corporation Hoffman Estates IL...

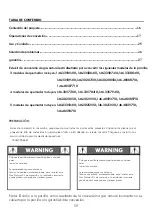
Page 15: ... las piezas con el paquete de lista de contenidos Si alguna pieza falta o está dañada no intente convertir Póngase en contacto con servicio al cliente para las piezas de repuesto en 1 844 553 6667 Coloque la parrilla sobre una superficie plana y nivelada antes iniciar la conversión Le recomendamos que contrate a un técnico capacitado profesionalmente para instalar este Gas Natural Kit de conversió...

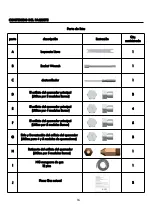
Page 16: ...ilice por 3 modelos Burner 3 E El orificio del quemador principal Utilice por 4 modelos Burner 4 F El orificio del quemador principal Utilice por 5 modelos Burner 5 G Side y Devastación del orificio del quemador Utilice para 4 y 5 modelos de quemadores 3 H Rotisserie del orificio del quemador Utilice por 5 modelos Burner 1 I 1 J Placa Gas natural 3 NG manguera de gas 12 pies 16 ...

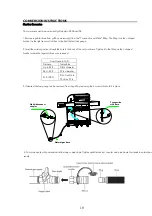
Page 17: ...rior de la cámara de combustión 2 Levante posterior de los quemadores principales mientras desliza quemadores de la cámara de combustión principal desenganchar quemadores de válvulas Fig 3 Fig 2 Fig 3 Frente del Firebox quemador principal 17 El procedimiento para el modelo 5 quemadores se muestra aquí El procedimiento para la estufa de 4 quemadores y 3 modelos es los mismos a excepción de las piez...

Page 18: ...Fig 4 llave de tubo orificio 4 Coloque el nuevo orificio en el zócalo llave e inserte la herramienta en la abertura del quemador y apriete la nueva orificio en la válvula Fig 5 Repita este paso para los otros quemadores Fig 5 5 Reemplace los pins del tubo del quemador y chavetas Asegúrese de involucrar a las válvulas de los quemadores como se muestra Fig 6 Fig 6 18 llave de bayoneta suministrada f...

Page 19: ...quemador y orificio unscrew desde el extremo de la válvula con llave de vaso y una llave de bayoneta suministrada fig 8 Fig 8 19 4 Coloque el nuevo orificio en el zócalo llave e inserte la herramienta en la abertura del quemador y apriete el nuevo orificio en la válvula Fig 9 5 Reemplace el quemador lateral y tornillos Quemador lateral Conversión uso para 4B y 5B Para los modelos de 4 y 5 quemador...

Page 20: ...la válvula de gas y déjela a un lado Fig 11 4 Coloque el nuevo orificio en la llave de tubo e inserte la herramienta en la abertura del quemador y apriete el nuevo orificio en la válvula Fig 13 5 Reemplace Devastación Burner tornillos y rejilla de cocción 20 Devastación Conversión del quemador Uso para 5B Para el modelo de 5 quemadores utilizar 1 de los 3 laterales y de abrasadoras Burner orificio...

Page 21: ... de la cámara de combustión para quitar el panel trasero del quemador del asador giratorio Fig 14 2 Inserte la llave de bayoneta siempre con Al final de abertura más grande en la grabadora apertura y orificio unscrew de final de la válvula Fig 15 Fig 15 Fig 14 3 Coloque el nuevo orificio en la llave de bayoneta y apriete el nuevo orificio en la válvula Vuelva a colocar los tornillos del panel y tr...

Page 22: ...y rejilla de calentamiento Ajuste el tornillo de control de la válvula 1 Saque todas las perillas de los quemadores y la perilla del quemador lateral a la salida de la válvula de deriva No saque las perillas de los quemadores abrasadoras o asador Fig 17 2 Ajuste el tornillo en cada orificio de la válvula con el destornillador Gire el tornillo en sentido contrario a las agujas del reloj Fig 18 Fig ...

Page 23: ... del regulador De la casa a la parrilla Distancia Tamaño de tubo Hasta 25 ft 3 8 in diámetro 26 ft 50 ft 1 2 in diámetro 51 ft 100 ft 2 3 of correr 3 4 in 1 3 of correr 1 2 in 3 Si lo desea el medidor de combustible se puede quitar de la parrilla mediante la remoción de los 4 tornillos que lo mantienen en su lugar 4 Cubra la boquilla del tubo con cinta de teflón resistente al gas o tuberías Apriet...

Page 24: ... fugas en estas conexiones antes de su uso Note También puede seguir las instrucciones que venían con la línea de gas natural que está utilizando 6 Pegue la nueva etiqueta de clasificación para Gas Natural cerca de la original de la etiqueta LP Clasificación Elite Etiqueta 3B Clasificación para Gas Natural Elite Etiqueta 3B Clasificación para LP Elite Etiqueta 4B Clasificación para Gas Natural Eli...

Page 25: ...ar combustible verifique cuidadosamente para asegurarse de que todas las conexiones están apretadas y que no haya fugas de gas 1 Prepare 59 15 ml a 88 72 ml de solución para fugas mezclando detergente líquido para platos con agua 2 Asegúrese de que todas las perillas de control estén en la posición de APAGADO 3 Coloque pequeñas cantidades de solución para fugas con el cepillo en todas las conexion...

Page 26: ...rucciones La parrilla genera poco calor con la perilla en la posición ALTO 1 La presión de gas natural está baja 2 Se instalaron las boquillas incorrectas 3 Los orificios de los quemadores están bloqueados 1 Este modelo está configurado para un uso con presión de gas natural de 17 78 cm Verifique su sistema de suministro de gas natural para determinar si tiene una presión de gas correcta No se nec...

Page 27: ... VENTA devolver un producto defectuoso a la tienda de la que fue comprado para el reemplazo libre Durante un año desde la fecha de la venta de este Esta garantía será nula si el producto se utiliza para otros fines que no sean los hogares privados Esta garantía le otorga derechos legales específicos y usted también puede tener otros derechos que varían de estado a estado Sears Brands Management Co...

Page 28: ...Sears Sears Parts Repair Service Center Parts Repair Service Center Parts Repair Service Center Parts Repair Service Center 1 1 1 1 800 800 800 800 488 488 488 488 1222 1222 1222 1222 U S A 1 1 1 1 800 800 800 800 469 469 469 469 4663 4663 4663 4663 Canada To purchase a protection agreement on a serviceable product 1 1 1 1 800 800 800 800 827 827 827 827 6655 6655 6655 6655 U S A 1 1 1 1 800 800 8...

Reviews: