ISTRUZIONI PER IL MONTAGGIO
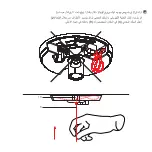
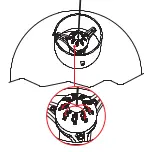
Appoggiare la basetta (1) al soffitto nella posizione desiderata e fare due segni utilizzandola come dima.
Rimuoverla successivamente e praticare due fori con una punta da trapano Ø6 mm.
ASSEMBLY INSTRUCTIONS
Place the base (1) on the ceiling in the desired position and make a mark on each side to indicate the
diameter. Then remove it and make two holes with a Ø6 mm drill bit.
MONTAGEANLEITUNG
Halten Sie den Fuß (1) in der gewünschten Position als Schablone an die Decke und fertigen Sie zwei
Markierungen an. Entfernen Sie ihn danach und führen Sie zwei Bohrungen mit einem Bohrer von Ø6 mm aus.
INSTRUCTIONS POUR LE MONTAGE
Posez la base (1) au plafond dans la position souhaitée et faites deux marques en l’utilisant comme un
gabarit. Enlevez-la puis percez deux trous avec une mèche de Ø6 mm.
INSTRUCCIONES DE MONTAJE
Apoye el zócalo (1) en el techo en la posición que desee y realice dos marcas para utilizarlas como
galga. A continuación, retírelo y practique dos orificios con una broca de taladro de Ø6 mm.
INSTRUÇÕES PARA MONTAGEM
Colocar a base (1) no tecto, na posição desejada e fazer dois sinais, utilizando-a como um gabarito.
Posteriormente removê-la e praticar dois furos com uma ponta de berbequim de Ø6 mm.
組み立て方
天井の取り付け位置に基板(1)を当て、定規のようにして穴をあける位置(2箇所)に印をつけます。ベース
を外して、軸径6 mmのドリルビットで2つ穴をあけます。
조립 지침
받침대(1)를 천장의 원하는 위치에 놓고 양쪽에 표시를 해서 직경을 표시한 다음 제거해 Æ6mm 드릴
비트로 두 개의 구멍을 뚫으십시오.
IT
EN
DE
FR
ES
PO
JP
CN
KO
Summary of Contents for Bellissima
Page 1: ...Bellissima Ferruccio Laviani...
Page 7: ...220 240V E27 max 15W LED Kartell...
Page 9: ...1 9 7 8 2 3 5 4 6...
Page 11: ...1 6 RU AR...
Page 13: ...RU AR 8 8 8 2 3 9...
Page 15: ...AR 13 3 2 3 9...
Page 17: ...RU AR 8 7 1...
Page 19: ...RU AR 7 8 2 1...
Page 21: ......
Page 23: ......
Page 34: ...Kartell...
Page 35: ......


