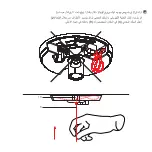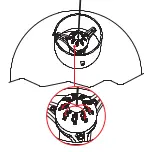
Prestare attenzione a non fare fuoriuscire i cavi oltre misura come indicato in figura.
Svolgere il cavo di alimentazione e la fune metallica, far passare i terminali attraverso il rosone (2).
Inserire la fune metallica (3) nell’apposito alloggiamento (9) e spingere verso l’alto.
Ensure that the cables do not protrude as shown in the figure.
Unwind the power cord and the metal cable, pass the terminals through the ceiling rose (2).
Insert the metal cable (3) in its lodging (9) and push upwards.
Achten Sie darauf, dass die Kabel nicht übermäßig heraustreten, wie in der Abbildung gezeigt.
Stromkabel und Metallseil abwickeln und die Klemmen durch den Baldachin führen (2).
Metallseil (3) in die Aufnahme (9) einfügen und nach oben drücken.
Veiller à ne pas faire sortir les câbles outre mesure, comme indiqué dans la figure.
Dérouler le câble d’alimentation et le cordon métallique, faire passer les bornes à travers la rosace (2).
Insérer le cordon métallique (3) dans le logement prévu à cet effet (9) et pousser vers le haut.
Preste atención para evitar que se salgan los cables más allá de su medida, como se indica en la figura.
Desenrolle el cable de alimentación y el cable metálico; pase los terminales por el rosetón (2).
Introduzca el cable metálico (3) en el alojamiento (9) y empuje hacia arriba.
Prestar atenção para que os cabos não saiam fora das medidas como indicado na figura.
Desenrolar o cabo de alimentação e o cabo metálico, fazer passar os terminais através da rosácea (2).
Inserir o cabo metálico (3) no alojamento específico (9) e empurrar para cima.
図に示すように、ワイヤーを長く出しすぎないように注意してください。
電源ケーブルとメタルケーブルを延ばし、天井のキャップ (2) を通して端子を通します。
メタルケーブル (3) を所定の位置 (9) に挿入し、上に押し込みます。
注意不要让缆线超出如图所示的尺寸。
松展电源线和钢丝绳,将端子穿过天花板灯线盒(2)。
将金属电缆(3)插入专用底座(9)并向上推。
“그림에서 보는 것처럼 케이블이 적정선 밖으로 나오지 않도록 주의하십시오.
전원 코드와 와이어 줄을 풀고 실링 로즈(2) 속으로 단자를 통과 시키세요.
와이어 줄(3)을 적절한 하우징(9)에 삽입하고 위쪽으로 밀어주세요.
Обратите внимание, что длина кабелей не должна превышать указанную на рисунке.
Разверните кабель питания и металлический тросик и протяните их через отверстие (2).
Вставьте металлический тросик (3) в соответствующее гнездо (9) и затолкайте излишек
его обратно вверх.
IT
EN
DE
FR
ES
PO
JP
CN
KO
RU
Summary of Contents for Bellissima
Page 1: ...Bellissima Ferruccio Laviani...
Page 7: ...220 240V E27 max 15W LED Kartell...
Page 9: ...1 9 7 8 2 3 5 4 6...
Page 11: ...1 6 RU AR...
Page 13: ...RU AR 8 8 8 2 3 9...
Page 15: ...AR 13 3 2 3 9...
Page 17: ...RU AR 8 7 1...
Page 19: ...RU AR 7 8 2 1...
Page 21: ......
Page 23: ......
Page 34: ...Kartell...
Page 35: ......


