


10
Please use exclusively KÄRCHER deter-
gents and care products to carry out the re-
spective cleaning task, as these were
specifically developed for your appliance.
The use of other detergents and care prod-
ucts may lead to premature wear and can
invalidate your warranty claims. Please ob-
tain information at your local dealer or re-
quest information directly from KÄRCHER.
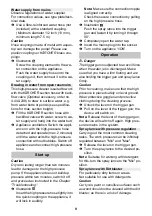
Notes regarding the detergent
: The most
commonly used KÄRCHER detergents can
be purchased ready to use in their Plug 'n'
Clean detergent bottles with locking lids.
This will make the pesky refilling and filling
processes redundant.
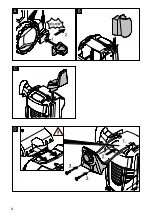
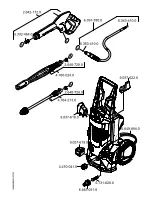
Illustration
Remove the lid from the Plug 'n' Clean
detergent bottle and press the deter-
gent bottle into the detergent connec-
tion with the opening facing down.
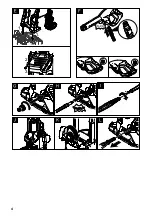
Illustration
Adjust the suction volume of the deter-
gent solution by means of the dosage
regulator for detergents.
Use spray lance with pressure regula-
tion (Vario Power).
Turn the spray lance to "Mix" position.
Note:
This will mix the detergent with
the water stream.
Note
: If required, the washing brushes can
be used to work with detergent.
Spray the detergent sparingly on the
dry surface and allow it to react, but not
to dry.
Spray off loosened dirt with the high
pressure jet.
Release the lever on the trigger gun.
Lock the lever on the trigger gun.
During longer breaks (more than 5 min-
utes), also turn the appliance off using
the "0/OFF" switch.
Caution
Only separate the high-pressure hose from
the trigger gun or the appliance while there
is no pressure in the system.
Remove the Plug 'n' Clean detergent
bottle from the intake and close it with
the lid. To store, place into the intake ro-
tated by 180°.
Release the lever on the trigger gun.
Turn off the appliance "0/OFF".
Turn off tap.
Press the lever on the trigger gun to re-
lease any remaining pressure in the
system.
Detach the appliance from the water
supply.
몇
Warning
When disconnecting the supply or high
pressure hose, hot water may leak from
the connections after operation.
Lock the lever on the trigger gun.
Pull out the mains plug.
Caution
In order to prevent accidents or injuries,
keep in mind the weight of the appliance
during transport (see Specifications).
Lift appliance by the carrying handle
and carry it.
Pull the appliance by its transport han-
dle.
Prior to horizontal transport: Remove
the Plug 'n' Clean detergent bottle from
the intake and close it with the lid.
Secure the appliance against shifting
and tipping over.
Working with detergent
Recommended cleaning method
Interrupting operation
Finish operation
Transport
When transporting by hand
When transporting in vehicles
Summary of Contents for K 7
Page 1: ...59659590 01 13 K 7 English...
Page 2: ...2...
Page 3: ...3...
Page 4: ...4...
Page 13: ......
Page 14: ......
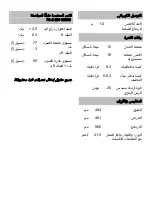
Page 16: ...I N O Vario Power x i M 220 240 1 50 V Hz 2 8 kW IP X5 I 16 0 6 60 12...
Page 17: ...KARCHER...
Page 18: ...Vario Power Mix 5 0 OFF Plug n Clean 180 0 OFF Plug n Clean...
Page 19: ...90 I N O Vario r e w o P n i M x a M KARCHER KARCHER Plug n Clean Plug n Clean...
Page 20: ...KARCHER EN 12729 BA KARCHER 4 730059 1 2 13 7 5 KARCHER KARCHER 4 440238 KARCHER...
Page 22: ...30 30 IEC 60364 30...
Page 23: ...30 1 10 1 5 2 10 30 2 5 2...
Page 24: ...KARCHER...
Page 25: ......
Page 26: ......
Page 27: ......
Page 28: ...59659590 01 13 K 7...


