9
NC
series
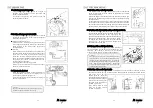
5-2 Adjusting the needle height
When the needle bar is at the bottom of its stroke, remove the plug on the head cover,
loosen screw A, and move the needle bar up or down. Setting distance B varies according to
the needle stroke or gauge size for further adjustment. (See chapter 5-4)
5-3 Angle and height for installing the looper
To obtain the proper angle and height, insert the looper fully into looper holder A and then
tighten screw B. The proper angle for the looper is 2º 30’. Distance at 25mm from the point
of the looper between the bottom of the looper blade and the extension line from the point
of the looper : Approximately 1.1mm.
< Note >
After the above adjustment, check to make sure each needle drops into the center of
each needle hole.
10
NC
series
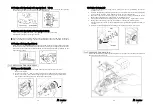
5-4 Looper setting distance
When the looper is at its farthest position to the right, looper setting distance is the
fundamental distance from the point of the looper to the center of the needle should be 6mm.
Also, setting distance X varies according to the needle stroke or gauge size for further
adjustment. (See the table below)
The point of the looper should pass the center of the left needle and 1.3~1.6mm above the
top of its needle’s eye when the looper moves to left on the back side of the left needle .
5-5 Needle/looper front-to-back relationship
When the point of the looper moves to the left needle should be same distance Y from the
top of its needle’s eye to the point of the looper by referring to the illustration below. To
adjust the timing of the looper to the needles, remove the machine cover, loosen screws A
on the timing pulley (upper), and shift the timing pulley (upper) by turning the handwheel
while holding the timing pulley by hand.
Needle height
(Bmm)
Looper setting
distance
(
Xmm
)
31
33
(
STANDARD
)
31/33
3.2 (1/8)
8.2
±
0.2
9.7
±
0.2
4.4
4.0 (5/32)
7.8
±
0.2
9.3
±
0.2
4.0
4.8 (3/16)
7.4
±
0.2
8.9
±
0.2
3.6
5.6 (7/32)
7.0
±
0.2
8.5
±
0.2
3.2
6.4 (1/4)
6.6
±
0.2
8.1
±
0.2
2.8
gauge
(inch)
Summary of Contents for NC Series
Page 2: ......
Page 3: ......
Page 4: ......
Page 5: ......
Page 6: ......
Page 7: ......
Page 8: ......
Page 9: ......
Page 10: ......
Page 11: ......
Page 12: ......
Page 13: ......
Page 14: ......
Page 15: ......
Page 16: ......
Page 17: ......
Page 18: ......
Page 19: ......
Page 20: ......
Page 21: ......
Page 22: ......
Page 23: ......
Page 24: ......
Page 25: ......
Page 26: ......
Page 27: ......
Page 28: ......
Page 29: ......
Page 30: ......
Page 31: ......
Page 32: ......
Page 33: ......
Page 34: ......
Page 35: ......
Page 36: ......
Page 37: ......
Page 38: ......
Page 39: ......
Page 40: ......
Page 41: ......
Page 42: ......
Page 43: ......
Page 44: ......
Page 45: ......
Page 46: ......
Page 47: ......
Page 48: ......
Page 51: ...NC Series Instruction Manual NC1103 4 G series ...
Page 63: ...NC J SJ Series Instruction Manual NC1001GSJ NC1001GSJF NC1001GJ ...


