


6
within the routing display.
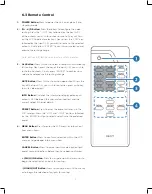
10. Note:
The associated analog output will not be muted.
11. LCD window:
Displays the unit’s menu, settings and information.
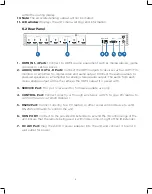
6.2 Rear Panel
1. HDMI IN 1~4 Ports:
Connect to HDMI source equipment such as media players, game
consoles or set-top boxes.
2. AUDIO/HDMI OUT A~D Ports:
Connect the HDMI outputs to devices such as HDMI TVs,
monitors or amplifiers for digital video and audio output. Connect the audio outputs to
powered speakers or an amplifier for analog stereo audio output. The audio from each
stereo analog output will be the same as the HDMI output it is paired with.
3. SERVICE Port:
This slot is reserved for firmware update use only.
4. CONTROL Port:
Connect directly, or through a network switch, to your PC/laptop to
control the unit via Telnet/WebGUI.
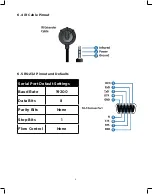
5. RS232 Port:
Connect directly to a PC, laptop or other serial control device to send
RS-232 commands to control the unit.
6. IR IN PORT:
Connect to the provided IR Extender to extend the IR control range of the
unit. Ensure that the remote being used is within direct line-of-sight of the IR Extender.
7. DC 24V Port:
Plug the 24V DC power adapter into the unit and connect it to an AC
wall outlet for power.
Summary of Contents for HDMX44A-18G
Page 35: ...35 ...