background image

32

Network Settings

Changing the IP address using the 
Internet Explorer (continued)

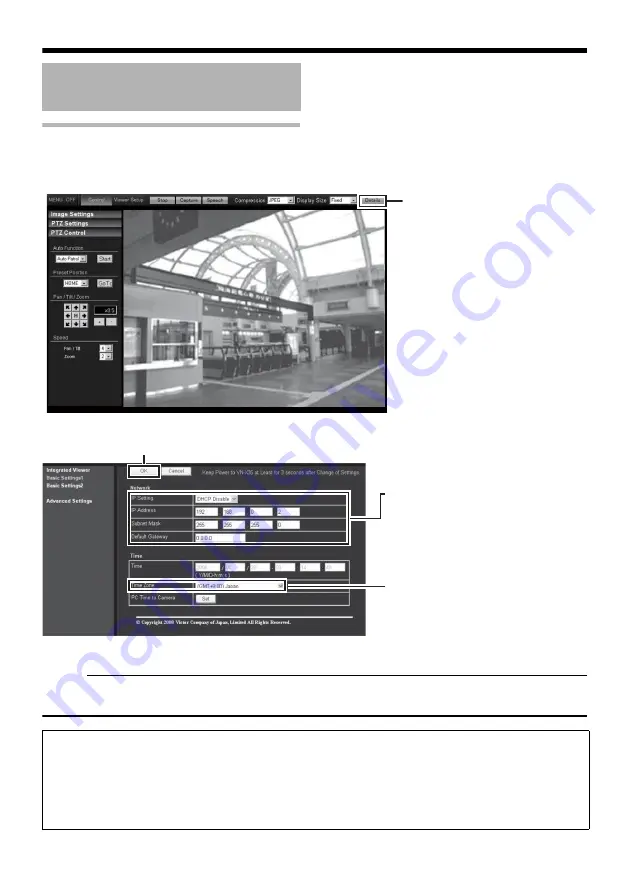
5

Click [Detalis] of the 

VN-X35U

 Built-in Veiwer

6

The [Basic Settings1] screen appears

A confirmation screen appears. Press the[OK]  button. VN-X35U restarts using the new IP address. It 
takes about one minute for the camera to reboot.

Memo:


Access from this computer may fail when the IP address of VN-X35U is changed. To enable access 
to VN-X35U from the same computer, alter the IP address at the computer accordingly.

IP Address Settings 
(continued)

Click 

A

B

C

Set the[IP setting] item to [DHCP 
Disable].
Enter the values you wish to 
specify in the [IP address], 
[Subnet Mask] and [Default 
Gateway] fields.

Select the [Time Zone].

Click

When the display or configuration of the opened screen appears strange, check 

using the following procedures.

A

Click 

[Start]

-

[Control Panel]

-

[Display]

 and open the 

[Display Properties]

 window

B

Click the 

[Settings]

 tab in the 

[Display Properties]

 windows and click the 

[Advanced]

 button

C

Check that 

[DPI setting]

 in the 

[General]

 tab has become 

[Normal size(96DPI)]

D

Otherwise, change the setting to 

[Normal size(96DPI)]

 andreboot windows

Summary of Contents for VN-X35U - Network Camera

Page 1: ...MEGAPIXEL IP CAMERA VN X35U INSTRUCTIONS LST0789 001A Thank you for purchasing this JVC product Before operating this unit please read the instructions carefully to ensure the best possible performance ...

Page 2: ... interference at his own expense This device complies with Part 15 of the FCC Rules Operation is subject to the following two conditions 1 This device may not cause harmful interference and 2 this device must accept any interference received including interference that may cause undesired operation Information for Users on Disposal of Old Equipment European Union This symbol indicates that the ele...

Page 3: ...ed ist JVC Technical Services Europe GmbH Postfach 10 05 04 61145 Friedberg Deutschland WARNING TOREDUCETHE RISK OF FIRE OR ELECTRIC SHOCK DO NOT EXPOSETHIS APPLIANCETO RAIN OR MOISTURE AVERTISSEMENT Due to design modifications data given in this instruction book are subject to possible change without prior notice WARNING FOR EUROPE This is a Class A product In a domestic environment this product ...

Page 4: ...oduct during a lightning storm or when it is left unattended and unused for long periods of time unplug it from the wall outlet and disconnect the antenna or cable system This will prevent damage to the product due to lightning and power line surges 11 Do not allow anything to rest on the power cord Do not locate this appliance where the cord will be abused by persons walking on it 12 Follow all w...

Page 5: ...ng Using Internet Explorer When the IP address of VN X35U is known 33 When the IP address of VN X35U is unknown 33 Setup 33 Internet Explorer Setup 33 Enter user name and password 35 Setting 36 How to open the setting page 36 Basic Settings1 37 Basic Settings2 38 Camera Page 41 Encoding Page 46 Audio Page 48 Alarm Page 50 Alarm Environment Page 54 PTZ Page 58 Auto Patrol Page 59 Privacy Mask Page ...

Page 6: ...illance over a wide angle using a smaller bandwidth Privacy Mask Feature You can configure the privacy mask setting to hide specific area in shooting area Motion Detection This feature enables output of an alarm upon detection of motion in the video image within preset area Pre Post recorded image files may be sent via FTP using the alarm input Support for PoE Power over Ethernet This product supp...

Page 7: ...orate Delay in the MPEG4 playback images and may result in interruption in playback Sound might not be played back properly To make use of Built in MPEG4 Viewer of VN X35U install ffdshow that is open source codec You can download ffdshow from the Internet AD DA clock varies significantly depending on the sound card built in the PC Using such card may cause overflow or underflow of audio data and ...

Page 8: ...e malfunction or failure of the other and result in fire 䢇 Do not block vents around the equipment Inadequate heat ventilation may result in malfunction of this product Be sure not to block vents around the product Saving Energy 䢇 When this product is not in use for a long period of time turn off the power of the system to ensure safety and reduce power consumption Maintenance 䢇 Be sure to turn of...

Page 9: ... is not a malfunction 䢇 When using this product with the white balance set to AATWB the displayed color may differ slightly from the actual color according to the condition of the object due to the principle of the automatic tracking white balance circuit This is not a malfunction 䢇 The electronic shutter of this product is set to AAuto 1 15 1 100 B by default For regions with a commercial power s...

Page 10: ...is product to a fixer or rotating platform Use screws with a length between 5 mm to 7 mm Screws beyond the specified length may damage the interior while those shorter than specified may cause the camera to fall off and therefore these must not be used A Page 21 F MAC address Indicator The MAC address is a unique physical address of the product This address cannot be altered G Camera Mounting Brac...

Page 11: ...e L STATUS indicator starts blinking in green color and orange color repeatedly and the Focus Assist mode is enabled A Page 24 You can also perform the same operation on the viewer A Page 93 Memo Pressing and holding the button for five seconds or longer enables the service confirmation mode The L STATUS indicator lights up in orange color in this mode Do not press the button for 5 seconds or long...

Page 12: ...vacy mask to AOffB A Page 61 O 10BASE T 100BASE TX Use this terminal to connect to the network via a LAN cable This product supports PoE IEEE802 3af and therefore can be used without a power cable PoE class 0 A Page 17 18 P ALARM INPUT OUTPUT Alarm Input Output Terminals Use these terminals to connect to an external alarm device A Page 20 Q AC24V Power Input Terminal Use this terminal to connect t...

Page 13: ...nal on the computer AStreaming PageB A Page 68 AImage quality settingB A Page 92 Surveillance via Dual Stream Simultaneous distribution of JPEG and MPEG4 images enables real time surveillance using MPEG4 30 fps and recording of JPEG images at the same time You can also lengthen the recording time by lowering the frame rate resolution and picture quality settings for JPEG images Saving JPEG images ...

Page 14: ...g of JPEG images before and after the alarm input time pre post recording to the server AAlarm PageB A Page 50 AImage quality settingB A Page 92 Restrictions on Clients VN X35U enables users to authorize or reject the acquisition of images by specific IP address A Page 70 Control via customized application software The following uses are also possible by developing a customized application softwar...

Page 15: ...ternet Explorer A Page 33 G Step 4 Operating Built in Viewer A Page 86 Setup Procedures Connect the lens mount power supply cord LAN cable and alarm cable Next mount the camera to the ceiling Make sure to attach the fall prevention wire firmly to the camera After the camera is mounted connect the video monitor to the MONITOR OUT terminal at the rear of the unit followed by adjusting the camera ang...

Page 16: ...mounted hence resulting in malfunctions 2 Turn the lens in the clockwise direction to mount it to the camera firmly 3 When using a DC iris lens pay attention to the pin position before connecting the lens cable Memo Use a 4 Pin Plug to connect when the plug of lens cable is different Product number of 4 Pin Plug CV2859 001 For inquiries on the 4 Pin Plug refer to the authorized dealer Mounting the...

Page 17: ...plate to connect the cord to the terminal When a two core VVF vinyl insulated vinyl sheath cable is used the connection distance is as follows Memo After DHCP timeout all IP addresses of VN X35U are set to 192 168 0 2 by default When the power of multiple cameras within the same LAN environment are turned on at the same time the IP address of the cameras overlap thus preventing proper access As su...

Page 18: ...ry 5 or higher cable when 100BASE TX is used To distribute images to the network A set the MONITOR OUT switch at the side of this product to AOFFB B Press the RESET button for less than 2 seconds to restart Power Connection continued What is PoE Power over Ethernet This is a function that enables operation of a LAN equipment without a power cable by supplying power simultaneously with the data usi...

Page 19: ...type capacitor microphone Note Make sure that the external microphone is connected to the R ch and not other channels When the microphone jack is plugged directly into the unit s AUDIO IN OUT terminal loud noises can be distributed to the network Monitor Signal Output Terminal Connection CAUTION NEVER USE PoE AND AC 24V AT THE SAME TIME DO NOT CONNECT TO THE TELEPHONE NETWORK SEE INSTRUCTION MANUA...

Page 20: ... buzzers 䡵 Output requirements Equivalent to NPN open collector output Set the output logic using the Internet Explorer Allowable applied voltage DC12 V and below Allowable inflow current 50 mA Momentary 100 ms to 5000 ms output Set time using the Internet Explorer A Page 57 Note Connect the G terminal of this camera to the GND terminal of the annunciating device or alarm input sensor Alarm Input ...

Page 21: ...rom the camera mounting bracket Make sure to fasten the screws firmly Note When mounting the camera use screws with a length between 5 mm to 7 mm from the mounting surface Screws beyond the specified length may damage the interior while those shorter than specified may cause the camera to fall off and therefore these must not be used Mounting the Camera Camera Mounting Screw Hole 1 4 20UNC Camera ...

Page 22: ...event it from falling off To prevent the camera from falling off ensure that it is connected to a firm place ceiling slab or channel using a fall prevention wire Pay also careful attention to the length strength wiring and material insulating properties of the fall prevention wire to be used The length used should be as short as possible within the permissible range of the mounting length The wire...

Page 23: ...he lens cannot be brought into focus using the focus ring 1 Loosen the back focus fastening screw by using a Phillips screwdriver and turning it in the anti clockwise direction 2 Shoot a fine pattern as far as possible 3 Set the focus ring of the lens to 4 Turn the back focus adjustment ring to obtain a sharp focus 5 Tighten the back focus fastening screw by turning it in the clockwise direction a...

Page 24: ...ia the network may fail Data volume to be sent by VN X35U varies with the settings and number of distributions The maximum bit rate for transmission is about 20 Mbps Estimation of Total Bit Rate The total JPEG bit rate from VN X35U is determined by the VN X35U settings number of clients and the client s requested number of frames The total MPEG4 bit rate from VN X35U is determined by the number of...

Page 25: ...2 audio streams and receives 1 audio stream data volume will be as follows 64 kbps x 3 192 kbps Restrictions on the Number of Distributions for VN X35U The maximum number of distributions for VN X35U is determined by the settings as well as requirements from the client When only JPEG images are distributed the maximum number of distributions is determined based on the highest bit rate within the s...

Page 26: ...Audio may be interrupted Packet Loss When acquiring images from VN X35U via TCP packet loss may be recovered by TCP transmission When there is considerable delay in the network however missing data may occur and the image frame rate may drop In the case of MPEG4 noise interference may occur and playback may fail Audio may be interrupted When packet loss occurs during multicast sending from VN X35U...

Page 27: ...er such that the same IP address is always assigned to the MAC address of VN X35U by the DHCP server Connection may fail if the above setting is not performed 䡵 B Assigning a static IP address 䢇 System configuration required for setting IP address The default setting for VN X35U is ADHCP EnableB DHCP client feature is turned on Upon starting up in LAN without DHCP server VN X35U starts running wit...

Page 28: ...n 4 TCP IPv4 checkboxes are selected 3 Select Internet Protocol TCP IP and click Properties Windows Vista Select Internet Protocol Version 4 TCP IPv4 and click Properties 4 Set the IP address 5 Click OK on the ALocal Area Connection PropertiesB screen IP Address Settings continued A B C D Specify the IP address For example use 192 168 0 100 when VN X35U is in its default settings and there is no D...

Page 29: ...twork LAN Settings window 3 If the active script of the Internet Explorer is disabled follow the steps below to enable it Select Trusted sites under Tool Internet Options Security Upon doing so the Sites button directly below becomes active Click this button and deselect the check in the displayed window and add the following web site to the zone http 192 168 0 2 Next select Trusted sites under To...

Page 30: ... directly In this case change the proxy settings of the Internet Explorer After the Security Settings screen appears press the OK button to proceed 2 Enter the user name and password login as administrator IP Address Settings continued A B Click Go Enter the following IP address into the address field http 192 168 0 2 A B C VN X35U Enter the user name This is set to AadminB by default Enter the pa...

Page 31: ...35U is displayed 4 The operator password entry screen appears A Enter operator password default is AjvcB B Click OK Memo The operator password entry screen does not appear if the password is stored on the computer Go to Step 5 A B ...

Page 32: ...P address at the computer accordingly IP Address Settings continued Click A B C Set the IP setting item to DHCP Disable Enter the values you wish to specify in the IP address Subnet Mask and Default Gateway fields Select the Time Zone Click When the display or configuration of the opened screen appears strange check using the following procedures A Click Start Control Panel Display and open the Di...

Page 33: ...ormation on the IP address using the following method You can look up the IP address of VN X35U using the search tool in the ATOOL_EB folder in the supplied CD ROM For details please refer to the AReadmeB file in the ATOOL_EB folder Internet Explorer Setup 1 Launch the Internet Explorer on the computer 2 When proxy settings are enabled in the Internet Explorer follow the steps below to disable the...

Page 34: ...ipt initiated window without size or position constraints under Miscellaneous 4 Disable pop up block Connection of VN X35U cannot be established when pop up block in the Internet Explorer is set to AEnableB Follow the steps below to set the pop up block to AdisableB Selecting Tool Pop up Blocker Turn Off Pop up Blocker permits all sites To allow only specific sites such as VN X35U select Tool Pop ...

Page 35: ...not reset or turn off the power of VN X35U immediately after the settings are changed Otherwise changes may not be saved and VN X35U may be restored to the factory settings User Name Default Password Description admin jvc All operations and setting changes are allowed operator jvc Change of settings other than those related to network and maintenance are allowed user jvc Viewing of images is allow...

Page 36: ...nternet Explorer A Page 30 A unified viewer is opened 2 Click Detalis Basic Settings1 page will be opened if accessed by user nameAadminB A Page 37 Basic Settings2 page will be opened if accessed by user name AoperatorB A Page 38 Miscellaneous page will be opened if accessed by user nameAuserB A Page 79 Setting Click ...

Page 37: ...ing the DHCP client function Connect VN X35U to a network environment with a DHCP server when DHCP is to be enabled If the DHCP server does not exist when DHCP is set to AEnableB VN X35U will start running with the 192 168 0 2 IP address and 255 255 255 0 subnet mask in about 2 minutes after startup A Page 27 B IP Address For setting the IP address of VN X35U C Subnet Mask For setting the subnet m...

Page 38: ...ings If the OK button is pressed upon entering an invalid value a warning message will appear and the entry will be denied Press the Cancel button to restore the invalid entry to the current value Memo You can open the Basic Settings2 screen without going through Built in Viewer by entering the following URL address in the address field of Internet Explorer http 192 168 0 2 cgi bin x35display cgi ...

Page 39: ... to the user s preference CRT Picture quality setting for CRT cathode ray tube monitors Set values Custom LCD1 LCD2 CRT C Encoding For selecting the frame size for each of the JPEG and MPEG4 screens from AQuad VGAB 1280 x 960 AVGAB 640 x 480 and AQVGAB 320 x 240 Select one of the eight different patterns Memo Refer to the API Guide on the file formats of JPEG 䡵 Combination of distribution sizes an...

Page 40: ...For setting the MPEG4 encoding bit rate Set values 64 kbps to 8000 kbps Bitrate Control For selecting whether to set the MPEG4 rate control mode to CBR Constant Bit Rate or VBR Variable Bit Rate CBR Encoding is performed at a fixed bit rate regardless of the condition of the input video signals Enables easy forecast of the bit rate VBR Changes the bit rate according to the condition of the input v...

Page 41: ...nu Click Camera Press the OK button to enable the new settings If the OK button is pressed upon entering an invalid value a warning message will appear and the entry will be denied Press the Cancel button to restore the invalid entry to the current value To restore the settings of this page to the factory settings press Initialize button A B C D E F G H I J K M L N O Click ...

Page 42: ...tens the image Setting range 0 to 2 Memo If the black level is set to 0 this may be too low depending on the monitoring device or dark area will become complete black When using MPEG4 images set to either 1 or 2 D Gamma To alter the appearance of dark areas in a video image adjust the gamma curve Off Do not perform gamma correction The entire image appears dull 3 to 3 Perform gamma correction When...

Page 43: ...el increases the shutter speed slows down and motion becomes unnatural When set to AOffB Sense Up is disabled Set values x2 1 7 5s x4 1 3 75s x8 0 5s x16 1 1s x22 1 5s Memo Upon raising the sensitivity level the screen may appear grainy or white or white defects may occur However this is not a malfunction When Sense Up is set to a value other than AOffB flickers occur under the light of fluorescen...

Page 44: ...flickers may occur when the Sense Up feature is used When Sense Up is set to a value other than AOffB the shutter speed cannot be set to a value between 1 250 to 1 10000 L Easy Day and Night For setting the Easy Day and Night feature Color Set to the color mode at all times Black and White Set to the black and white mode at all times Auto Image color switches to black and white when the luminance ...

Page 45: ... execution results Even when white balance is set to ATW pressing the One Push button switches the mode automatically to AWC AWC R GAIN For setting the gain of R red when in the AWC mode Larger value Increases the redness Smaller value Decreases the redness Set values 0 to 85 to 255 AWC B GAIN For setting the gain of B blue when in the AWC mode Larger value Increases the blueness Smaller value Dec...

Page 46: ...value a warning message will appear and the entry will be denied Press the Cancel button to restore the invalid entry to the current value When settings on this page are altered during playback using Built in Viewer reboot the viewer There is a maximum limit to the bit rate for transmission by VN X35U If a bit rate that exceeds the maximum limit is specified this new setting will not be applied Fo...

Page 47: ...ng range for QVGA 3 KB to 33 KB MPEG4 C Bitrate For setting the MPEG4 encoding bit rate Setting range 64 kbps to 8000 kbps D Bitrate Control For selecting whether to set the MPEG4 rate control mode to CBR Constant Bit Rate or VBR Variable Bit Rate CBR Encoding is performed at a fixed bit rate regardless of the condition of the input video signals Enables easy forecast of the bit rate VBR Changes t...

Page 48: ...page is for setting the audio parameters This page can be used during access using AadminB or AoperatorB Click Advanced Settings to display setting menu Click Audio To enable the new settings press the OK button Setting continued A B C D E F G H I Click ...

Page 49: ... 䡵 To output the registered audio file Get ready an audio file on the computer with the following specifications and register it to the camera Audio file specifications File format WAV file Encoding format linear PCM Sampling frequency 8 kHz Quantization bit 16 bit Monaural Maximum size 30 seconds total of playback files 1 to 5 Configure the action item on the Alarm page to Play Audio A Page 50 No...

Page 50: ...ng menu Click Alarm Press the OK button to enable the new settings Only items that are valid under the selected action will be saved When Disable is selected for the action all settings will be restored to their default values If the OK button is pressed upon entering an invalid value a warning message will appear and the entry will be denied Press the Cancel button to restore the invalid entry to...

Page 51: ...UDP Data field to the destinations specified in TCP UDP IP Address and TCP UDP Port Number via TCP UDP Sends out the character string entered in the TCP UDP Data field to the destinations specified in TCP UDP IP Address and TCP UDP Port Number via UDP TCP UDP Data Input up to 127 alphanumeric characters Output 1 Make Changes Alarm Output 1 to Make Output 1 Break Changes Alarm Output 1 to Break Out...

Page 52: ...52 Setting Using Internet Explorer Alarm Page continued Setting continued E F G H I J K ...

Page 53: ...phanumeric characters Attach Image For specifying whether to attach images to the mail I TCP UDP TCP UDP IP Address For entering the address when alarm action notification is to be sent via TCP or UDP IP or FQDN TCP UDP Port Number For entering the port number when alarm action notification is to be sent via TCP or UDP 1 to 65535 TCP UDP Data For entering the data to send during TCP or UDP notific...

Page 54: ...minB or AoperatorB Click Advanced Settings to display setting menu Click Alarm Environment Press the OK button to enable the new settings If the OK button is pressed upon entering an invalid value a warning message will appear and the entry will be denied Press the Cancel button to restore the invalid entry to the current value Setting continued A B Click ...

Page 55: ...ing Example subdir1 subdir2 Destination directory of FTP transfer will be dependent on the FTP server if is added at the beginning Setting Periodic FTP to AOnB enables transfer of the latest JPEG images to the FTP server at regular intervals Specify the interval in seconds for Periodic FTP Interval File name Select a type from the two types of periodic FTP file names When AAutoB is selected images...

Page 56: ...56 Setting Using Internet Explorer Alarm Environment Page continued Setting continued C ...

Page 57: ... input in seconds Setting range 0 to 60 seconds Memo The maximum time intervals for PrePostRecording Before Trigger and PrePostRecording After Trigger are determined by the JPEG size on the Encoding page as well as the set values for PrePostRecording Frame Rate A message appears if the combination of the entered values are not feasible C Alarm Output For setting the alarm output Duration For setti...

Page 58: ...ng continued C B A Click A Auto Return Restores automatically to the state specified under Mode when action is not performed on the manually operated camera over the interval specified in Return Time Mode For setting the action after Auto Return None Auto Return disabled HOME Returns to the home position Auto Patrol Restores the auto patrol action Return Time For setting the time interval before r...

Page 59: ...re A Page 95 Press the OK button to enable the new settings If the OK button is pressed upon entering an invalid value a warning message will appear and the entry will be denied Press the Cancel button to restore the invalid entry to the current value Note This feature can be used when the distribution size pattern setting on the Encoding page is set to A MPEG4 only C MPEG4 only D JPEG only F or H...

Page 60: ... For setting the sequence of position numbers in which the camera moves Set values 0 to 19 D Stay Time For setting the time interval for displaying the image of the respective positions Unit seconds Select Skip for positions that you do not want to display during Auto Patrol Set values Skip 10 20 30 45 60 120 E Moving speed For setting the speed of movement to the said position Set values Moment L...

Page 61: ...o display setting menu Click Privacy Mask Press the OK button to enable the new settings If the OK button is pressed upon entering an invalid value a warning message will appear and the entry will be denied Press the Cancel button to restore the invalid entry to the current value Note his feature can be used when the distribution size pattern setting on the Encoding page is set to B MPEG4 only E J...

Page 62: ...procedures to create the BMP file Press the Browse button to display the file selection screen Select the BMP file in the PC Press the Upload button to upload the selected BMP file to VN X35U Creating the BMP file 1 Upon installing the camera use JPEG Viewer to save the JPEG file on the computer JPEG Viewer A Page 82 2 Open the saved JPEG file on the computer using the Paint tool and paint the are...

Page 63: ...is page can be used during access using AadminB or AoperatorB Click Advanced Settings to display setting menu Click Motion detection The area valid for motion detection is displayed in blue When motion is detected the frame of Built in Viewer turns red B C D E F A Click ...

Page 64: ...p other clients or Built in Veiwer before using the Motion Detection page Setting continued A Display Screen The screen is divided into blocks of 10 horizontal x 8 vertical Use this to set whether to mask each block All blocks are masked in the default setting The block turns blue when it is clicked indicating that it is unmasked Click again to return to the masked state Press the OK button to ena...

Page 65: ...CP server does not exist when DHCP is set to AEnableB VN X35U will start running with the 192 168 0 2 IP address and 255 255 255 0 subnet mask in about 2 minutes after startup Refer to AIP Address SettingsB A Page 27 for the IP address B IP Address For setting the IP address of VN X35U C Subnet Mask For setting the subnet mask of VN X35U D Default Gateway For setting the default gateway of VN X35U...

Page 66: ...bits are converted to 0 and the value becomes 252 TOS values are used in networks that support QoS By setting QoS for the network switch routing can be done by giving priority to packets with a larger TOS value B MPEG4 TOS DS field For setting the TOS value of IP packets in which MPEG4 is stored For details refer to the JPEG TOS DS field item above C Audio TOS DS field For setting the TOS value of...

Page 67: ...to 65535 The default port number setting is 80 The JPEG and MPEG4 HTTP port number for the web server will also be changed During access to VN X35U from the Internet Explorer enter the following in the Internet Explorer when the camera is in its default settings http 192 168 0 2 If the port number is changed to 8080 for example enter the Internet Explorer as follows http 192 168 0 2 8080 B VISIP P...

Page 68: ... AoperatorB Click Advanced Settings to display setting menu Click Streaming Press the OK button to enable the new settings If the OK button is pressed upon entering an invalid value a warning message will appear and the entry will be denied Press the Cancel button to restore the invalid entry to the current value Setting continued A B C D E G H I J F Click ...

Page 69: ...the Start button F Destination Address For specifying the destination address for MPEG4 streaming Specify the multicast address When other devices that make use of multicast transmission exist ensure that each of them is set to a different multicast address G Destination Port For specifying the destination port number for MPEG4 streaming Specify an even number for RTP compliance When other devices...

Page 70: ...a warning message will appear and the entry will be denied Press the Cancel button to restore the invalid entry to the current value This feature is targeted at JPEG MPEG4 acquisition It does not impose restrictions on access via a web browser or use of API Note The Access Restriction feature determines whether to impose restrictions during TCP connection by the client In the case when access rest...

Page 71: ... Destination Address Restrictions may be imposed on clients accessing VN X35U using the IP address A Access Restrictions When AdenyB is selected acquisition of JPEG MPEG4 via the IP address specified for the IP Address item will be denied Restrictions are not imposed on access to the Web Settings page When AallowB is selected acquisition of JPEG MPEG4 via the IP address specified for the IP Addres...

Page 72: ...ls to acquire the time In addition time will be recorded in the JPEG headers distributed by VN X35U Discontinuity in JPEG header s time may occur immediately before and after acquiring time from the NTP server B NTP Server For setting the IP address of the NTP server C Access Interval For setting the time interval for access to the NTP server D Time Displays the time on the clock of VN X35U The cl...

Page 73: ...e new settings Note Be sure to handle the password carefully in case you forget it In the event that you forget the password please consult JVC s servicing center A B C Click A Username Select a user name B New Password Enter a new password Passwords shall be at least 4 characters and not longer than 8 characters VN X35U is case sensitive C New Password Again Enter again to confirm the new passwor...

Page 74: ...d reboots the unit The settings of VN X35U will be saved Copy the new firmware file to the computer on which Internet Explorer is used and specify this file using the Browse button Press the Update button to start the update JPEG MPEG4 transmission and all others services that are running will be discontinued The update process may take several minutes A message will be displayed on the Internet E...

Page 75: ...he new settings A LED State For selecting whether to light up the STATUS indicator of this unit when it is running Enable Lights up when unit is running Disable Turns off the indicator after startup is complete B Identify Unit If you want the STATUS indicator to blink such as during visual check of the camera currently being configured from the computer set this item to ABlinkB Memo The light of t...

Page 76: ...ck Light Compensation Off Item Factory Settings Frame Size Quad VGA VGA Digital PTZ MPEG4 only JPEG Quality VFS5 MENU ONMPEG4 Bitrate 2000 kbps MPEG4 Bitrate Control CBR MPEG4 FPS 15 fps MPEG4 I Frame Interval 30 MPEG4 Priority FPS Item Factory Settings Duplex Mode Half Duplex Mike GainMENU OFF 32 dB Mike Power Supply On Audio File 1 Audio File 2 Audio File 3 Audio File 4 Audio File 5 Item Factory...

Page 77: ...stRecording Frame Rate 15 fps PrePostRecording Before Trigger 5 sec PrePostRecording After Trigger 5 sec Duration Output 1 1000 msec Duration Output 2 1000 msec Manual Output 1 Break Manual Output 2 Break Item Factory Settings Mode None Return Time 1 Zoom Limit 8 Speed Moment tem Factory Settings Position 0 to 19 Stay Time Skip Moving speed Moment Item Factory Settings Mode Off Masking Color Setti...

Page 78: ...rver Port 80 VISIP Protocol Off VISIP Server Port 5510 AMX Device Discovery Protocol On Item Factory Settings JPEG Destination Address 225 0 1 1 JPEG Destination Port 49152 JPEG Frame Rate 15 fps MPEG4 Destination Address 225 0 2 1 MPEG4 Destination Port 59152 Audio Destination Address 225 0 3 1 Audio Destination Port 39152 Item Factory Settings Access Restrictions deny IP Address Item Factory Set...

Page 79: ...rmation This page can be used during access using AadminB AoperatorB and AuserB Click Advanced Settings to display setting menu Click Miscellaneous A Click A Open Source Software Press the Show button to display information of the software used by VN X35U ...

Page 80: ...anced Settings to display setting menu Click Operation Setting continued A B C Click A Total Sending Bitrate Displays the total TCP UDP bit rate sent by VN X35U as well as the individual bit rates B Destination Displays the destination that VN X35U is sending data to C System Log Displays the following information Number of seconds after startup Alarm information ...

Page 81: ...tings Page Display the version information and current settings of VN X35U This page can be used during access using AadminB or AoperatorB Click Advanced Settings to display setting menu Click Settings Click ...

Page 82: ...82 Setting Using Internet Explorer Settings Page continued Setting continued ...

Page 83: ...83 ...

Page 84: ...r Position List The Position List displays information on the preset positions This page can be used during access using AadminB or AoperatorB Click Advanced Settings to display setting menu Click Position List Setting continued Click ...

Page 85: ...ation Patrol Information displays the Auto Patrol information and settings This page can be used during access using AadminB or AoperatorB Click Advanced Settings to display setting menu Click Patrol Infomation Click ...

Page 86: ...ingsB A Page 100 AAudio Monitor SettingsB A Page 102 AExiting the ViewerB A Page 105 Internet Explorer Setup 1 Launch the Internet Explorer on the computer 2 When proxy settings are enabled in the Internet Explorer follow the steps below to disable the proxy of the Internet Explorer Select in the order of Tool Internet Options Connections LAN Setting followed by deselecting the check for AUse a pr...

Page 87: ...position constraints under Miscellaneous 4 If the pop up block function of the Internet Explorer is enabled follow the steps below to disable it T Built in Viewer cannot be used when the pop up block function is enabled Selecting Tool Pop up Blocker Turn Off Pop up Blocker permits all sites To allow only specific sites such as VN X35U select Tool Pop up Blocker Turn On Pop up Blocker followed by s...

Page 88: ...nstalling Built in Viewer 1 Enter IP address of camera in the address bar ofInternet Explorer Operation of Built in Viewer continued A B Click Go Enter the following IP address into the address field http 192 168 0 2 ...

Page 89: ...9 2 Enter the user name and password 3 The viewer is installed and launched A B C VN V25 Enter the user name This is set to AadminB by default Click OK Enter the password This is set to AjvcB by default ...

Page 90: ...iewerB AAudio MonitorB or AOperator PasswordB D Stop Pauses Resumes playback of images E Capture Captures the currently displayed image on the computer The captured data is recorded as a JPEG file in the folder that is created under My Document of the computer The default folder name is AVN X35UB The file name is made up of the year month day hour minute second and millisecond Memo In the case of ...

Page 91: ...nt PC when transmission of audio sound from a different client PC is in progress The Speech button lights up in red during audio sound transmission The Speech button does not turn red when audio transmission is not possible Memo Audio sound cannot be sent out simultaneously from the JPEG and MPEG4 Viewers G Compression Switches the stream to acquire You can specify either JPEG or MPEG4 H Display S...

Page 92: ... configuring the Image settings When a different menu is currently being displayed click Control to switch the viewer Click each menu bar on the left of the screen to open the setting screen Operation of Built in Viewer continued B A C D Click 䡵 Image Settings ...

Page 93: ...y area Off Disables backlight compensation Area1 to 4 For selecting a photometry area from the four available types Set values Off Area1 Area2 Area3 Area4 Memo The backlight compensation area is not linked to digital PTZ Mode Off Disables backlight compensation Area1 to 4 For selecting a photometry area from the four available types Set values Off Area1 Area2 Area3 Area4 C Easy Day and Night For s...

Page 94: ... setting the preset positions When a different viewer is currently being displayed click Control to switch the viewer Click the menu bar on the left side of the screen to open the setting screen Operation of Built in Viewer continued A B C Click 䡵 PTZ Settings ...

Page 95: ...ted by the arrow Release the button to stop moving the area Click the AHB button to move to the home position 䡵 Zoom operation Use this function to perform digital zoom on the display area Zooms toward the tele end and display of the object is enlarged Zooms toward the wide end and display of the object becomes smaller 䡵 Ratio to Full Area Shows current ratio to full area Memo You can restrict the...

Page 96: ...s can be configured on the PTZ Settings A Page 94 When a different menu is currently being displayed click Control to switch the viewer Click each menu bar on the left of the screen to open the setting screen Operation of Built in Viewer continued B A C D Click 䡵 PTZ Control ...

Page 97: ...e this function to perform digital zoom on the display area Zooms toward the tele end and display of the object is enlarged Zooms toward the wide end and display of the object becomes smaller 䡵 Ratio to Full Area Shows current ratio to full area Memo You can restrict the magnification of the object using the button by altering the Zoom Limit settings D Speed For configuring the operation speed set...

Page 98: ... Click 䡵 On Screen Display Settings For setting display items on the viewer screen For the JPEG Viewer characters are displayed as overlay on the video image A Camera ID Select AOnB to display Camera ID Camera ID can be specified on the Basic Settings2 or Camera page of VN X35U B Position Title Selecting AOnB displays the position title C Disp MD When AOnB is selected the frame of the video image ...

Page 99: ... the parameter that is set on the Protocol page of VN X35U C Frame Rate For selecting the acquisition frame rate of the viewer Selecting a large frame rate will increase the processing load of the computer on which the viewer is running Set values 15 10 7 5 6 5 3 2 1 1 2 1 3 1 5 1 10 1 15 1 20 1 30 1 60 Note Set to a rate such that the CPU burden of the computer does not exceed 80 When the CPU is ...

Page 100: ... click Viewer Setup to switch the viewer Click the menu bar on the left side of the screen to open the respective setting screens Memo To make use of Built in MPEG4 Viewer of VN X35U you will need to install the ffdshow open source codec You can obtain ffdshow through the Internet Operation of Built in Viewer continued B A D C B A D C 䡵 Title Bar 䡵 Stream Click Click ...

Page 101: ...U may be monitored using multiple viewers when AMulticastB is selected When playing back via multicast start multicast sending on the Streaming page of the VN X35U unit Note When Built in Viewer is launched with AMulticastB specified a Windows firewall warning may appear In this case select AunblockB and proceed If AblockB is selected the Windows firewall will block the multicast stream and playba...

Page 102: ...io sound using the JPEG and MPEG4 Viewers When a different menu is currently being displayed click Viewer Setup to switch the viewer Click the menu bar on the left side of the screen to open the respective setting screens Operation of Built in Viewer continued B A D C A A 䡵 Receive 䡵 Speech 䡵 Common Click Click Click ...

Page 103: ... multicast stream and playback of multicast by the viewer will fail C Multicast IP Address You can change the multicast IP address The default address is 225 0 3 1 Specify the same value as the parameter that is set on the Streaming page of VN X35U D Multicast Port You can change the multicast port number The default port number setting is 39152 Specify the same value as the parameter that is set ...

Page 104: ...rrently being displayed click Viewer Setup to switch the viewer Click the menu bar on the left side of the screen to open the setting screen Operation of Built in Viewer continued A Operator Password Follow the procedures below to configure the operator password required for sending receiving audio sound or PTZ operation Operator Password For entering the Operator Password A Click ...

Page 105: ...aunch the Internet Explorer and enter the URL of Built in Viewer in the address field For example if the IP address of VN X35U is 192 168 0 2 enter as follows http 192 168 0 2 cgi bin x35viewing cgi x35ptzviewer html Memo To open the viewer again enter the IP address in the address field of Internet Explorer A Page 88 Click ...

Page 106: ...s case change the settings of the Anti virus software before installing Built in Viewer A Page 86 Authentication by Verisign appears during installation of Built in Viewer Verisign s electronic signature is stored in Built in Viewer For computers with a network environment that is connected to the Internet the authenticity of the viewer can be verified via authentication by Verisign A warning mess...

Page 107: ...me rate will be constrained when the network bandwidth is narrow A Page 90 A Page 99 A white zone appears in Built in Viewer For some computers a part of the Internet Explorer graphics may not appear and is left white when the following setting is performed on the Internet Explorer If Right click on the Desktop screen Properties Settings Advanced Advanced DPI setting is set to ALarge sizeB or ACus...

Page 108: ...show from the Internet No MONITOR OUT image output Set the switch to or and press the Reset button When using the output set the privacy mask to AOffB A Page 11 A Page 61 Zonal noise occurs at the bottom of the MONITOR OUT image When using the output set the privacy mask to AOffB A Page 61 Images from the network are distorted Set the switch to and press the Reset button A Page 19 No sound is hear...

Page 109: ...mpression format µ law 64 kbps AD DA 16 bits Fs 8 kHz mono Network interface RJ 45 100BASE TX 10BASE T FULL HALF Auto negotiation supported LAN Specifications Compliant with IEEE802 3 IEEE802 3u and IEEE802 3af Communication protocol TCP IP UDP HTTP FTP ICMP ARP RTP DHCP SNTP SMTP IGMP General Alarm input No voltage a contact input NPN open collector input low level latch momentary 500 ms and abov...

Page 110: ...h T Specifications and appearance of this product are subject to changes for improvement without prior notice Specifications continued 1 4 20UNC 126 5 115 4 9 16 66 2 5 8 30 1 3 16 55 2 3 16 35 1 3 8 63 2 1 2 U1 32 65 2 9 16 42 1 5 8 ...

Page 111: ... 2008 Victor Company of Japan Limited LST0789 001A VN X35U MEGAPIXEL IP CAMERA ...

Reviews: