46
EN
Master Page: Left
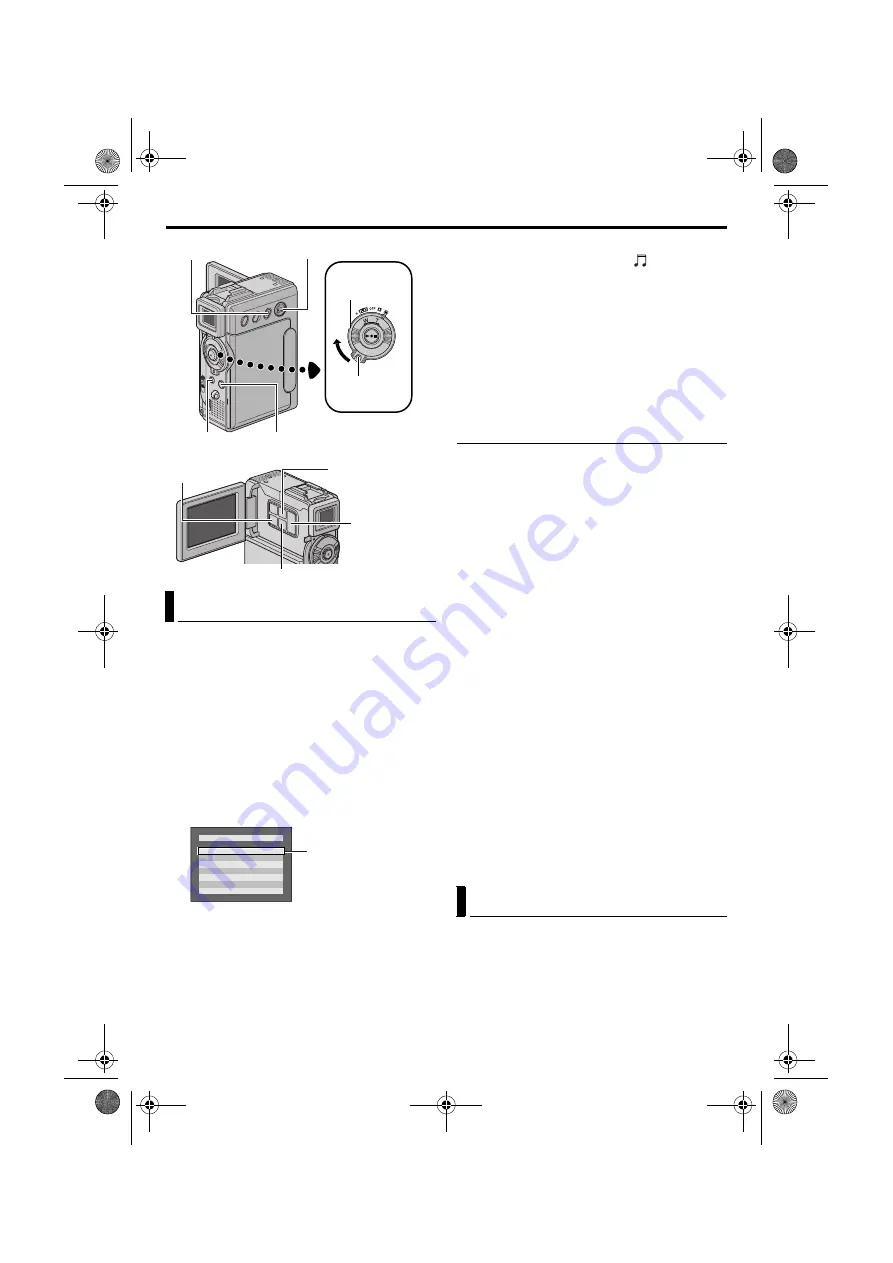
The sound effects pre-stored in the provided
memory card can be dubbed onto a tape.
1
Load a cassette. (
2
Load the provided memory card. (
3
Set the
VIDEO/MEMORY
Switch to “VIDEO”.
4
Set the Power Switch to “
A
” or “
M
” while
pressing down the Lock Button located on the
switch.
5
Open the LCD monitor fully, or pull out the
viewfinder fully.
6
Press
INDEX
. The Index Screen for sound effects
7
Press
+
or
–
to select the desired sound effect.
8
Press
SET/SELECT
.
●
Pressing
D.SOUND
starts playback of the
currently selected sound effect. You can check
it without recording it onto the tape. Press
D.SOUND
again to stop the sound effect
playback midway.
9
Press
D.SOUND
during recording. The selected
sound effect indication with a “
” mark appears
moving and the sound effect is recorded onto the
tape.
●
The sound effect cannot be heard from the
speaker during recording. Connect a
headphone to the headphone connector to
hear the sound effect.
To cancel recording the sound effect midway...
Press
D.SOUND
again. The camcorder stops
recording the sound effect and the sound effect
indication disappears.
Downloading sound data from Web Site
You can download sound data available at our Web
Site (see below for URL) and transfer them from your
PC to the memory card using a USB cable to create
more sound effects.
http://www.jvc-victor.co.jp/english/download/
d-sound/index.html
●
You can also use the PC card adapter
CU-VPSD60, floppy adapter CU-VFSD50 or USB
reader/writer CU-VUSD70 to transfer sound data
from a PC to the memory card.
●
Sound data should be copied into the memory
card’s DCSD\100JVCGR folder.
●
The file names should be in numerical sequence
starting from DVC00001.mp3. If you are using the
provided memory card, file names should be from
DVC00013.mp3 since 12 sound effects are pre-
stored as DVC00001.mp3 through
DVC00012.mp3.
NOTES:
●
Sound effects can also be used for Audio Dubbing.
(
●
Sound effects can also be selected during D.S.C.
playback mode. (
●
Sound effects created on a PC can be transferred
to a memory card by copying them into the
memory card’s sound folder with the specified file
name. For details, refer to the instruction manual
of the provided software. However, some sound
(effects) created on a PC cannot be played back
with this camcorder.
The Navigation Function helps you check tape
contents by making thumbnail images on a memory
card.
Recording Digital Sound Effects
Power Switch
MENU Button
SNAPSHOT Button
VIDEO/MEMORY Switch
Lock Button
INDEX/NAVI
Button
D.SOUND Button
+, – Button
SET/SELECT Button
NAVI STORE Button
Selected Sound
F
B
D
R
L
S
E
A
U
O
A
A
I
X
N
N
Z
O
C
U
R
P
F
Z
R
E
G
E
L
A
E
H
N
O
R
R
B
C
T
S
E
E
A
E
I
L L
R
R
O
I NDEX
NAVIGATION Function
FEATURES FOR RECORDING (cont.)
GR-DVP9US.book Page 46 Wednesday, January 22, 2003 5:35 PM


