background image

16

 EN

PL

AY

O

FF

FUL L

RECORDING

  Basic Recording (cont.)

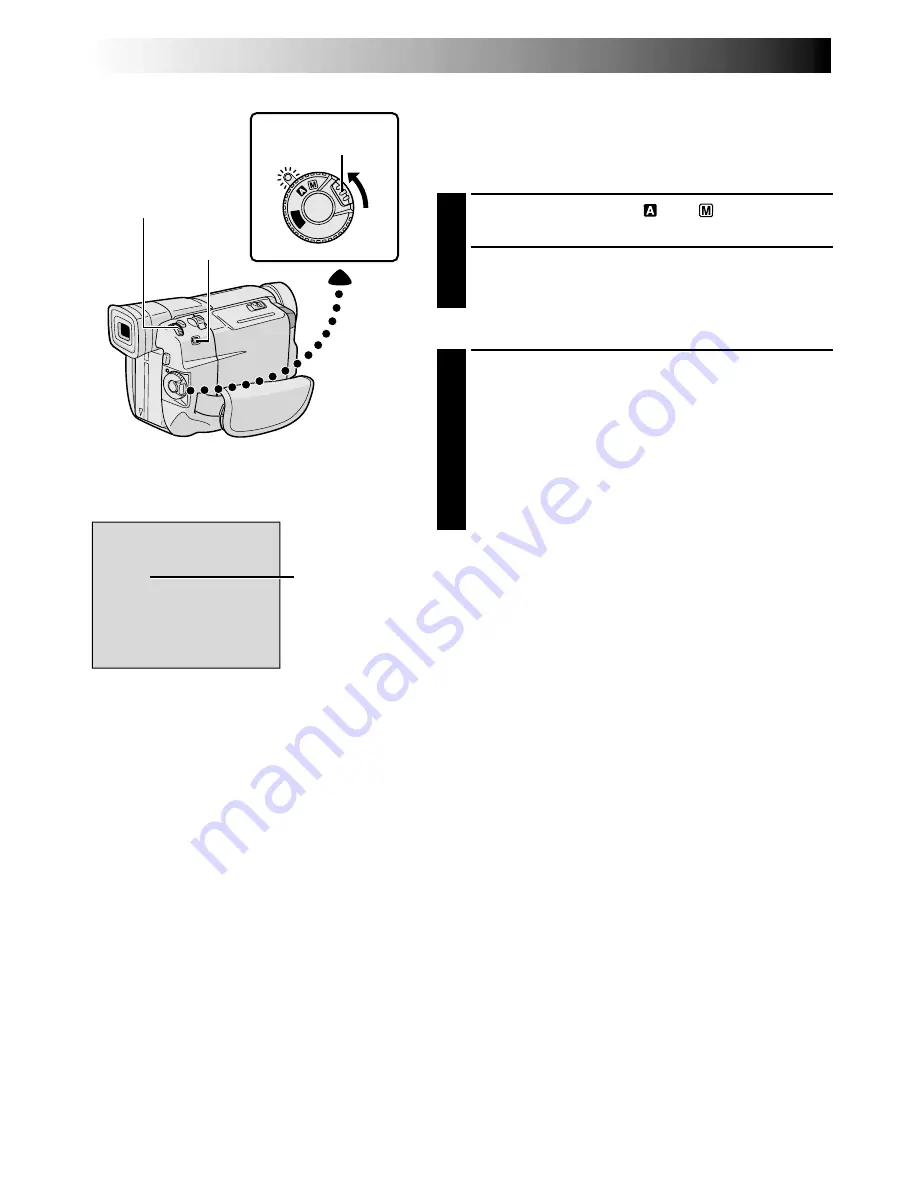
Snapshot

This feature lets you record still images that look like
photographs onto a tape.

SNAPSHOT MODE SELECTION

1

Set the Power Switch to “

” or “

” while pressing

down the Lock Button located on the switch.

2

Choose the appropriate Snapshot mode from the 5
available by repeatedly pressing 

MODE

 until the

desired snapshot mode indicator appears.

SNAPSHOT RECORDING

1

Press 

SNAPSHOT

.

If you press during Record-Standby . . .

.... “PHOTO” appears and a still image will be

recorded for approx. 6 seconds, then the
camcorder re-enters the Record-Standby mode.

If you press during Recording . . .

.... “PHOTO” appears and a still image will be

recorded for approx. 6 seconds, then the normal
recording resumes.

Motor Drive Mode

Keeping 

SNAPSHOT

 pressed provides an effect similar to

serial photography. (Interval between still images: approx.
1 second)

Power Switch

SNAPSHOT Button

Lock Button

MODE
Button

Snapshot mode

Display

Summary of Contents for GR-DVL100

Page 1: ...res 32 Basic Connections 34 Advanced Connections 36 DUBBING 38 39 Dubbing To A VCR 38 Dubbing To Or From A Video Unit Equipped With A DV Connector 39 USING THE REMOTE CONTROL UNIT 40 50 Playback Zoom 42 Random Assemble Editing 43 For More Accurate Editing 47 Audio Dubbing 49 Insert Editing 50 TROUBLESHOOTING 51 56 INDEX 57 61 Indications 57 Controls Connectors And Indicators 60 USER MAINTENANCE 62...

Page 2: ...INTRODUIRE LA LAME LA PLUS LARGE DE LA FICHE DANS LA BORNE CORRESPONDANTE DE LA PRISE ET POUSSER JUSQU AU FOND Dear Customer Thank you for purchasing this digital video camera Before use please read the safety information and precautions contained in the following pages to ensure safe use of this product When the equipment is installed in a cabinet or on a shelf make sure that it has sufficient sp...

Page 3: ...rsonal safety In order not to defeat the built in safeguards observe the following basic rules for its installation use and servicing ATTENTION Follow and obey all warnings and instructions marked on your product and its operating instruc tions For your safety please read all the safety and operating instructions before you operate this product and keep this manual for future reference INSTALLATIO...

Page 4: ...ing amplifiers that produce heat SERVICING 1 Servicing If your product is not operating correctly or exhibits a marked change in performance and you are unable to restore normal operation by following the detailed procedure in its operating instructions do not attempt to service it yourself as opening or removing covers may expose you to dangerous voltage or other hazards Refer all servicing to qu...

Page 5: ...not use a tripod on unsteady or unlevel surfaces It could tip over causing serious damage to the camcorder CAUTION Connecting cables Audio Video S Video Editing DC etc to the camcorder and leaving the unit on top of the TV is not recommended as tripping on the cables will cause the camcorder to fall resulting in damage 䡲 This camcorder is designed exclusively for the digital video cassette Only ca...

Page 6: ...Charger AA V40U DC Cord AAA R03 Battery x 2 for remote control unit Audio Video Cable ø3 5 mini plug to RCA plug Editing Cable PROVIDED ACCESSORIES Shoulder Strap Battery Pack BN V408U Lens Cap Remote Control Unit RM V715U ...

Page 7: ...order power is turned off 䡲 To cancel Automatic Demonstration set the Power Switch to then press the MENU BRIGHT wheel while the demo is in progress This takes you directly to the demo mode s Setting Menu so you will not have to go through the Menu Screen Rotate the MENU BRIGHT wheel to select OFF and press it The normal screen appears 1 R S Z G T I D R E O O A A D E E C U O I L M C T N M N L N O ...

Page 8: ... DC cord to the adapter during battery charging power is supplied to the camcorder and charging stops Since the AC Power Adapter Charger processes electricity internally it becomes warm during use Be sure to use it only in well ventilated areas When charging the battery pack for the first time or after a long storage period the CHARGE indicator may not light In this case remove the battery pack fr...

Page 9: ...by mode is engaged repeatedly The LCD monitor is used repeatedly The playback mode is engaged repeatedly Before extended use it is recommended that you prepare enough battery packs to cover 3 times the planned shooting time USING AC POWER Use the AC Power Adapter Charger connect as shown in the illustration NOTES The provided AC Power Adapter Charger features automatic voltage selection in the AC ...

Page 10: ...ower Switch GETTING STARTED cont Shoulder Strap Attachment 1 Make sure the battery pack or DC cord is removed Following the illustration thread the strap through the eyelet 1 then fold it back and thread it through the buckle 2 Repeat the procedure to attach the other end of the strap to the other eyelet 3 located under the Grip Strap making sure the strap is not twisted CAUTION When using a tripo...

Page 11: ...Menu Screen appears 3 Rotate the MENU BRIGHT wheel to select Press it and DISPLAY MENU appears 4 Rotate the MENU BRIGHT wheel to select CLOCK ADJ Press it and month is highlighted Rotate the MENU BRIGHT wheel to input the month Press it Repeat to input the day year hour and minute Rotate the MENU BRIGHT wheel to select 1RETURN and press it twice The Menu Screen closes NOTE Even if you select CLOCK...

Page 12: ...ver and try again If the cassette holder still does not open turn the camcorder off then on again If the tape does not load properly open the cassette holder cover fully and remove the cassette A few minutes later insert it again When the camcorder is suddenly moved from a cold place to a warm environment wait a short time before opening the cassette holder cover Closing the cassette holder cover ...

Page 13: ...b Menu appears Select SP or LP by rotating the MENU BRIGHT wheel and press it Rotate the MENU BRIGHT wheel to select 1RETURN and press it twice The Menu Screen closes Audio Dubbing 墌 pg 49 and Insert Editing 墌 pg 50 are impossible on a tape recorded in the LP mode LP Long Play is more economical providing 1 5 times the recording time NOTES If the recording mode is switched during recording the pla...

Page 14: ...ess in the tabs on the lens cap to remove it 2 Set the Power Switch to or while pressing down the Lock Button located on the switch Shooting while using the LCD monitor Press PUSH OPEN and open the LCD monitor fully Tilt it upward downward for best viewability Shooting while using the viewfinder Close the LCD monitor The power lamp lights and the camcorder enters the Record Standby mode PAUSE is d...

Page 15: ...d the accuracy of the calculation may vary according to the type of tape used TAPE END appears when the tape reaches its end and the power goes off automatically if left in this condition for 5 minutes TAPE END also appears when a cassette at its end is loaded If the Record Standby mode continues for 5 minutes the camcorder s power shuts off automatically To turn the camcorder on again set the Pow...

Page 16: ...shot mode indicator appears SNAPSHOT RECORDING 1 Press SNAPSHOT If you press during Record Standby PHOTO appears and a still image will be recorded for approx 6 seconds then the camcorder re enters the Record Standby mode If you press during Recording PHOTO appears and a still image will be recorded for approx 6 seconds then the normal recording resumes Motor Drive Mode Keeping SNAPSHOT pressed pr...

Page 17: ...28 is engaged certain modes of Program AE with special effects are disabled during Snapshot recording In such a case the icon blinks If SNAPSHOT is pressed when DIS is set to ON 墌 pg 24 the Stabilizer will be disabled During playback as well all Snapshot modes are available The shutter sound is not heard During Snapshot recording the image displayed in the viewfinder may be partially missing Howev...

Page 18: ...he focus by using the manual focus 墌 pg 21 then zoom in or out in Record mode Zooming is possible to a maximum of 250X or it can be switched to 10X magnification using the optical zoom 墌 pg 23 Zoom magnification of over 10X is done through Digital image processing and is therefore called Digital Zoom During Digital zoom the quality of image may suffer Digital zoom cannot be used when digital image...

Page 19: ...serted during shooting When shooting using a partially recorded tape When shooting on a blank portion located partway through the tape When shooting again after shooting a scene then opening closing the cassette holder cover Recording From The Middle Of A Tape 1 Play back a tape to find the spot at which you want to start recording then engage the Still Playback mode 墌 pg 31 2 Set the Power Switch...

Page 20: ...required OFF Turns off the light AUTO Automatically turns on the light when the camcorder senses insufficient lighting on the subject ON Always keeps the light on as long as the camcorder is turned on 䡲 The video light can only be used with the camcorder s power on 䡲 It is recommended to set the white balance 墌 pg 30 to when you use the video light 䡲 When not using the video light turn it off to s...

Page 21: ...aturally When shooting a subject close to the lens zoom out first 墌 pg 18 If zoomed in in the auto focus mode the camcorder may automatically zoom out depending on the distance between the camcorder and the subject This will not occur when TELE MACRO 墌 pg 24 is activated FEATURE Manual Focus PURPOSE To obtain correct focus OPERATION 1 If you are using the viewfinder you should already have made th...

Page 22: ...ed Adjustment This camcorder is equipped with an easy to use on screen menu system that simplifies many of the more detailed camcorder settings 墌 pg 23 25 1 Set the Power Switch to while pressing down the Lock Button located on the switch 2 Press the MENU BRIGHT wheel The Menu Screen appears 3 Rotate the MENU BRIGHT wheel to select the desired function icon and press it The selected function menu ...

Page 23: ...cessing and magnifying images zooming is possible from 10X the optical zoom limit to a maximum of 250X digital magnification Allows you to shoot dark scenes with no picture brightness adjustment The overall appearance may be grainy but the image is bright The shutter speed is automatically adjusted 1 30 1 200 sec Shooting a subject in low or poor lighting at 1 30 sec shutter speed provides a brigh...

Page 24: ...rounds Switch off this mode when recording with the camcorder on a tripod The indicator blinks or goes out if the Stabilizer cannot be used Usually the distance to a subject where the lens is in focus depends on the zoom magnification Unless there is a distance more than 1m 3 3 ft to the subject the lens is out of focus at the maximum telephoto setting When set to ON you can shoot a subject as lar...

Page 25: ... factory preset Resets all settings to the factory preset Keeps the camcorder s display except the date time and time code from appearing on the connected TV screen Makes the camcorder s display appear on screen when the camcorder is connected to a TV Keeps the indications except the tape running indicator warnings date time time code etc from appearing in the camcorder Also keeps the camcorder s ...

Page 26: ...when recording is started 1 Follow steps 1 through 4 above 2 If you select Picture Wipe Dissolve during recording press the Recording Start Stop Button when one scene is finished The point at which the scene ended is stored in memory If you select Picture Wipe Dissolve during Record Standby mode press the Recording Start Stop Button to start recording and press it again when one scene is finished ...

Page 27: ...een toward the top and bottom or wipe out from the top and bottom toward the center leaving a black screen The new scene gradually appears as the old one gradually disappears The new scene wipes in over the previous one from the upper right corner to the lower left corner The next scene gradually wipes in from the center of the screen toward the corners covering the previous scene The next scene g...

Page 28: ... the Cinema mode it enhances the classic film effect CLASSIC FILM Gives recorded scenes a strobe effect STROBE Your recording looks like a series of consecutive snapshots VIDEO ECHO Adds a ghost to the subject giving your recording a fantasy feeling Zoom magnification of over 10X is not available SLOW Slow Shutter Lights dark subjects or areas even brighter than they would be under good natural li...

Page 29: ...ing the BACKLIGHT button has no effect when the exposure is set to MANUAL and the Power Switch is set to EX 0 P Iris lock indicator MENU BRIGHT Wheel Power Switch Iris Lock Use this function in the following situations When shooting a moving subject When the distance to the subject changes so its size in the LCD monitor or the viewfinder changes such as when the subject is backing away When shooti...

Page 30: ...ivated Manual White Balance Operation Perform Manual White Balance when shooting under various types of lighting 1 Follow steps 1 through 4 of the white balance adjustment and select MAN 2 Hold a sheet of plain white paper in front of the subject Adjust zoom or position yourself so that the white paper fills the screen 3 Press the MENU BRIGHT wheel until begins blinking When the setting is complet...

Page 31: ...he indications are displayed When a cable is connected to the AV connector the sound is not heard from the speaker Power Zoom Lever VOL Speaker Lock Button Still Playback Pauses during playback 1 Press 4 6 during playback 2 To resume normal playback press 4 6 again If still playback continues for more than about 3 minutes the camcorder s Stop mode is automatically engaged After 5 minutes in the St...

Page 32: ...t twice to close the Menu Screen Display Power Switch MENU BRIGHT Wheel 墌 pg 33 墌 pg 33 墌 pg 48 Allows you to set the video recording mode SP or LP depending on your preference 墌 pg 13 It is recommended you use REC MODE in the VIDEO MENU when using this camcorder as a recorder during digital dubbing 墌 pg 39 Makes the camcorder s indications appear disappear from the connected TV screen Makes the d...

Page 33: ...t is called 48 kHz The camcorder cannot detect the sound mode in which the recording was made during fast forward or rewind During playback the sound mode is displayed in the upper left corner SOUND MODE 12BIT MODE Factory preset STEREO SOUND L SOUND R SOUND 1 SOUND 2 MIX Sound is output on both L and R channels in stereo Sound from the L channel is output in stereo Sound from the R channel is out...

Page 34: ...To TV or VCR S Video cable optional TV VCR Audio Video cable provided To AV Red to AUDIO R IN TV VCR To TV or VCR White to AUDIO L IN When connecting the cables open this cover Connector cover Yellow Not connected Yellow to VIDEO IN Core filter Core filter A Connection to a TV or VCR equipped with an S VIDEO IN and A V input connectors B Connection to a TV or VCR equipped only with A V input conne...

Page 35: ...er as the power supply instead of the battery pack 墌 pg 9 Use the provided Audio Video cable making sure to connect the end with a core filter to the camcorder The core filter reduces interference The S Video cable is optional Be sure to use the YTU94146A S Video cable Consult the JVC Service Center described on the sheet included in the package for details on its availability Make sure to connect...

Page 36: ... the Lock Button located on the switch and turn on the PC NOTES It is recommended to use the AC Power Adapter Charger as the power supply instead of the battery pack 墌 pg 9 The date time information cannot be captured into the PC Refer to the manufacturer s instruction manual for the DV connector equipped capture board When using a DV cable be sure it has a core filter attached The core filter red...

Page 37: ...itch to while pressing down the Lock Button located on the switch and turn on the other units NOTES It is recommended to use the AC Power Adapter Charger as the power supply instead of the battery pack 墌 pg 9 For Digital Dubbing this camcorder can be connected only to one device at a time This camcorder can also be used as a recorder 墌 pg 39 If Still Playback Fast Forward or Rewind is attempted wi...

Page 38: ...deo cable is optional Be sure to use the YTU94146A S Video cable Consult the JVC Service Center described on the sheet included in the package for details on its availability Make sure to connect the end with a core filter to the camcorder The core filter reduces interference You can use Playback Zoom 墌 pg 42 in step 5 Before you start dubbing make sure that the indications do not appear on the co...

Page 39: ...layer during dubbing the dubbing may stop so that an unusual image is not dubbed Even though the DV cable is connected correctly sometimes the image may not appear in step 3 If this occurs turn off the power and make connections again If Playback Zoom 墌 pg 42 or Snapshot is attempted during playback only the original playback image recorded on the tape is output from the DV IN OUT connector When u...

Page 40: ... Insert the battery in the holder and be sure to have the mark visible 3 Slide the holder back in until you hear a click Read the caution concerning lithium batteries in the RM V700U instruction manual Installing The Batteries RM V715U provided The remote control uses two AAA R03 size batteries See General Battery Precautions 墌 pg 63 1 Open the battery compartment cover as illustrated 2 Insert two...

Page 41: ...corder s Power Switch set to the camera position or Transmits the beam signal Zoom in out 墌 pg 18 Functions the same as the Recording Start Stop Button on the camcorder With the camcorder s Power Switch set to Zoom in out 墌 pg 42 Playback start 墌 pg 31 Rewind Reverse Shuttle Search 墌 pg 31 Stop 墌 pg 31 墌 pg 50 Fast Forward Forward Shuttle Search 墌 pg 31 Pause 墌 pg 46 墌 pg 49 墌 pg 44 墌 pg 43 墌 pg 4...

Page 42: ... the Zoom Buttons T W on the remote control Make sure the remote control is pointed at the camcorder s remote sensor Pressing T zooms in 䡲To end zoom press and hold W until magnification returns to normal Or press STOP 5 and then press PLAY 4 NOTES Zoom can also be used during still playback Due to digital image processing the quality of the image may suffer Remote sensor Zoom Buttons Press T Norm...

Page 43: ...emote towards the VCR s infrared sensor Then referring to the VCR CODE LIST press and hold MBR SET and press button A and then B The code is automatically set once you release MBR SET and the VCR s power comes on 2 Make sure the VCR s power is on Then while holding VCR CTL press the button on the remote for the desired function The functions the remote can control are PLAY STOP PAUSE FF REW and VC...

Page 44: ... ON or OFF in the Menu Screen 墌 pg 32 Playback Sound Mode Tape Speed And Tape Running Displays set ON SCREEN to LCD or SIMPLE in the Menu Screen 墌 pg 32 Use the provided cables making sure to connect the end with a core filter to the camcorder The core filter reduces interference The S Video cable is optional Be sure to use the YTU94146A S Video cable Consult the JVC Service Center described on th...

Page 45: ...CANCEL on the remote control The registered points disappear one at a time from the most recently registered point NOTES When choosing a scene set Edit In and Edit Out points so that there is a relatively large difference between them If the search time for an in point exceeds 5 minutes the recording deck s Record Standby mode will be canceled and editing will not take place If there are blank por...

Page 46: ...the Pause mode and the VCR enters its Record Pause mode If you do not register an Edit Out point the tape will be dubbed all the way to the end automatically If you operate the camcorder during automatic editing the VCR will enter its Record Pause mode and automatic editing will stop 1 14 Engage the Stop modes for the camcorder and the VCR To make the R A Edit counter display disappear press ON OF...

Page 47: ...in the camcorder then point the remote control at the camcorder s remote sensor and press ON OFF The Random Assemble Editing Menu appears 2 Perform Random Assemble Editing on Program 1 only In order to check VCR and camcorder timing select the beginning of a scene transition as your Edit In point 3 Play back the dubbed scene If any images from the scene prior to the transition you chose for your E...

Page 48: ...VCR s record timing by rotating the MENU BRIGHT wheel towards You can also delay the VCR s record timing by rotating the MENU BRIGHT wheel towards The adjustment range is from 1 3 to 1 3 seconds in 0 1 second increments Press the MENU BRIGHT wheel to finish the setting 7 Rotate the MENU BRIGHT wheel to select 1RETURN and press it twice Now perform Random Assemble Editing beginning with step 4 on p...

Page 49: ...ng playback set 12BIT MODE to SOUND 2 or MIX in the Menu Screen 墌 pg 32 33 NOTES Sound is not heard from the speaker during Audio Dubbing When editing onto a tape that was recorded at 12 bit the old and new soundtracks are recorded separately If you dub onto a blank space on the tape the sound may be disrupted Make sure you only edit recorded areas If feedback or howling occurs during TV playback ...

Page 50: ...oint is located then press PAUSE 6 3 Press and hold INSERT w on the remote control then press PAUSE 6 6w and the Time Code min sec appear and the camcorder enters Insert Pause mode 4 Press START STOP to begin editing Confirm the insert at the time code you checked in step 1 To pause editing press START STOP Press it again to resume editing 5 To end Insert Editing press START STOP then STOP 5 NOTES...

Page 51: ...ge is low 8 The Squeeze mode is selected 1 Connect the AC Power Adapter Charger securely 墌 pg 9 Replace the dead battery with a fully charged one 墌 pg 8 9 2 Set the date time 墌 pg 11 Consult your nearest JVC dealer for replacement 3 Set the tape s erase protection tab to REC 墌 pg 12 Set the Power Switch to or 墌 pg 15 Replace with new cassette 墌 pg 12 Close the cassette holder cover 4 Turn the camc...

Page 52: ...for editing was registered 15 The last selected editing scene is ending At the end of the last selected scene for editing the Power Switch was set to OFF The power is off 9 Find a white subject and compose your shot so that it also appears in the frame 墌 pg 16 Turn off Sepia and Monotone 墌 pg 28 10 Press the BACKLIGHT Button 墌 pg 29 11 Set ZOOM to 40X or 250X in the Menu Screen 墌 pg 23 Disengage t...

Page 53: ...ng fast moving subject or during rapid panning 18 The Picture Wipe or Dissolve functions are in use WIDE MODE is set to SQUEEZE in the Menu Screen A Fade In or Fade Out is in progress 19 When shooting in the dark the unit becomes highly sensitive to light and the image takes on an effect similar to Slow Shutter 20 The Picture Wipe or Dissolve function is in use 21 The Sepia or Monotone mode is act...

Page 54: ...the camcorder When the LCD monitor s fluorescent light reaches the end of its service life images on the LCD monitor become dark Consult your nearest JVC dealer 27 The light used to illuminate the LCD monitor causes it to become hot 28 This may occur when the surface or the edge of the LCD monitor is pressed 29 Certain Fade Wipe effects certain modes of Program AE with special effects DIS and othe...

Page 55: ...墌 pg 31 33 Set the TV to the mode or channel appropriate for video playback 墌 pg 34 35 Close the cassette holder cover 墌 pg 12 34 35 Turn the speaker volume down 墌 pg 31 36 Clean the video heads with an optional cleaning cassette 墌 pg 64 37 Wipe them gently with soft cloth Wiping strongly can cause damage 墌 pg 62 38 Check the section of the manual that explains LCD monitor viewfinder indications 墌...

Page 56: ...s attached The LCD monitor s brightness setting is too dark 42 This is not a malfunction 43 The DV cable was plugged unplugged with power turned on 39 Remove the power supply battery pack etc and wait a few minutes for the indication to clear When it does you can resume using the camcorder If the indication remains even though you repeat the above two or three times please consult your nearest JVC...

Page 57: ...se 6w mode is engaged 墌 pg 50 9 Approximate zoom ratio Appears during zooming 墌 pg 18 Appears when GAIN UP is set to AUTO and the shutter speed is automatically adjusted 墌 pg 23 0 Appears when the wind cut mode is engaged to cut down on noise created by wind 墌 pg 25 Displays the date time 墌 pg 11 BRIGHT Displays the brightness of the LCD monitor 墌 pg 14 SOUND Displays the sound mode for approx 5 s...

Page 58: ...31 The level indicator moves Indications Function Displays the battery remaining power Remaining power level high Remaining power level exhausted As the battery power comes close to nil the battery indicator blinks When the battery power is exhausted power turns off automatically Appears when no tape is loaded 墌 pg 12 Appears when the erase protection tab is set to SAVE while the Power Switch is s...

Page 59: ...pg 49 Appears if Insert Editing is attempted on a blank portion of a tape 墌 pg 50 Appears if Insert Editing is attempted on a tape recorded in the LP mode 墌 pg 50 Appears if INSERT w on the remote control is pressed when the erase protection tab is set to SAVE 墌 pg 50 Appears if dubbing of copyguarded signals is attempted while this camcorder is being used as a recorder The error indications E01 E...

Page 60: ...60EN INDEX Controls Connectors And Indicators P L A Y O FF 1 w u y r t q 3 4 5 6 7 8 o e 2 E Q R W p 9 0 i ...

Page 61: ...forming Random Assemble Editing Connect to a JLIP compatible camcorder or VCR to control it from the computer using the provided Software JLIP controlled editing from the camcorder to a VCR is not possible if the VCR is not equipped with a J terminal DC Input Connector 墌 pg 9 The connectors to q are located beneath a cover Audio Video Output Connector AV 墌 pg 34 38 44 Digital Video Connector DV IN...

Page 62: ...d clean the interior of the viewfinder with it 2 6 Close the cover Tilt the viewfinder back to the horizontal position NOTES Avoid using strong cleaning agents such as benzine or alcohol Cleaning should be done only after the battery pack has been removed or other power units have been disconnected Mold may form if the lens is left dirty When using a cleaner or chemically treated cloth refer to th...

Page 63: ...it s power cord to an AC wall outlet other than American National Standard C73 series type use an AC plug adapter called a Siemens Plug as shown For this AC plug adapter consult your nearest JVC dealer Plug adapter Battery Packs The supplied battery pack is a lithium ion battery Before using the supplied battery pack or an optional battery pack be sure to read the following cautions 1 To avoid haz...

Page 64: ...y pack attached when the camcorder is not in use 2 Avoid using the unit in places subject to excessive humidity or dust in places subject to soot or steam such as near a cooking stove in places subject to excessive shock or vibration near a television set near appliances generating strong magnetic or electric fields speakers broadcasting anten nas etc in places subject to extremely high over 40 C ...

Page 65: ...eorient or relocate the receiving antenna Increase the separation between the equip ment and receiver Connect the equipment into an outlet on a circuit different from that to which the receiver is connected Consult the dealer or an experienced radio TV technician for help Serious malfunctioning If malfunctioning occurs stop using the unit immediately and consult your local JVC dealer The camcorder...

Page 66: ...g 32 Monotone 墌 pg 28 A AC Power Adapter Charger 墌 pg 8 9 Audio Dubbing 墌 pg 49 Auto Focus 墌 pg 21 Auto Shut off 墌 pg 15 31 B Backlight Compensation 墌 pg 29 Battery Low 墌 pg 58 Battery Pack 墌 pg 8 9 63 Brighten The LCD Monitor 墌 pg 14 C Channels Left Right 墌 pg 33 Charge The Battery Pack 墌 pg 8 Cinema 墌 pg 24 Classic Film 墌 pg 28 Clean The Camcorder 墌 pg 62 Connections 墌 pg 9 34 36 39 44 D Darken ...

Page 67: ...墌 pg 28 Set Remote Control VCR Code 墌 pg 43 Shuttle Search 墌 pg 31 Shutter Speed 墌 pg 28 Slow Shutter 墌 pg 28 Snapshot 墌 pg 16 17 Snapshot Mode 墌 pg 16 17 Sound Mode 墌 pg 23 32 33 Speaker Volume 墌 pg 31 Specifications 墌 pg 68 69 Squeeze 墌 pg 24 Still Playback 墌 pg 31 Strobe 墌 pg 28 T Tally 墌 pg 14 23 Tele Macro 墌 pg 24 Time Code 墌 pg 19 25 32 33 Tripod Mounting 墌 pg 10 Twilight 墌 pg 28 U Unload A ...

Page 68: ...4 F Operating humidity 35 to 80 Storage temperature 20 C to 50 C 4 F to 122 F Pickup 1 4 CCD Lens F 1 8 f 3 6 mm to 36 mm 10 1 power zoom lens Filter diameter ø37 mm LCD monitor 2 5 diagonally measured LCD panel TFT active matrix system Viewfinder Electronic viewfinder with 0 24 black white LCD Speaker Monaural For Digital Video Camera Format DV format SD mode Signal format NTSC standard Recording...

Page 69: ...le AC Power Adapter Charger AA V40U Power requirement U S A and Canada AC 120 V 60 Hz Other countries AC 110 V to 240 V 50 Hz 60 Hz Power consumption 23 W Output Charge DC 7 2 V 1 2 A VTR DC 6 3 V 1 8 A Dimensions W x H x D 68 mm x 38 mm x 110 mm 2 11 16 x 1 1 2 x 4 3 8 Weight Approx 250 g 0 56 lbs Specifications shown are for SP mode unless otherwise indicated E O E Design and specifications subj...

Page 70: ...MEMO ...

Page 71: ...MEMO ...

Page 72: ...COPYRIGHT 2000 VICTOR COMPANY OF JAPAN LTD U Printed in Japan 0300HOV UN YP VICTOR COMPANY OF JAPAN LIMITED EN GR DVL100 ...

Reviews: