

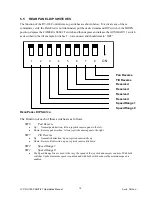
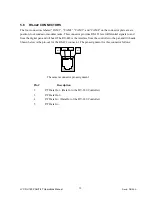

located on the rear panel of the DV-180 Controller.
These switches used in conjunction with the CAMERA SELECT switches and the AUXILIARY 1 switch
allow setting the speed range of the joystick and seesaw manual control functions. For example, it may be
necessary to slow the motion of the pan & tilt head because very smooth control is needed for “on air”
moves. To change the speed range for camera 1, perform the following steps:
Put the SETUP Switch #1(Speed Range bit 1) in the DOWN position, depress the CAMERA SELECT 1
switch and hold it down. Depress and release the AUXILIARY 1 switch while the CAMERA SELECT 1
switch is still depressed. Release the CAMERA SELECT 1 switch. The Speed Range has now been slowed
for camera 1 only. To change the Speed Range of camera 2, repeat the above procedure with the CAMERA
SELECT 2 switch depressed instead of the CAMERA SELECT 1 switch. For the highest speed operation,
load with both switches in the up position. For the slowest speed operation, load with both switches in the
down position.
7.9
VIDEO RECORDER CONTROLS
There are five video recorder control commands available from the front panel of the DV-180, they are: stop,
record, rewind, fast-forward, and pause. These controls use the preset switches 1-5. To activate these
controls, verify the PAGE LED is illuminated indicating the functions listed under the PRESET switches are
enabled, and then depress desired tape command.
7.10 AUTO
FOCUS
There is an auto focus command available from the front panel of the DV-180. This control use the preset
switches 6. To activate auto focus, verify the PAGE LED is illuminated indicating the functions listed under
the PRESET switches are enabled.
7.11 MANUAL
IRIS
There is two manual iris control commands available from the front panel of the DV-180, they are: open and
close. These controls use the preset switches 7 and 8. To activate these controls, verify the PAGE LED is
illuminated indicating the functions listed under the PRESET switches are enabled, and then depress desired
iris command.
7.12 AUTO
IRIS
There is an auto iris control command available from the front panel of the DV-180, this function is labeled
A/I. This controls uses the preset switch 6. To activate these controls, verify the PAGE LED is illuminated
indicating the functions listed under the AUXILLLARY 1 switch is enabled, and then depress A/I (PRESET
6) switch.
JVC DV-180 PAN/TILT Operations Manual
Doc #: D0154-A
17