background image

F 6

0106

.GB

5

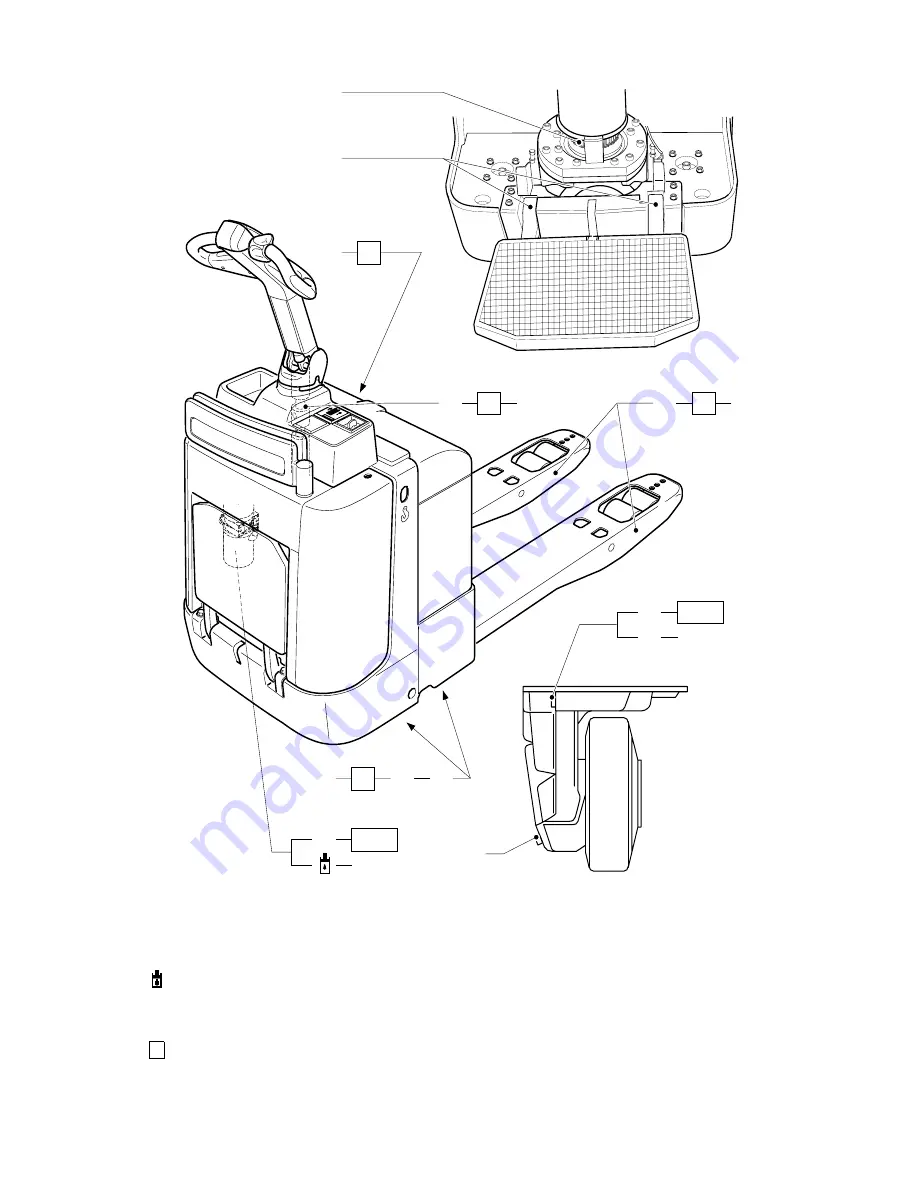
Lubrication schedule

g

Slide surfaces

1) Compound for cold store usage 1:1

s

Grease nipple
Filler plug for hydraulic oil

2) 1.25 l - 1.3 l 
depending on the transmission variant 
(level must always reach the lower edge 
of the filler neck)

b

Filler plug for transmission oil

a

Drain plug for transmission oil
Cold store operation

E

s

F

A

0,7l

A+C

1)

b

B

B+C

1)

G

C

a

E

F

E

F

s

g

E

s

F

1,25l - 1,3l

2)

Summary of Contents for ERE 224

Page 1: ...Operating instructions 50468220 ERE 224 G 09 05 01 06...

Page 2: ...explanations are indicated by the following graphics F Used before safety instructions which must be observed to avoid danger to personnel M Used before notices which must be observed to avoid materi...

Page 3: ...0108 GB...

Page 4: ...Transportation and commissioning 1 Transportation by crane C 1 2 Commissioning C 2 3 Moving the truck with the drive unit inoperative C 3 D Battery Servicing recharging replacement 1 Safety regulation...

Page 5: ...7 4 1 Safety regulations applicable when operating the truck E 7 4 2 Driving steering braking E 8 4 3 Picking up and setting down loads E 14 4 4 Safe parking of the truck E 15 5 Keyboard CANCODE o E...

Page 6: ...maintenance operations F 8 6 2 Opening the front hood F 8 6 3 Opening the front hood F 8 6 4 Checking the mounting and the attachment of the drive wheel F 9 6 5 Checking the hydraulic oil level F 9 6...

Page 7: ...1003 GB I 4...

Page 8: ...06 GB Appendix JH Traction Battery Operating Instructions Z These operating instructions apply only to Jungheinrich battery models If using another brand refer to the manufacturer s operating instruct...

Page 9: ...0506 GB 2...

Page 10: ...f or on whose behalf it is used In special cases e g leasing or renting the user is consid ered the person who in accordance with existing contractual agreements between the owner and the user of the...

Page 11: ...0600 GB A 2...

Page 12: ...tanding platform is available as an option The truck has been designed for lifting operations and transportation on level ground and is able to pick up outside the load bearing wheel range pallets wit...

Page 13: ...2 t Control shaft 9 t Collision guard 3 o Display instrument CANDIS 10 t Safety extension 4 t Key switch 11 t Master switch 5 o Keyboard CANCODE 12 o Fixed driver standing platform 6 t Supporting whe...

Page 14: ...ng platform Chassis height Designation Q Capacity 2 400 kg c Load centre distance 600 mm Travelling speed pedestrian controlled operation with without load 4 5 km h Travelling speed stand on operating...

Page 15: ...170 200 330 e Fork width 170 b11 Track width 340 370 500 a Safety distance 200 Dead weight Refer to truck identification label l I1 3 y1 1 3 x 1 I6 b12 Wa 1 2 3 Ast 2 3 1 000 1 723 1 509 814 1 000 800...

Page 16: ...ed by driving over bumps with a constant speed Electromagnetic compatibility EMC The manufacturer confirms compliance with the limit val ues for electromagnetic emission and interference immu nity as...

Page 17: ...The battery identification plate 18 is visible after the battery hood has been opened refer to chapter D Item Designation 14 Truck identification plate 15 Caution Heed the operating instructions see...

Page 18: ...1 of the truck Item Designation Item Designation 20 Type 26 Manufacturer logo 21 Serial No 27 Min max battery weight in kg 22 Rated capacity in kg 28 Drive power in kW 23 Battery voltage 29 Load centr...

Page 19: ...09 05 GB B 8...

Page 20: ...h ment points 1 M The lifting gear must be attached to the attachment points in such a manner that it cannot slip and does not come into contact with any attachments M If the battery hood is marked ac...

Page 21: ...1 transport plugs have been introduced F When there is no battery in the truck the truck cannot be braked with counter current brake and service brake In the front hood area there is a warning sign fo...

Page 22: ...h the drive unit inoperative F This operating mode is not permitted when negotiating inclines and gradients If the truck has to be moved after a failu re affecting proper operation has rende red it im...

Page 23: ...1003 GB C 4...

Page 24: ...cable shoes must be clean lightly greased with pole grease and must be securely tightened Batteries with bare terminal posts must be covered using a non skid insulating mat Disposal of the battery Ba...

Page 25: ...ce free batteries F When replacing or installing batteries ensure that the battery is correctly secured in the battery compartment of the truck 3 Exposing the battery F Park the truck and render it sa...

Page 26: ...side o Set the master switch 7 to position OFF Unlock the hood locking mechanism 4 by pressing it down tilt the battery hood 5 towards the front and unlock the hood catch 6 r Fold the battery hood 5 d...

Page 27: ...e placed on the battery Prior to starting the recharging operation check all cable connections and plugged connec tions for visible damage All safety instructions as provided by the supplier of the ba...

Page 28: ...hat the crane is of ade quate capacity the battery weight is indicated on the battery identification plate at the battery trough The lifting gear must pull in a vertical direction to prevent damage to...

Page 29: ...tery exchange point Z The battery can also be removed using crane gear 5 3 Installation of the battery Installation is in the reverse order of steps F Following reinstallation of the battery check all...

Page 30: ...k or on the attach ments must immediately be brought to the notice of the person in charge Fork lift trucks that cannot be safely operated e g due to worn tyres or defective brakes must not be used un...

Page 31: ...key t Pedestrian controlled operation Safety function which when operated will force the truck for approx 5 seconds in the opposite trav elling direction R and which will then switch off the travelli...

Page 32: ...E 3 1003 GB 1 11 12 11 12 10 2 6 7 8 10 13 3 4 5 5 5 15 16 17 18 19 9 11 12 11 12 10 10 9 14...

Page 33: ...on the control shaft variant o Truck with moveable control shaft Deadman key pressed Travelling function released Deadman key released Truck coasts to a stop Truck with rigid control shaft Deadman ke...

Page 34: ...E 5 1003 GB 1 11 12 11 12 10 2 6 7 8 10 13 3 4 5 5 5 15 16 17 18 19 9 11 12 11 12 10 10 9 14...

Page 35: ...e truck variant and truck con figuration 3 2 Switching on the truck Pull out the master switch 3 Use the key to set the key switch 7 to position I Check the horn 10 for proper func tioning F When swiv...

Page 36: ...slopes or inclines Loads must always be carried at that end of the truck facing uphill U turns cutting obliquely over slopes or inclines and parking the fork lift truck on slopes or inclines is not pe...

Page 37: ...e eliminated by trained service personnel Cut out Depress the master switch 3 This will switch off all electric functions Emergency stop Depending on the truck variant the emergency stop function can...

Page 38: ...E 9 1003 GB 5 15 14 9 16 19 1 B B B F R V 0 4 9 2 1 2 2 R V 3 13...

Page 39: ...ety extensions are not folded out The truck can only be operated at a reduced travelling speed when the standing plat form is weighted and the safety extensions are not folded out o Truck with rigid s...

Page 40: ...E 11 1003 GB 5 15 14 9 16 19 1 B B B F R V 0 4 9 2 1 2 2 R V 3 13...

Page 41: ...l shaft t Turn the controller 5 into the opposite travelling direction until the truck has come to a standstill The truck is braked with the counter current brake Braking by means of the service brake...

Page 42: ...E 13 1003 GB 5 15 14 9 16 19 1 B B B F R V 0 4 9 2 1 2 2 R V 3 13...

Page 43: ...mitted to pick up long loads crosswise M When picking up the load ensure that it does not project excessively from the tips of the tines less than 50 mm Lifting and lowering Z When operating the keys...

Page 44: ...pletely lower the fork Switch the key switch 7 to position 0 and remove the key from the key switch Set the master switch 3 to position OFF Swing in the hinged safety extensions if available F When sw...

Page 45: ...junction with the indicator in strument CANDIS o The o key has top priority and reset the truck from any condition to the basic condi tion without modifying any settings 5 1 Code lock After entering t...

Page 46: ...incorrect code has been entered LED 20 lights up red for two seconds After that you can enter a new code Z The Set key 21 has no function in operating mode Switching off The truck is switched off by a...

Page 47: ...Additionally the battery parameters can be set Z For trucks without indicator instrument CANDIS o only the code lock parameters can be set Parameter groups The parameter number is composed of three d...

Page 48: ...ehaviour is changed you must perform a trial in a specially assigned and suitable working area run after changing any of the parameters Entering the master code Press the o key Enter master code Code...

Page 49: ...minate the input press the o key 25 The following parameters can be entered Code lock parameter list No Function Range Setting value Default Setting value Comments Work flow Codeschloss 000 Change mas...

Page 50: ...Confirm Set LED 23 flashes Enter a new code Confirm Set LED 24 flashes Repeat the code en try Confirm 003 Delete operator code 0000 9999 or 00000 99999 or 000000 999999 LED 23 flashes Enter a code Con...

Page 51: ...code is already operator code New operator code is already master code Operator code to be changed does not exist Tried to change the operator code to an existing code Operator code to be deleted doe...

Page 52: ...you must wait until the operating hours are displayed again Enter or change the parameter value according to the parameter list Check the LC display of the indicator instrument CANDIS o confirm with t...

Page 53: ...ents 101 Acceleration 0 9 9 102 Coasting brake 0 9 9 104 Maximum speed in drive direction via controller 0 9 8 depending on controller 105 Pedestrian controlled op eration speed in drive di rection vi...

Page 54: ...itional Warning 26 and Stop 28 indicators may result Number Bars Charging condition Wet battery Maintenance free battery LED yellow Warning LED red Stop LED yellow Warning LED red Stop 10 90 1 100 Off...

Page 55: ...r then an E for error with alternating three digit error number If several errors occur they are displayed one after the other The errors are displayed as long as they are present always in combinatio...

Page 56: ...essary Master switch de pressed Release the master switch Key switch in position 0 Set the key switch to position I Battery exhausted Check the charging condition of the bat tery and recharge if neces...

Page 57: ......

Page 58: ...ans trained especially for these assign ments We thus recommend signing a maintenance contract with the relevant service location of the manufacturer Lifting and jacking up When a fork lift truck is t...

Page 59: ...ecific settings have to be retained Tyres The quality of the tyres greatly affects the stability and the driving behaviour of the fork lift truck Changes must only be made following consultations with...

Page 60: ...fluctuations or multiple shift operation the servicing intervals must be shortened accordingly The following servicing checklist indicates the operations to be performed and the re spective intervals...

Page 61: ...leaks and for damage t 5 3 Check the brake linings for wear t 5 4 Check the brake linkage adjust and grease if necessary k t Hydraulic system 6 1 Performance check k t 6 2 Check all connections for l...

Page 62: ...orm a visual check of rollers sliding elements and stops t 10 3 Check the fork tines and fork carrier for wear and damage t Lubrication 11 1 Grease the vehicle in accordance with the lubrication sched...

Page 63: ...ple Filler plug for hydraulic oil 2 1 25 l 1 3 l depending on the transmission variant level must always reach the lower edge of the filler neck b Filler plug for transmission oil a Drain plug for tra...

Page 64: ...ely prescribed in these operating instructions Avoid spilling Spilt liquid must be removed immediately using a suitable binding agent and the mixture of consumption type material and binding agent is...

Page 65: ...ect the battery plug 2 so that the truck cannot be started by unau thorised persons When work is to be carried out under the jacked up truck immobilise the truck in such a way that it cannot sink in t...

Page 66: ...wrench tighten the wheel screws 9 crosswise Z Tightening torque Step 1 MA 10 Nm Step 2 MA 105 Nm Mount the standing platform 4 and secure it in place by means of the attachment screws Reconnect the co...

Page 67: ...section 6 3 Refer to the table and check all fuses for correct rating Replace if required Item Designation Protection of Value 10 3F9 Steering motor o 30 A 11 1F10 Field driving 40 A 12 2F1 Pump moto...

Page 68: ...more than 6 months additional meas ures must be discussed with the Service Department of the manufacturer 7 1 Operations to be performed prior to decommissioning Thoroughly clean the fork lift truck...

Page 69: ...k ked by a qualified inspector The inspector must assess the condition of the truck from a standpoint purely concerned with safety aspects uninfluenced by any company or economic circumstances The ins...

Page 70: ...tive tubular plates type EPzS and EPzB 2 6 Type plate Jungheinrich traction battery 7 Instruction for use Aquamatic BFS III water refilling system 8 12 2 Jungheinrich traction battery Maintenance free...

Page 71: ...d clothes when working on batteries Pay attention to the accident prevention rules as well as DIN EN 50272 3 DIN 50110 1 No smoking Do not expose batteries to naked flames glowing embers or sparks as...

Page 72: ...ucks is the standard which ap plies to the operation traction batteries in industrial trucks 2 1 Discharging Be sure that all breather holes are not sealed or covered Electrical connections e g plugs...

Page 73: ...The containers for batteries with plate protection packs must not be closed until at least half an hour after charging has past 2 3 Equalising charge Equalising charges are used to safeguard the life...

Page 74: ...ound further testing and maintenance by the service department should be requested 3 4 Annually In accordance with DIN VDE 0117 at least once per year the insulation resistance of the truck and the ba...

Page 75: ...be taken into account when considering the life of the battery 6 Malfunctions If malfunctions are found on the battery or the charger our service department should be called in without delay The meas...

Page 76: ...l battery capacity 5 Battery tray number 12 Number of battery cells 6 Delivery date 13 Battery weight 7 Battery manufacturer s logo 14 Safety instructions and warnings Typ 1 T ype Nennspannung 5 Nomin...

Page 77: ...sing batteries which comply with I and II it is important to follow the in structions on maintaining the respective protection class during operation see asso ciated certification Cell series Aquamati...

Page 78: ...d by means of a central sealing coupler through the hose connections in the individual Aquamatic BFS plugs 2 Application The Aquamatic BFS battery water refilling system is used in traction batteries...

Page 79: ...surface 5 2 Pressurised water The pressure reducing valve in the Aquamatic System is set from 0 2 bars to 0 6 bars and from 0 3 bars to 1 8 bars in the BFS system 5 3 Water Refill Trolley serviceMobi...

Page 80: ...ve a diagnostics hole with a 6 5 mm diameter Aquamatic plugs or a 7 5 mm diameter BFS plugs 9 2 Float Different floats are used depending on the cell design and type 9 3 Cleaning The plug systems may...

Page 81: ...en tral supply pipe This is connected to the water supply system at the battery charging station by means of a sealing coupler system On the battery side a closing nipple ident no 50219538 is mounted...

Page 82: ...battery Work on batteries to be carried out by skilled personnel only Use protective glasses and clothes when working on batteries Pay attention to the accident prevention rules as well as DIN EN 5027...

Page 83: ...g plugs must only be made or broken in the open circuit condition To achieve the optimum life for the battery operating discharges of more than 60 of the rated capacity should be avoided deep discharg...

Page 84: ...0 0171 Ex I in areas with a firedamp hazard or Ex II in potentially explosive areas The attention pictograms has to be respected 2 3 Equalising charge Equalising charges are used to safeguard the life...

Page 85: ...1000 4 Care of the battery The battery should always be kept clean and dry to prevent tracking currents Clea ning must be done in accordance with the ZVEI code of practice The Cleaning of Vehicle Trac...

Page 86: ...raction battery CE mark is only for batteries with a nominal voltage greater than 75 volt Item Designation Item Designation 1 Logo 8 Recycling symbol 2 Battery designation 9 Dustbin material 3 Battery...

Page 87: ...0506 GB 18...

Reviews: