background image


GT06-S32H5112J 

EN/1908.V01


EN 

33 

SERVICE PROCEDURE 

If you have reason for complaint, or your device is defective, please contact your dealer or the service division of JAY-tech 
GmbH to make arrangements for service procedures. 


Service Hours:

  Monday – Thursday 


8:00 am to 5:00 pm 


Friday from 8:00 am to 2:00 pm. 

Phone No.:


02161 / 575 8950 

Email:


[email protected] 

 
Please do not send your product to our address unless requested to do so by our service team. All costs and the risk of 

loss are the responsibility of the sender. 
We reserve the right to reject unrequested deliveries, or return the package at the sender’s expense. 


EU DECLARATION OF CONFORMITY 

Herewith the company JAY-tech GmbH declares that the described product complies with the EU directive 2014/53/EU 
and the other applicable for the product. 

The full text of the EU Declaration of Conformity is available at the following Internet address: www.jay-tech.de 
 

The device carries the CE marking and complies with all required EU standards. 


DIRECTIVE 2012/19/EU ON WASTE ELECTRICAL AND ELECTRONIC EQUIPMENT (WEEE) 

This symbol on the product or in the instructions means that your electrical and electronic equipment 
should be disposed at the end of its life separately from your household waste. There are separate 

collection systems for recycling in the EU. 
For more information, please contact the local authority or your retailer where you purchased the 

product. 


INTENDED USE 

The wireless adapter into the device is intended only for making a data connection via a wireless radio network to a 
wireless router or other Wi-Fi-enabled device. 

Any other use or extended use is considered improper. 
Any claims for damage resulting from improper use are excluded. 

The risk is borne solely by the operator. 
This product complies with the applicable national and European requirements. 


APPLICATIONS 

Built-in 802.11b/g/n Wireless Adapter

 (Frequency in the 2.4 GHz & 5.0 GHz band) 

Applications of all channels in all European countries are allowed by ETSI (European Telecommunication Standards 
Institute). 

The device can only be used within range of Wi-Fi enabled channels of 802.11b/g/n. 
 

Summary of Contents for S32H5112J

Page 1: ......

Page 2: ...ION 10 PC VGA CONNECTION 10 SCART CONNECTION 11 AV COMPOSITE VIDEO CONNECTION 11 YPbPr CONNECTION 12 LAN RJ45 Connection 12 USB CONNECTION 12 INSERT CI CARD 13 COAXIAL CONNECTION 13 CONNECT EARPHONE T...

Page 3: ...lowing conditions When the power supply cord or plug is damaged If liquid has been spilled into or objects have fallen into the product If the product has been exposed to rain or water If the product...

Page 4: ...parately in order to optimize the recovery and recycling of the materials they contain and reduce the impact on human health and the environment The crossed out wheeled bin symbol on the product remin...

Page 5: ...s TV please carry out the Stand Installation according to the instructions below Step 1 Place the TV faced down on a soft cloth or cushion to prevent the panel from being damaged Step 2 Assemble the T...

Page 6: ...ed color when switching on the unit the indicator light will display blue color 3 Stand Holder 4 POWER Button To turn ON OFF the TV 5 VOL Button To increase decrease the volume level or move left righ...

Page 7: ...GA input terminal 6 USB 1 2 input slot 7 CI input terminal CI compatible 8 Mini AV input terminal 9 Mini YPbPr input terminal 10 COAXIAL output terminal 11 EARPHONE output terminal 12 RF input termina...

Page 8: ...he available Teletext 9 Display electronic program guide 10 Hold the Teletext 11 Enable disable subtitles 12 Switch Teletext size 13 Enter Teletext sub page 14 Press it repeatedly to select desired sc...

Page 9: ...time 35 Return to previous channel 28 Exit the menu page 36 Select desired input source 29 Mute the sound 37 Enter Home page of Smart TV 30 Increase decrease the volume level 38 In Smart TV press thi...

Page 10: ...Point the remote control from no more than about 6 m from the remote control sensor and within about 60 of the front of the player Fig 2 NOTES The operating distance may vary according to the brightne...

Page 11: ...er source Read through the instructions before connecting other equipment CONNECTING TO AC POWER SOURCE CONNECT EXTERNAL ANTENNA TO UNIT Install external antenna into antenna jack for best picture Mai...

Page 12: ...Cable Not included VGA Cable Not included Use VGA cable and Audio cable not included to connect the unit with TV or PC and use this product as a monitor Use HD INPUT cable not included to connect the...

Page 13: ...AV COMPOSITE VIDEO CONNECTION Back of BD DVD VCR Back of BD DVD VCR AV Cable Not included SCART Cable Not included For basic connection use the composite Audio L R white red and CVBS yellow cable not...

Page 14: ...N Use a LAN cable not included to connect this TV with available network Insert a USB memory device not included to playback MOVIE MUSIC PHOTO Multimedia files LAN Cable Not included USB Memory Device...

Page 15: ...uipment and power cords are connected properly and the unit is set in correct mode before operation Use coaxial cable not included to connect the unit with amplifier or other audio decoding devices fo...

Page 16: ...URCE SETTING Press SOURCE button on unit or remote control to display the sources list Press UP or DOWN navigation button to select desired input source and then press OK button to confirm selection A...

Page 17: ...s OK button on remote control to enter Channel List menu page Press UP or DOWN navigation buttons to select preferred channel Press OK button to confirm the selection TELETEXT Press TEXT button on rem...

Page 18: ...urning on this TV Press LEFT RIGHT UP DOWN navigation buttons to select desired option and press OK button to confirm selection Press EXIT button to return to previous page Welcome Press RIGHT navigat...

Page 19: ...etup and enjoy this TV SMART TV OPERATION Press LEFT RIGHT UP DOWN navigation buttons on Remote Control to select desired option and press OK ENTER button to confirm selection Press EXIT button to ret...

Page 20: ...BROWSER Use UP DOWN LEFT RIGHT navigation buttons to select Browser on HOME page and press OK ENTER button to open it Use UP DOWN LEFT RIGHT navigation buttons to move the cursor to input field Press...

Page 21: ...return to previous page Use navigation buttons to select multimedia Video Music Photo in your USB memory device or internal memory and press OK ENTER button to start playback 3 APPLICATION MANAGER Us...

Page 22: ...eless Hotspot set the wireless hotspot Language input Select OSD available language Time and Date Set date time time zone time format and date format here System Allow installation of non AppStore app...

Page 23: ...or RIGHT navigation button to enter submenu Press MENU button to save current setting and return to previous menu page Press EXIT button to exit menu page DTV MODE Press SOURCE button on the unit or...

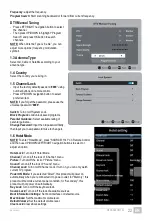
Page 24: ...rating of parental guidance Change Password Input the old password firstly then input your new password twice to change it 1 6 Hotel Mode NOTE To enter Hotel Mode press SOURCE 1147 on Remote Control a...

Page 25: ...s OK navigation button to enter it Press UP DOWN navigation button to highlight desired channel Press RIGHT navigation button to set current channel as a favorite channel and press RIGHT button again...

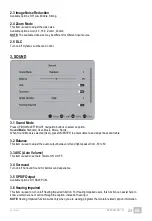
Page 26: ...ed User press OK ENTER to enter submenu and adjust bass and treble 3 2 Balance This item is used to adjust the audio output between left and right speaker from 50 to 50 3 3 AVC Auto Volume This item i...

Page 27: ...0 90 120 180 240 minutes 4 3 Auto Power Time This item is used to select desired Auto Sleep standby duration when no operations were done through the remote control Available options Off 1 2 3 4 hours...

Page 28: ...2 terminal first to receive satellite signals Press SOURCE button on remote control to select DTV Make sure Antenna Type has been selected Satellite 1 AUTO TUNING Press MENU button to call out the mai...

Page 29: ...o select desired option Longitude Angle Press number buttons on remote control to input desired value Band Press LEFT RIGHT navigation button to select desired option 2 Press GREEN button on remote co...

Page 30: ...ed Channel Type Service Type and Scan Mode Then press OK to scan programs automatically C When the Setting Right column is highlighted LNB Low Noise Block Power Press LEFT RIGHT navigation button to s...

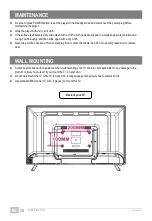
Page 31: ...wrung out thoroughly and then wipe again with a dry cloth Never use alcohol benzene thinner cleaning fluid or other chemicals And do not use compressed air to remove dust WALL MOUNTING Contact a profe...

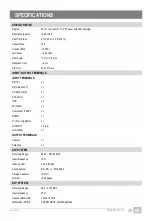
Page 32: ...T TERMINALS INPUT TERMINALS RF TV x 1 RF Satellite TV x 1 PC RGB VGA x 1 PC AUDIO x 1 USB x 2 AV Video x 1 Component YPbPr x 1 SCART x 1 CI CI compatible x 1 HD INPUT x 3 1 4 LAN RJ45 x 1 OUTPUT TERMI...

Page 33: ...Frequency Response 100 Hz 15 kHz 3 dB 1 kHz 0 dB reference signal Class D Amplifier 8 W x 2 8 Ohm THD 10 USB MULTIMEDIA FORMATS Movie AVI MPG MPEG MKV MOV RMVB Music WMA AAC MP3 Photo JPEG BMP PNG SMA...

Page 34: ...rate the remote control unit at a distance of no more than 6m from the remote control sensor Remove the obstacles between the remote control and remote control sensor No key operation by the main unit...

Page 35: ...s with all required EU standards DIRECTIVE 2012 19 EU ON WASTE ELECTRICALAND ELECTRONIC EQUIPMENT WEEE This symbol on the product or in the instructions means that your electrical and electronic equip...

Page 36: ......

Reviews: