4-6
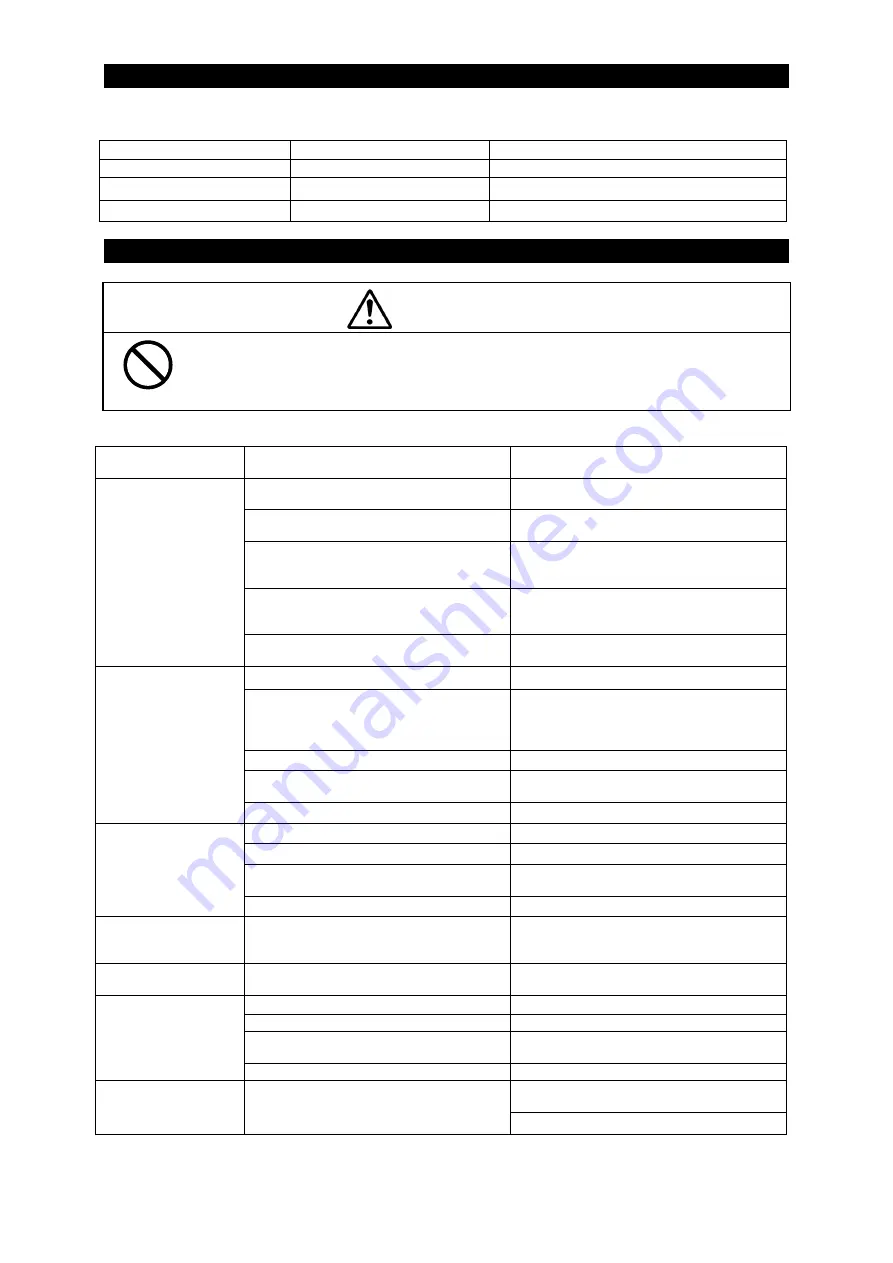
4.4 Maintenance Parts
-The maintenance par list is showed the following table:
Part name
Model number
JRC part code
Printer unit
H-7HPJD0001
7HPJD0001
Printing paper
H-7ZPJD0384
7ZPJD0384
Fuse
MF51NR 250V 3.15
5ZFGD00201
4.5 Trouble Shooting
As for reference, the following trouble shooting table shows to find out some malfunction point:
Symptom of
malfunction
Cause of infer/ malfunction
Countermeasure
Power is not supplied from the power
distribution panel in the ship.
Check whether the wiring from the power
distribution panel is normal or not.
Power is not supplied from the power
unit (option).
Check whether the wiring from the power
unit or not.
A fuse in the equipment is blown-out. Check whether the wiring is normal or
not, and then replace the blown-out fuses
in the equipment.
The fuse in the power unit (option) is
blown-out.
Checked whether the wiring is normal or
not, and then replace the blown-out fuses
in the power unit.
Even if pressing the
POWER KEY, the
equipment is not
turned power on.
The POWER KEY switch is
malfunctioned.
Request to our service center or agent to
repair it.
The power is not turned on.
Turn on the power.
The print time interval is incorrectly set. Set
correctly
the print time interval.
The each preset print time interval is
based on 0 minutes per hour. Refer to
“3.5 Printing” as detail operation.
The printing paper is not loaded.
Load the printing paper.
The PRINT TIME INTERVAL SETTING
switch is malfunctioned.
Request to our service center or agent to
repair it.
The equipment does
not print at its
periodical time.
The paper cover is opening condition. Close completely the paper cover.
The power is not turned on.
Turn on the power.
The printing paper is not loaded.
Load the printing paper.
The PRINT KEY switch is
malfunctioned.
Request to our service center or agent to
repair it.
Even if pressing the
PRINT KEY, the
equipment does not
print data.
The paper cover is opening condition. Close completely the paper cover.
The equipment does
not print some
item(s) in data.
The needed printing data cannot be
received.
Input (supply) the needed printing data.
The equipment has
some dead pixel(s).
The printer unit is malfunctioned.
Request to our service center or agent to
repair it.
The power is not turned on.
Turn on the power.
The printing paper is not loaded.
Load the printing paper.
The FEED KEY switch is
malfunctioned.
Request to our service center or agent to
repair it.
Even if pressing the
FEED KEY, the
equipment dopes not
feed the printing
paper.
The paper cover is opening condition. Close completely the paper cover.
Check whether the wiring is normal or
not, and then receive data.
The green lamp on
the POWER KEY
blinks.
The equipment cannot receive data.
Check to meet its baud rate.
Do not open the equipment to inspect or repair internal circuits.
Inspection or repairs by anyone other than a specialized technician may result in
fire, electrical shock, or malfunction. If internal inspection or repair is necessary,
contact our service center or agents.
WARNING
Summary of Contents for NKG-94
Page 1: ...INSTRUCTION INSTRUCTION MANUAL MANUAL PRINTER PRINTER NKG NKG 94 94 ...
Page 2: ......
Page 8: ...vi EQUIPMENT APPEARANCE NKG 94 Printer 単位 mm Unit mm Body Bracket ...
Page 13: ...1 3 1 4 Structure NKG 94 Printer Unit mm Mass 2 2kg or less Bracket Body ...
Page 36: ...6 2 ...
Page 38: ...7 2 ...
Page 40: ...8 2 8 4 Mechanical Specifications 8 4 1 Mechanical details of desk mounting type ...
Page 43: ......


