background image

85

VIGOR

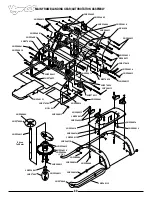
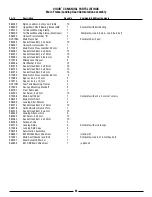
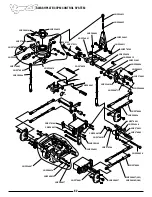
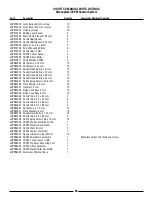
CS MANUAL PARTS LISTINGS

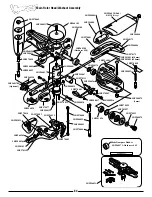
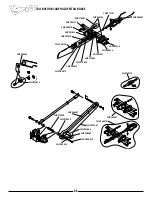
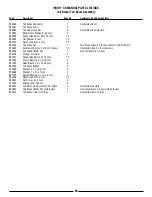
Main Rotor Head/ Washout Assembly

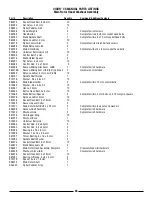
Part # 

Description

Quantity  

Comments/ Additional Contents

980013

Socket Head Bolt, 3 x 8 mm  

10

980004

Set Screw, 4 x 4 mm 

10

996020

Flybar Paddles, Red

1

994008

Flybar Weights  

2

Complete w/set screws

960189

Head Button

1

Complete w/one 3 x 8 mm socket head bolts

960180

Blade Spindle Shaft 

1

Complete w/two 5 x 10 mm socket head bolts

980040

Nylon Lock Nut, 4 mm

10

960179

Flybar Control Arm  

2

Complete w/steel joint ball and screws

960288

Blade Dampeners, 50

2

960195

Main Rotor Body

1

Complete w/four 3 x 8 mm socket head bolts

970098

Universal Ball Link (short)  

10

994005

Control Ball, 14 mm 

2

960176

Blade Holder Spacer 

2

980001

Set Screw, 3 x 4 mm  

10

980052

Control Rod, 2.3 x 15 mm

2

960258

Seesaw Mixing Arm Assm. w/BB  

1

Complete w/all hardware

960178B 

Seesaw Mixing Arm w/BB (23) (optional)

2

Hardware not included

980039

Nylon Lock Nut, 3 mm Low Profile 

10

994007

Spindle Shaft Guide  

1

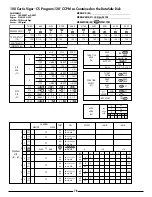
970115

Washer, .03 x 4.5 x 0.7  

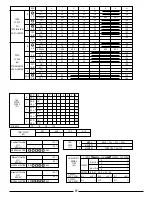
10

996026

Main Blade Holder

2

Complete w/two 14 mm control balls

970082

Washer, .03 x 4.5 x 0.4  

10

980037

Hex nut, 2 mm

10

980030

Button Head Bolt, 3 x 5 mm 

10

970069

Blade Bolts w/Spacers 

2

Complete w/two 4 mm bolts, and 12 mm grip spacers

980075

Nylon Lock Nut. 5mm  

10

980016

Socket Head Bolt, 3 x 15 mm

10

970029

Seesaw Spacer Collar 

2

970077

Main Rotor Shaft Bolt, 3 x 22 mm

2

Complete w/two lock nuts and washers

996028

Seesaw Shaft Assembly 

1

Complete w/all hardware

970010

Washout Link

2

Complete w/all hardware  

981015

CA Stopper Ring

10

960013

Washout Base

1

970004

Universal Ball Link 

10

980053

Control Rod, 2.3 x 50 mm

2

980042

Control Rod, 2.3 x 30 mm

2

981026

Bearing, 8 x 16 x 5 mm  

2

970099

Washer, 12 x 16 x 0.5 mm 

2

981027

Thrust Bearing, 8 x 16 x 5 mm 

2

970093

Spindle Shaft Washer 

2

980074

Socket Head Bolt, 5 x 10 mm 

10

960573

Blade Dampeners, 45

2

996021

Main Rotor Head Assembly, Complete  

1

Preassembled w/all hardware

960249

Washout Arm w/BB 

1  

Complete w/all hardware

980016

Socket Head Bolt, 3 x 15 mm  

10

981031

Bearing w/Flange, 3 x 8 x 4 mm 

2

970119

Spacer, 3 x 5 x 1.8 mm

2

996012

Main Rotor Shaft

1

KSJ330

Flybar Paddles, Grey

1

Summary of Contents for Vigor CS

Page 1: ...is Youngblood in conjunction with JR Engineers VIGOR CS SPECIFICATIONS Overall Length 56 25 Overall Height 18 Main Rotor Blade Length 680 720 mm Main rotor blades not included Tail Rotor Diameter 10 34 Gear Ratio 9 33 1 4 83 Gross Weight 10 2 10 5 lb JRP9051 46 Revised 7 2001 ...

Page 2: ...rpilot com For the latest up to date information on the Vigor CS visit the Vigor Web page at www vigorpilot com vigorpilot com will contain up to date information on new upgrade parts and radio programming tips as well as many helpful tips and suggestions from Team JR s pilots to keep you on the cutting edge of Vigor CS developments and fine tuning WARNING The radio controlled model helicopter con...

Page 3: ...llation 34 5 8 Horizontal Vertical Fin Installation 34 5 9 Tail Center Hub Assembly 35 5 10 Tail Blade Holder Assembly 35 5 11 Steel Joint Ball Installation 36 5 12 Tail Drive Shaft Tail Gear Box Installation 36 6 1 Upper Servo Tray Body Mount Attachment 37 6 2 Servo Switch Harness Installation 38 6 3 Tail Control Rod Assembly 39 6 4 Tail Control Rod Tail Guide Attachment 39 6 5 Gyro Receiver Batt...

Page 4: ...airflow to double the normal amount Main shaft bearing spacing is 50 wider than conventional designs for superior rigidity Additional BB engine drive pinion gear support keeps power loads from being introduced to the engine New larger 20 ounce fuel tank for extended flight times CNC machined delrin bevel drive gear Optimum 9 33 to 1 to 4 83 gear ratio JR XP8103 JR PCM10X JRPB4340 1400mAh Battery P...

Page 5: ...lcohol Fuel Filter Glow Plugs HAN3020 2 ENGINE REQUIREMENTS not included 3 BUILDING SUPPLIES not included The following items are needed to complete the assembly of the JR Vigor CS A 60 61 R C helicopter engine is required A special helicopter type muffler is also required OS 61 WC Heli Engine YS STII Heli Engine KSJ520 O S KSJ583 YS YEIMP900 Muscle Pipe Set Right High Speed Grease Medium Silicone...

Page 6: ...ttery Helicopter Fuel 15 30 Pitch Gauge JRP960326 Fuel Pump Ball Link Pliers RVO1005 Glow Plugs HAN3020 Hex Starting Shaft JRP960090 Phillips Screwdriver Nut Drivers 5 mm 7 mm 4 TOOLS NEEDED TO ASSEMBLE THE JR VIGOR CS not included 5 FIELD EQUIPMENT REQUIRED not included JR Ball Link Sizing Tool JRP60219 Optional 1 5 Volt Glow Plug Battery OR Must have long shaft to reach glow plug Remote Glow Plu...

Page 7: ...ch step All of the hardware screws nuts etc contained in the Vigor CS kit are described in the following A B C manner C C C A A B A A B B B C A B 3 x 8 mm Socket Head Bolt Set Screw C A B C C A A A A B 2 x 8 mm Flat Head Screw 2 6 x 10 mm Self Tapping Screw A B B 3 mm Flat Washer A B B 3 mm Lock Nut Star Washer A B B 3 mm Star Washer A B Flat Head Cap Screw A C B C 3 x 8 mm Flat Head Cap Screw A H...

Page 8: ... the bearing with the 5 mm ID faces upward Note Use Red Green Threadlock TEAM TIP Clean areas with rubbing alcohol to remove any oil residue before applying threadlock Use Green Threadlock Note Position so that bearing is at the top of the bearing block Green Green Red Apply red threadlock tighten at Step 3 8 Red Lightly Oil Assembly Order 1 Attach pinion to clutch bell 2 Attach clutch bell to bea...

Page 9: ...lock A Arm Bearing Collar 2 pcs 11 mm Red Elevator A Arm Remove 1 mm from the bottom of this link using a hobby knife Special Universal Link White 2 pcs Red 5 mm Remove JR Propo from outside of link using a hobby knife Note Oil outside of link to ease assembly Note Connect the A arm to the A arm base in the standard range position as shown Wide Range Standard Range Note Threaded Rod 2 3 x 15 mm Ap...

Page 10: ... mm washer and 7 mm nut supplied Be sure to secure this assembly firmly to avoid leakage Nut 7 mm Washer 7 x 12 x 1 mm 2 Insert the assembly into the fuel tank opening so that the nipple is inside the tank Next slide the fuel tank grommet over the medium fuel tubing Fuel Tank Grommet 1 3 T ARM LEVER ASSEMBLY 3 Inset the fuel tank grommet into the fuel tank opening making sure that it is fully seat...

Page 11: ...n Frame 2 pcs Flat Washer 3 mm Flat Washer 3 mm 5 pcs Flat Washer 3 mm 12 pcs 4 pcs 5 pcs 5 pcs 8 pcs TEAM TIP Don t tighten bolts completly at this time These bolts will be tightened in Step 3 8 to achieve proper alignment Positon so that bearing faces upward Note Top Bearing Case Direction Up Prior to assembling the main frames sand all edges of the frame using 120 grit sandpaper This will preve...

Page 12: ... Rear Short Socket Head Bolt 3 x 8 mm Nylon Lock Nut 3 mm 4 pcs 4 pcs 1 pc Spacer 4 x 5 x 1 mm Socket Head Bolt 4 x 10 mm 1 pc Socket Head Bolt 4 x 10 mm Nylon Lock Nut 3 mm 4 pcs Spacer 4 x 5 x 1 mm Socket Head Bolt 3 x 8 mm 4 pcs R ed Use Red Threadlock Elevator Arm Bearing Case 2 pcs ...

Page 13: ...ep 3 8 Set Screw 3 x 18 mm 2 pcs Cross Member 24 mm 10 mm R e d TEAM TIP Do not apply Threadlock to bolts unless you will procede through Step 3 8 during this building session Cross Member 24 mm 2 pcs Cross Member 32 mm Set Screw 3 x 18 mm 2 pcs Red Nylon Lock Nut 3 mm 3 pcs Socket Head Bolt 3 x 40 mm 3 pcs Cross Member 24 mm 2 pcs Set Screw 3 x 18 mm 2 pcs Cross Member 32 mm 1 pc Red When install...

Page 14: ... Mixing Lever Spacer 2 pcs 2 pcs Spacer 3 x 5 x 1 mm T Lever Positions If a collar in T arm is too one sided please correct the collar to center before inserting the bolts 140 CCPM Standard Range 120 CCPM Standard Range T Lever Position on Main Frame Slots Note TEAM TIP If you have difficulty reaching the 3 mm T lever nuts remove the two top bolts from the plastic crossmember and slide the crossme...

Page 15: ...ion Nylon Lock Nut 4 mm Flat Washer 4 mm Set Screw 4 x 4 mm 90 Nylon Lock Nut 4 mm 1 pc Flat Washer 4 mm 1 pc Set Screw 4 x 4 mm 2 pcs Use Red Threadlock Elevator Control Arm A Arm Base Make sure that the elevator control arm is installed so that it is 90 to the A arm base Note Red Red ...

Page 16: ...Remove a 1 2 x 3 4 portion of the clear coating from the inside of each main frame as shown Remove these two raised portions using a knife or file so that they are flush with the cross member side Remove a 1 2 x 3 4 portion of the clear coating from the inside of each frame plate as shown 1 2 3 4 2 pcs 6 pcs 2 pcs 8 pcs Socket Head Bolt 3 x 10 mm Socket Head Bolt 3 x 40 mm Socket Head Bolt 3 x 50 ...

Page 17: ...ass RF grounding plate between the cross member B and the inside of the two main frames as shown C When installing the carbon bottom plate replace the four 3 x 6 mm socket head bolts that connect the carbon plate to the motor mount with the four 3 x 8 mm socket head bolts included with the RF grounding plate Insert the brass RF grounding plate so it s positioned between the cross member B and the ...

Page 18: ...s Member 32 mm 3 pcs 3 pcs 6 pcs 4 pcs 2 pcs Cut the tank mounting rubber to a length as shown from the two pieces included with the kit 120 mm 210 mm Fuel Tank Use Red Threadlock Attach fuel line to tank prior to installation TEAM TIP Insert 32 mm crossmembers before installing the fuel tank Red Red Red R e d Red Red If a YS engine is to be used replace the existing tank mounting rubber with Aero...

Page 19: ...vent warping of main drive gear Socket Head Bolt 3 x 8 mm 4 pcs Socket Head Bolt 3 x 10 mm 4 pcs Socket Head Bolt 3 x 10 mm Body Mounting Standoff 32 mm Body Mounting Standoff 32 mm 2 pcs Cross Member 64 mm Cross Member 64 mm Front Radio Bed 4 pcs 4 pcs 2 pcs 4 pcs 1 pc Up Apply a light coating of grease to torrington bearing Use Red Threadlock Use Red Threadlock TEAM TIP Apply a light coating of ...

Page 20: ... mm Hex Head Bolt 6 x 10 mm Steel Washer 10 x 16 x 2 5 mm Main Shaft Washer Main Shaft Washer Direction Bevel Cutting Up Note Bevel Gear Bevel Gear Hub Flat Head Bolt 3 x 6 mm Flat Head Bolt 3 x 6 mm 4 pcs 4 pcs Use Red Threadlock Red Attach the bevel gear hub as shown Be sure not to overtighten the four 3 mm bolts as this could distort the bevel gear Socket Head Bolt 3 x 12 mm 1 pc Socket Head Bo...

Page 21: ...a cleaner apearance Len TEAM TIP The landing skid tubes can be shortened by 3 to save weight 3 4 COOLING FAN HUB INSTALLATION Socket Head Bolt 3 x 6 mm Socket Head Bolt 3 x 6 mm 4 pcs 4 pcs 4 pcs Nut supplied with engine Washer supplied with engine Use for O S engines only Omit for YS engines Taper Collet Upper small Taper Collet Lower large 4 pcs Flat Washer 3 mm Flat Washer 3 mm 4 pcs Cooling Fa...

Page 22: ...allation of the engine 3 5 CLUTCH ASSEMBLY ATTACHMENT 1 pc 2 pcs 1 pc 1 pc Flat Head Screw 2 x 8 mm Flat Head Screw 2 x 8 mm Steel Joint Ball Steel Joint Ball Hex Nut 2 mm Hex Nut 2 mm Socket Head Bolt 4 x 6 mm Socket Head Bolt 4 x 6 mm 2 pcs Clutch Assembly 2 pcs Use Red Threadlock TEAM TIP Before the clutch is permanently attached rotate the clutch fan assembly to check for trueness If any clutc...

Page 23: ... together then secure the bearing blocks in place When setting the gear mesh make sure that the pinion gear remains parallel to the main drive gear teeth as it is possible to alter the pinion gear angle during adjustment If you find difficulty achieving proper alignment of the pinion it is also possible to loosen the six bolts that attach the engine mount to the main frame This will allow the engi...

Page 24: ...rew 2 6 x 8 mm 6 pcs Flat Washer 3 mm 4 pcs Cooling Fan Shroud left Glow Plug Opening can be enlarged if necessary Tighten after right shroud half has been aligned TEAM TIP The best alignment of the fan shroud can be achieved by attaching only the right half of the shroud Next align the mounts so the shroud is centered around the fan Tighten the fan mounts then attach the left half of the shroud W...

Page 25: ...cer 2 75 mm 4 pcs note correct direction 140 120 Aluminum Swashplate Assembly Steel Joint Ball 4 pcs 140 CCPM Swash Type Long Control Ball 20 mm 2 pcs Short Control Ball 4 mm 1 pc 120 CCPM Swash Type Short Control Ball 4 mm 3 pcs Control Ball 20 mm 140 CCPM Control Ball 4 mm 2 pcs 1 pc Set Screw 3 x 3 mm If there is play between the upper and lower swashplate tighten set screw 3 x 3 mm to the lowe...

Page 26: ...HPLATE WASHOUT INSTALLATION Washout Assembly preassembled Swashplate Long Flange Up Install onto the main rotor shaft so the longer portion of the washout base faces downward toward the swashplate WASHOUT ASSEMBLY ...

Page 27: ... place Note Main Rotor Head Dampeners Maintenance The main rotor head dampeners should be inspected after 30 to 50 flights and replaced as needed When replacing the dampeners it is also suggested that the thrust bearings be greased using a high speed grease to prolong bearing life Rotor Head Pins 2 Washout Base Driver TEAM TIP For safety it s important to note that a hardened bolt with a long shan...

Page 28: ...y are parallel to the flybar control arms and to each other Version 2 Note Thread each flybar paddle onto the flybar until the threaded tip of the flybar protrudes approximately 5 mm Adjust each flybar paddle so they are parallel to the flybar control arms and to each other Secure to the flybar using two 4 mm nylon lock nuts Note proper direction of each flybar paddle short portion forward clockwi...

Page 29: ...link with a small pair of pliers This reduces the size of the link hole and makes the link fit tighter JR links are some of the best links available It is important to note that very little force is needed on the ridges to resize the link Using pliers on any other part of the link can cause the links to break Note The seesaw mixing arms included with the Vigor are designed to offer a pitch range o...

Page 30: ...5 2 TAIL DRIVE SHAFT ASSEMBLY 4 pcs Set Screw 3 x 4 mm Use Red Green Threadlock Green Green Drive Shaft GuideBearing 2 pcs Aluminum Drive Joint Front Set Screw 3 x 4 mm 2 pcs O ring 13 5 x 2 5 2 pcs Set Screw 3 x 4 mm 2 pcs Make sure that all holes are aligned Aluminum Drive Joint Rear Red 2 pcs 2 pcs Red Set Screw 3 x 4 mm Set Screw 3 x 4 mm When secured the 4 mm set screws should be nearly flush...

Page 31: ...fore aft movement of the shaft but the shaft will spin freely in the bearing assembly 5 3 BEVEL PINION GEAR ASSEMBLY Note Use Poly Zap not included to attach bearings to the drive shaft Once the Poly Zap is applied and the guide bearings are in their correct positions 260 mm 230 mm the Poly Zap can be quick cured using Zip Kicker Position the shaft assembly on a flat surface before while the Poly ...

Page 32: ...peat this procedure using thinner paper If backlash can t be detected double the paper thickness and retest It is better to set this gear mesh slightly tight rather than loose or damage to the bevel gear can occur during extreme 3D flying or tail blade contact with the ground Note BEVEL GEAR MESH ADJUSTMENT Socket Head Bolt 3 x 8 mm Rod Guide Socket Head Bolt 3 x 40 mm Nylon Lock Nut 3 mm 2 pcs 3 ...

Page 33: ... Head Bolt 3 x 12 mm 2 pcs Use Red Threadlock 5 6 5 6 TAIL BOOM BRACE ASSEMBLY Socket Head Bolt 2 6 x 12 mm Socket Head Bolt 2 6 x 12 mm 4 pcs Tail Brace Tube Tail Brace Connector 4 pcs 4 pcs TEAM TIP It is suggested that the Tail Brace Connectors be bonded to the Tail Brace Tubes using either thick CA adhesive or JB Weld Tail Support Clamp Direction FRONT Note offset in bolt hole location ...

Page 34: ... Threadlock Flat Washer 3 mm 4 pcs Socket Head Bolt 3 x 22 mm Do not tighten completely Socket Head Bolt 3 x 8 mm 3 pcs Tail Case Support A Thick Keep vertical Tail Case Support B Thin 4pcs Red Socket Head Bolt 3 x 6 mm 2 pcs Carbon Horizontal Fin Flat Washer 3 mm 2 pcs Position the horizontal fin so that it is level to the building surface 90 to the main rotor shaft and tighten the 2 tail support...

Page 35: ...tation direction Be sure to note the correct direction of the tail rotor blades during assembly 2 pcs Green Set Screw 3 x 3 mm 2 pcs Tail Slide Ring Assembly Tail Center Hub Nylon Lock Nut 3 mm Bearing sealed 4 x 10 x 4 mm 2 pcs Washer 7 x 10x 1mm 2 pcs Small I D Washer 4 x 7 x 0 5 mm 2 pcs Flat Washer 3 mm 2pcs Thrust Bearing 4 x 9 x 4 mm 2 pcs O Ring 5 x 7 x 1 mm 2 pcs Bearing Open 4 x 10 x 3 mm...

Page 36: ...r Box Assembly Tighten after gear box has been aligned Attach the tail drive shaft to the tail gear box as shown using the 4 4 mm set screws use Threadlock Please leave a very slight space between the drive shaft and the bearing of the tail gear box Next apply a light coating of oil to the drive shaft guide O rings and install the assembly into the tail boom To allow the tail gear box to be fully ...

Page 37: ... Threaded Rod 3 x 50 mm 1 pc Cross Member 41 mm 2 pcs Cross Member 41 mm 2 pcs BODY MOUNT ATTACHMENT Use Red Threadlock TEAM TIP Increase the size of the hole using a Dremel tool This will allow for easier insertion of the servo leads Red CCPM Aluminum Servo Mount Standard Fuel Tubing Not included use remaining from engine fuel tank installation 8 mm 20 mm Add two 20 mm pieces of fuel tubing to th...

Page 38: ...ng installation Attach as shown Switch Switch Plate Dampener Rubber 2 pcs Off On TEAM TIP When installing the switch harness position it so that Up is off and Down is the on position This will prevent the switch from accidentally being turned off in a hard landing or auto 2 pcs Self Tapping Screw 2 6 x 15 mm Type B Servo Mounting Plate 2 pcs Self Tapping Screw 2 6 x 12 mm 10 pcs Self Tapping Screw...

Page 39: ...rsal links onto the steel rod ends as shown 5 Apply JB Weld epoxy to each end of the rod where it has been sanded and attach the two steel rod ends Make an additional fillet of JB Weld at the back of each steel rod end as shown for proper adhesion 6 Let assembly set on a flat surface until the JB Weld has cured Self Tapping Screw 2 x 8 mm 5 pcs Tail Rod Guide 5 pcs 60 mm 130 mm 140 mm 145 mm 160 m...

Page 40: ...e gyro unit to the front radio bed that it does not come in contact with the frame of the helicopter etc Also make sure that the front radio bed is free from oil and debris Clean with rubbing alcohol if necessary to insure proper adhesion Note Double Sided Servo Tape Double Sided Servo Tape Ni Cd RX Battery Pack 1400mAh minimum Double sided servo tape and sponge foam rubber are not included in thi...

Page 41: ...t all servos operate with the appropriate control stick 3 Rest the throttle stick to the center position making sure the throttle trim is still at low 4 Turn off the receiver switch first followed by the transmitter For proper operation it s important that the servo horns are positioned on the servos in the exact neutral position Although most computer radio systems offer a sub trim feature it is ...

Page 42: ...three servos work together to move the swashplate fore and aft For collective it s also the strength of three servos that will move the swashplate up and down the main rotor shaft With two or three servos working at the same time during any given control input servo torque is maximized and servo centering is also increased In addition to these benefits CCPM achieves these control responses without...

Page 43: ...For example when a down elevator forward cyclic command is given the two front servos B and C will move rearward while the top servo A moves foreward so that the swashplate will tilt forward During this function with 120 CCPM the top servo A travels at 100 while the two front servos B and C travel at 50 1 2 the travel value of the top servo This difference in travel is necessary due to the fact th...

Page 44: ...servo reversing directions for the three CCPM servos aileron elevator Aux 1 be set as indicated in the upcoming radio programming steps If one or more servos is not set to the correct direction the CCPM function will be out of synchronization and the three control functions Aileron Elevator Collective will not move properly In the event that a control surface is working in the wrong direction the ...

Page 45: ...We will refer to this servo as the Top servo The channel number for this servo when using a JR radio is CH3 Aileron Servo We will refer to this servo as the Right Front servo The channel number for this servo when using a JR radio is CH2 Aux 1 Pitch Servo We will refer to this servo as the Left Front servo The channel number for this servo when using a JR radio is CH6 Please refer to the CCPM conn...

Page 46: ... for use with the following equipment Gyro JR G5000T or G550T Tail Lock Gyros Servos JR 8231 or 8411 Digital Servos Cyclic JR 8417 or 8700G Digital Super Servos Tail Rotor Engine OS 61 SXH WC Muffler YEIMP900 Muscle Pipe Tuned exhaust system Blades NHP 700S Symmetrical or 700mm Symmetrical V Blades Main NHP 105mm Tail Rotor Blades Tail If a different combination of equipment is used it will be nec...

Page 47: ...ter the system mode Next press the Up or Down keys to move the cursor to the model select function Press the Up and Down keys simultaneously to enter the model select function Select the desired model number to be used then press the Clear key to reset the current model to the factory default settings Press the Up and Down keys simultaneously to exit the model select function B CCPM Activation Pre...

Page 48: ... values as shown using the channel key to move the cursor and the and keys to set the value Press the Sel key to access the pitch channel values and set as indicated Please note that the required travel values will vary based on the type of servo selected Note The travel values shown for the rudder function are for use with Piezo type gyros like the JR G550T or G5000T type gyros CCPM SOFTWARE ACTI...

Page 49: ... Press Enter to exit the swash type function C Servo Reversing Access the servo reversing function code 11 Next reverse channels 1 2 and 4 by pressing the desired channel number The screen should appear as shown Press Enter to exit the servo reversing function D Travel Adjust Access the travel adjust function code 12 and adjust the servo travel values as shown Please note that the required travel ...

Page 50: ... the servo arm to be varied when rotated at 180 degree intervals To test fit the servo horns turn the radio system on and set the collective stick to the center position Next test fit the servo arms at 180 degree intervals to find the direction that will allow the horn to be positioned as close to the vertical position 90 degrees from the servo case as possible as shown in the diagram This will re...

Page 51: ...e sub trim function code 15 2 Adjust the left aileron right Aux 1 and top elevator servos as needed until the servo arm is exactly parallel to the servo as shown when the collective stick is in the center position It will be necessary to press the Page button to access the right servo Aux 1 sub trim value 3 Press Enter to exit the sub trim function SUB TRIM THRO AILE ELEV RUDD GEAR 0 0 0 0 0 ENTER...

Page 52: ...A 64 5 mm Control Rod 2 3 x 85 mm B 70 5 mm 120Wide Range Control Rod 2 3 x 95 mm 4 pcs 2 pcs A 76 mm Control Rod 2 3 x 85 mm B 66 mm 120Standard Range For 8103 and 10 Series Systems Control Rod 2 3 x 95 mm 4 pcs 2 pcs A 64 5 mm Control Rod 2 3 x 85 mm B 70 5 mm All instructions are based on the use of the standard range CCPM setup It is not recommended that the wide range setup be used Note ...

Page 53: ... to the servo arms first Next test fit the rods to the T lever balls to ensure that the rods are the correct length If the rods are too long or too short adjust each rod an equal amount until the control rods line up with each of the T lever control Note Use JR Ball Link Sizing Tool ...

Page 54: ...eadlock Servo arm should be offset 1 2 servo splines at neutral Adjust the length of the tail control rod until the tail pitch slider is in the center of its travel and the servo arm is at the position shown below offset Note that control ball is attached to the inside of the servo arm Remove shaded area Offsetting the servo arm as shown will balance the feel of the tail rotor during flight ...

Page 55: ...rottle 12 5 mm Universal Link 2 pcs Control Rod 2 3 x 100 mm 82 mm approximate Flat Head Screw 2 x 8 mm Steel Joint Ball Hex Nut 2 mm Servo Horn Attach the joint ball to the outside of the servo arm Remove shaded area JR Option For smooth operation pre size the ball links with the JR ball link sizing tool prior to attachment ...

Page 56: ...ntil the correct barrel travel is achieved Please note that it is very important the ATV travel volume for both the high and low throttle setting remain at their maximum values 150 to prevent over travel and binding of the throttle linkage when cyclic to throttle mixing is used For initial cyclic to throttle mixing value information please refer to the JR 8103 and PCM10X series data sheets located...

Page 57: ...red to the frame of the model adjust either the left or right servo control rods as needed To determine which rod needs adjustment it may be helpful to view the swashplate from the left and right side view of the model to determine which side is high or low Once this left to right adjustment is completed it will now be necessary to check the fore aft position of the swashplate to insure that it is...

Page 58: ... are correct If no rolling tendency is found it will now be necessary to repeat this procedure from the center collective stick position to full low pitch If no rolling tendency is found proceed to Step 7 9 In our example we have shown that the swashplate has been tilted to the right as the collective has been increased to full pitch This would indicate that the left servo s maximum travel is grea...

Page 59: ... has been increased to full high pitch This would indicate that the top servo s maximum travel is more than that of the two left right servos In this condition we suggest that the travel value for the top servo be decreased slightly 5 10 Repeat the above procedure and decrease the value as needed until the tilting tendency is eliminated For information on the travel adjustment function please refe...

Page 60: ...of the travel adjustment function as this will alter the pitch to aileron and pitch to elevator travel values established in Steps 7 8 and 7 9 Please refer to the CCPM activation section page 46 for information on how to access the CCPM function Once the CCPM function has been activated set the maximum positive pitch settings as mentioned above Since the CCPM function does not allow for independen...

Page 61: ...l be approximately 10 20 less than that of the established hover gain due to aerodynamic forces present in forward flight This variance depends greatly on the specific gyro used If you are using a dual rate gyro adjust the gain so you are using the higher gain setting for hover and the lower gain setting for forward flight Gyro Direction It will also be necessary to confirm the direction the gyro ...

Page 62: ...T ATTACHMENT Rubber Grommets 4 or 6 pcs Cut here remove It may be necessary to trim the lower edge of the canopy slightly if it contacts the lower tank mounts Trim Rubber Grommets 4 pcs Drill four 15 64 holes and insert rubber grommets as shown ...

Page 63: ...e all sanding dust Apply a coating of primer to the canopy Many modelers use a lacquer based automotive primer available in most automotive supply stores Once the primer dries check the canopy for any pinholes that may exist These pinholes can be spot filled using either an automotive Glazing putty or a special pinhole filler like BVM Bob Violett Models BVM1925 pinhole filler Sand the spot filler ...

Page 64: ...64 E A C D G F DECAL PLACEMENT ...

Page 65: ...65 B 3 2 5 1 DECAL PLACEMENT ...

Page 66: ...s to swing freely within the main blade holders Socket Head Bolt 4 x 35 mm 1 pc Not included order NOH680C or NOH700S 12 mm Insert the main rotor blade spacers as shown Apply a light drop of CA adhesive to hold the main rotor blade spacers in place Lock Nut 4 mm 1 pc Hold the 4 mm Lock Nut while tightening using a Wiha 7 mm Nut Driver or equivalent Lock Nut 4 mm Socket Head Bolt 4 x 35 mm 2 pcs 2 ...

Page 67: ...ecessary to re static balance the main rotor blades Blade Labeling for Tracking Purposes BLADE TRACKING ADJUSTMENT Blade tracking is an adjustment to the main rotor blade pitch that must be accomplished during the initial test flights Although the blade pitch angle in each blade may appear equal it is still possible for a set of main rotor blades to run out of track making adjustment necessary Mai...

Page 68: ...ghts to help reduce wear Washout Base Lubricate the washout base using light oil every 10 15 flights to insure smooth operating and reduce wear Inspect the washout base every 50 75 flights If excess wear is noted replace as needed Tail Pitch Slider Lubricate the tail pitch slider using light oil every 5 10 flights to insure smooth operation and reduce wear Check Ball Link Wear Check to insure that...

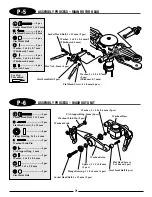
Page 69: ...ade holder bearings so as not to distort damage the main blade holders Make two main blade holders Socket Head Bolt 3 x 8 mm Socket Head Bolt 3 x 8 mm Socket Head Bolt 3 x 8 mm 4 pcs Head Button Main Rotor Head Body Set Screw 3 x 4 mm Spindle Shaft Guide Main Rotor Hub Assembly 5 pcs 1 pc Set Screw 3 x 4 mm Position hole at top to engage set screw ALL TEAM TIP JB Weld the bearings into the blade h...

Page 70: ...er Silver 2 pcs Blade Spindle Shaft Blade Dampener Rubber 2 pcs check after approx 30 50 flights and replace as needed Washer 12 x 16 x 0 5 mm 2 pcs Large I D Small I D Be sure to note correct placement of large small I D thrust washers during assembly Button Head Bolt 3 x 5 mm Button Head Bolt 3 x 5 mm 2 pcs Seesaw Spacer Collar Seesaw Spacer Collar 2 pcs Seesaw Assembly 2 pcs 2 pcs Be sure to no...

Page 71: ...ashout Base Washout Arm 2 pcs Spacer 3 x 5 x 1 8 mm Spacer 3 x 5 x 1 8 mm 2 pcs 2 pcs Steel Joint Ball Steel Joint Ball 2 pcs 2 pcs P 6 ASSEMBLY PROCESS WASHOUT UNIT Socket Head Bolt 3 x 15 mm Flat Head Screw 2 x 8 mm Flat Head Screw 2 x 8 mm 4 pcs Steel Joint Ball Steel Joint Ball 2 pcs Hex Nut 2 mm 4 pcs Washer 3 x 4 5 x 0 7 mm Thickness 0 7 mm Washer 3 x 4 5 x 0 7 mm 2 pcs Thickness 0 7 mm Wash...

Page 72: ... pcs Be sure to center Pin between pitch link ears when installing Make two flybar control arms Installing with four moulded circle marks in link facing in the direction of arrow as shown Tail slide ting sleeve is reverse left hand thread Use caution when installing Circle Marks Flat Head Screw 2 x 8 mm Flat Head Screw 2 x 8 mm 2 pcs 2 pcs Steel Joint Ball Steel Joint Ball 2 pcs Flybar Control Arm...

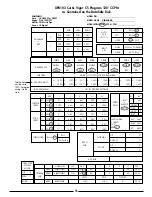
Page 73: ...T 1 HOLD 0 INVT AIL 48 ELEV 52 PIT 60 UP 0 DOWN 0 UP 0 DOWN 0 GYRO SENS SWASH MIX 3 SERVO 120 EXP ACT INH RUDD D R AUTO STUNT PROGRAM MIX THROTTLE CURVE Throttle travel must be set to 150 if program mixing is to be used PITCH CURVE THRO HOLD INH ACT CHANNEL SW EXP L 1 2 3 H SW MIX1 AILE THRO ON OFF ON 20 0 20 F S12 MIX2 ELEV THRO ON OFF ON 20 0 20 F S12 POS POS OFFSET MIX3 ELEV AILE 14 14 0 F S12 ...

Page 74: ...POS Delay 1 4 1 2 3 4 1 FLIGHT INH GEAR EXTRA AILE GEAR INH GEAR SW HOLD AUX2 INH ACT SW PIT LOW INH ACT LEVER HI INH ACT ADT STUNT INH ACT THROTTLE HOLD 16 INH AUX 3 AUTO GYRO SENS 44 FUNCTION SELECT 17 CHANNEL TRIM SW OFFSET GAIN GAIN MASTER SLAVE INH OFF NR S1 S2 S3 S4 5 1 ACT ON HD AX2 GER INH OFF NR S1 S2 S3 S4 5 2 ACT ON HD AX2 GER INH OFF NR S1 S2 S3 S4 5 3 ACT ON HD AX2 GER INH OFF NR S1 S...

Page 75: ...W HOV T CENTER PITCH CURVE 68 P TRIM CENTER HOV P CENTER 75 1 SERVO 3SERVO 120 CCPM 3SERVO 140 CCPM ELE AIL D 0 1SERVO U 0 AIL ELE L 0 R 0 SWITCH NR S1 S2 S3 S4 HD 3 SERVO AIL ELE PIT 120 CCPM 3 SERVO AIL ELE PIT 140 CCPM SWASHPLATE MIXING TYPE 65 TRIM OFFSET HV T HV P LO P HI P 82 N NOR IN L 1 2 3 4 5 6 H ORG OUT 1 NOR IN 100 ORG OUT 2 NOR IN 100 ORG OUT 3 NOR IN 100 ORG OUT 4 NOR IN 100 ORG OUT ...

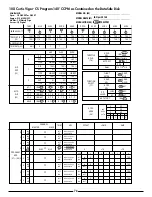
Page 76: ...POS Delay 1 4 1 2 3 4 1 FLIGHT INH GEAR EXTRA AILE GEAR INH GEAR SW HOLD AUX2 INH ACT SW PIT LOW INH ACT LEVER HI INH ACT ADT STUNT INH ACT THROTTLE HOLD 16 INH AUX 3 AUTO GYRO SENS 44 FUNCTION SELECT 17 CHANNEL TRIM SW OFFSET GAIN GAIN MASTER SLAVE INH OFF NR S1 S2 S3 S4 5 1 ACT ON HD AX2 GER INH OFF NR S1 S2 S3 S4 5 2 ACT ON HD AX2 GER INH OFF NR S1 S2 S3 S4 5 3 ACT ON HD AX2 GER INH OFF NR S1 S...

Page 77: ...RO CURVE 18 TH TRIM SLOW HOV T CENTER PITCH CURVE 68 P TRIM CENTER HOV P CENTER 1 SERVO 3SERVO 120 CCPM 3SERVO 140 CCPM ELE AIL D 1SERVO U AIL ELE L R SWITCH NR S1 S2 S3 S4 HD 3 SERVO AIL ELE PIT 120 CCPM 3 SERVO AIL ELE PIT 140 CCPM SWASHPLATE MIXING TYPE 65 TRIM OFFSET HV T HV P LO P HI P 82 N NOR IN L 1 2 3 4 5 6 H ORG OUT 1 NOR IN 100 ORG OUT 2 NOR IN 100 ORG OUT 3 NOR IN 100 ORG OUT 4 NOR IN ...

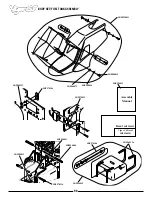
Page 78: ...JRP991001 JRP996013 JRP981005 JRP996017 JRP970080 JRP980012 JRP980036 JRP996003 JRP996011 JRP980062 JRP970102 JRP996014 JRP980039 JRP980036 JRP980036 JRP980022 JRP980071 JRP980064 JRP980037 JRP970001 JRP970004 JRP980106 JRP980122 JRP980026 JRP980029 JRP980029 JRP980036 JRP980036 JRP996002 JRP996002 JRP996006 JRP996006 START SHAFT CLUTCH ENGINE ASSEMBLY ...

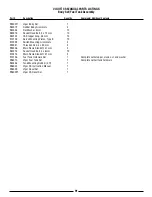
Page 79: ... Bearing 15 x 24 x 5 mm 1 996013 Long Bearing Block B 1 Complete w bearing 996016 Long Bearing Block A 1 Complete w bearing 980059 Socket Head Bolt 3 x 14 mm 10 970050 Taper Collet B Upper 1 996006 Cooling Fan Shroud 1 1 left 1 right half Complete w screws 996002 Cooling Shroud Brackets 2 Complete w screws and washers 996003 Cooling Fan Blades 1 Complete w screws and washers 996011 Cooling Fan Hub...

Page 80: ...P970020 JRP980036 JRP970094 JRP980122 JRP980019 JRP980122 JRP980022 JRP980022 JRP980022 JRP980036 JRP970018 JRP980036 JRP980036 JRP980012 JRP960338 JRP980004 JRP970008 JRP996012 JRP996015 JRP996030 JRP980012 JRP994001 JRP970047 JRP980004 JRP980036 JRP980060 JRP980014 JRP996018 JRP960036 JRP960119 JRP970048 JRP994010 JRP990053 JRP960504 CNC Driven Tail Rotor JRP9940011 80 MAIN FRAME LANDING GEAR AU...

Page 81: ...22 mm 10 980122 Socket Head Bolt 3 x 50 mm 10 980013 Socket Head Bolt 3 x 8 mm 10 970092 Main Frame Crossmember 64 mm 2 970094 Spacer 3 x 6 x 14 mm 2 970213 Spacer 3 x 6 x 10 mm 2 RV01051 Fuel Tank Mounting Frames 2 970204 Canopy Mounting Standoff 2 960191 Front Radio Bed 1 980004 Set Screw 4 x 4 mm 10 970008 Main Shaft Collar 1 Complete w four 4 x 4 mm set screws 996012 Main Rotor Shaft 1 996005 ...

Page 82: ...980040 JRP980071 JRP994020 JRP980004 JRP980039 JRP994018 JRP980013 JRP970001 JRP991003 JRP980057 L95 JRP970001 JRP996040 JRP970001 JRP970002 JRP980020 JRP970206 JRP996041 JRP980148 JRP980037 JRP970104 JRP980022 JRP970018 JRP980039 JRP970053 JRP970002 JRP994019 JRP970201 JRP996039 JRP980016 JRP970078 JRP970004 JRP980046 JRP980002 JRP970020 JRP996038 SWASHPLATE CCPM CONTROL SYSTEM ...

Page 83: ...Head Bolts 3 x 40 mm 10 JRP980027 Self Tapping Screws 2 x 8 mm 10 JRP980035 Plate Washer 2 6 mm 10 JRP980037 Hex Nuts 2 mm 10 JRP980039 Nylon Lock Nuts 3 mm 10 JRP980040 Nylon Lock Nuts 4 mm 10 JRP980046 Control Rod 2 3 x 60 mm 2 JRP980052 Control Rod 2 3 x 15 mm 2 JRP980056 Control Rod 2 3 x 85 mm 2 JRP980057 Control Rod 2 3 x 95 mm 2 JRP980067 Set Screws 3 x 3 mm 10 JRP980071 Plate Washers 4 mm ...

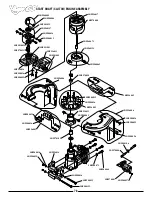
Page 84: ...RP980053 JRP980042 JRP994005 JRP960258 JRP970098 JRP980052 JRP996027 JRP994005 JRP980075 5mm JRP994007 JRP970115 JRP996026 JRP970082 JRP980016 JRP980037 JRP981026 JRP970099 JRP970001 JRP980030 JRP970029 JRP980039 JRP996028 JRP970077 JRP980016 JRP981031 JRP970002 JRP970119 JRP970004 JRP996021 JRP980015 JRP960249 JRP970010 JRP981027 JRP970093 JRP980074 JRP970082 JRP981015 JRP996039 JRP970069 JRP9830...

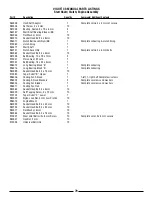
Page 85: ...sher 03 x 4 5 x 0 7 10 996026 Main Blade Holder 2 Complete w two 14 mm control balls 970082 Washer 03 x 4 5 x 0 4 10 980037 Hex nut 2 mm 10 980030 Button Head Bolt 3 x 5 mm 10 970069 Blade Bolts w Spacers 2 Complete w two 4 mm bolts and 12 mm grip spacers 980075 Nylon Lock Nut 5mm 10 980016 Socket Head Bolt 3 x 15 mm 10 970029 Seesaw Spacer Collar 2 970077 Main Rotor Shaft Bolt 3 x 22 mm 2 Complet...

Page 86: ...80036 JRP980013 JRP980019 JRP960132 JRP993005 JRP983007 JRP980024 JRP970081 JRP970004 JRP980039 JRP994010 JRP980036 JRP990053 JRP980022 JRP980036 JRP980013 JRP980015 JRP980036 JRP960133 JRP960134 JRP980015 JRP980067 JRP980004 JRP980067 JRP980001 JRP980001 JRP970170 JRP970171 JRP970171 JRP970169 JRP993004 JRP970172 JRP970173 JRP960111 JRP980060 JRP960092 JRP980069 JRP960094 JRP991002 JRP980065 JRP9...

Page 87: ...r 3 mm 10 JRP980037 Hex Nuts 2 mm 10 JRP980039 Nylon Lock Nuts 3 mm 10 JRP980060 Socket Head Bolts 3 x 2 0mm 10 JRP980065 Flat Head Bolts 3 x 6 mm 10 JRP980067 Set Screws 3 x 3 mm 10 JRP980069 Set Screws 4 x 6 mm 10 JRP980073 Socket Head Bolts 2 x 6 mm 10 JRP980077 Self Tapping Screws 2 x 4 mm 10 JRP981004 Ball Bearing 5 x 13 x 4 mm 2 JRP981015 CA Stopper Ring 2 mm 10 JRP983007 CF Tail Control Rod...

Page 88: ...0129 JRP980070 JRP980036 JRP981018 JRP970054 JRP970065 JRP981019 JRP976103 JRP970002 JRP981034 JRP980067 JRP980128 JRP980016 JRP960128 JRP960507 JRP960370 JRP960470 JRP993003 JRP980009 JRP994004 JRP970018 JRP970020 JRP980019 JRP980036 JRP990054 JRP996024 JRP960047 ...

Page 89: ...oint Ball w 2 x 10 mm Screw 10 Complete w ten 2 x 8 mm screws 960128 Tail Blade Holder Set 1 One complete set 4 pcs 976103 O Ring Tail Hub 2 980131 Socket Head Bolt 2 x 10 mm 10 981034 Thrust Bearing 4 x 9 x 4 mm 2 981018 Open Bearing 4 x 10 x 4 mm 2 960129 Tail Rotor Blades 2 970054 Washer 4 x 7 x 0 5 mm 2 970065 Washer 7 x 10 x 1 mm 2 981019 Sealed Bearing 4 x 10 x 4 mm 2 980128 Nylon Lock Nut 2...

Page 90: ...al JRP970104 JRP970025 JRP996029 JRP994006 JRP996010 JRP996032 JRP970106 JRP960336 JRP970214 JRP980013 JRP990051 JRP9920011 JRP980132 JRP960072 JRP980036 JRP980015 Vigor CS Decal JRP9960291 90 BODY SET FUEL TANK ASSEMBLY ...

Page 91: ...70104 Servo Mounting Plates Type B 10 970025 Switch Mounting Grommets 4 990051 Threaded Rod 3 x 50 mm 2 994006 Main Frame Standoff 41 mm 2 980013 Socket Head Bolt 3 x 8 mm 10 970214 Main Frame Standoff 21 mm 2 970106 Fuel Tank Hardware Set 1 Complete with stopper clunk nut and washer 996010 Vigor Fuel Tank Set 1 Complete with all tank hardware 960336 Tank Mounting Rubber 3 ft 1 996032 Vigor CS Ins...

Page 92: ...Distributed exclusively by Horizon Hobby Inc 4105 Fieldstone Road Champaign IL 61822 www horizonhobby com www vigorpilot com 2001 Horizon Hobby Inc All Rights Reserved JRP9051 46 ...

Reviews: