


measure the maximum width of the
spacing. If it goes beyond the limit,
replace the bush.
[Benchmark]
:0.025-0.069mm
[Limit]
:0.10mm
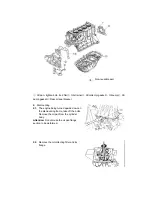
2.4.5.
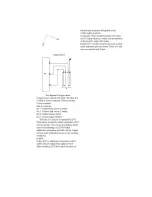
Remove Main bearing cover,
Crankshaft, Crankshaft bush, Thru
st washer
Attention:
tighten the bolts fixing bearing
cover according the order show as right
figure
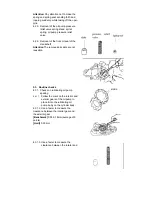
2.5.
Disassembling of connecting rod
assembly of the piston
2.5.1. Use the piston ring pliers to remove
the primary ring, the secondary ring
and the oil ring
Attention
Do not mix up the pistons and
piston rings for each unit of assembly.
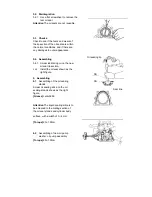
2.5.2. Use SST to remove the piston,
connecting rod and piston pin
①
Remove the piston pin to take off the
piston and the connecting rod by using
SST.
43. Clearing
44.
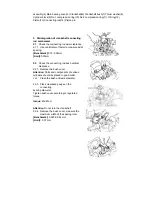
2.6. Cylinder body
Warning
Wear eyeglasses during the
clearing operation to protect your eyes.
2.6.1.
Use flat chisel to clear the cylinder
body, the cylinder cover, the oil
bottom casing, the oil pump and the
oil seal.
2.7. Piston
Warning
Wear eye glassed in the process
SST
SST
SST
Summary of Contents for JNSZ1100SVB
Page 6: ...Warranty policy...
Page 7: ......
Page 8: ......
Page 9: ......
Page 10: ......
Page 11: ......
Page 12: ......
Page 13: ......
Page 14: ......
Page 15: ......
Page 41: ...13 ENGINE WIRING DIAGRAM...
Page 96: ...95 46 ELECTRIC INJECTION SYSTE...
Page 97: ...96...
Page 98: ...97...
Page 99: ...98...
Page 100: ...99...
Page 101: ...100...
Page 102: ...101...
Page 103: ...102...
Page 104: ...103...
Page 105: ...104...
Page 106: ...105...
Page 107: ...106...
Page 108: ...107...
Page 109: ...108...
Page 110: ...109...
Page 111: ...110...
Page 112: ...111...
Page 113: ...112...
Page 114: ...113...
Page 115: ...114...
Page 116: ...115...
Page 117: ...116...
Page 118: ...117...
Page 119: ...118...
Page 120: ...119...
Page 121: ...120...
Page 122: ...121...
Page 123: ...122...
Page 124: ...123...
Page 125: ...124...
Page 126: ...125...
Page 127: ...126...
Page 128: ...127...
Page 129: ...128...
Page 130: ...129...
Page 131: ...130...
Page 132: ...131...
Page 133: ...132...
Page 134: ...133...
Page 135: ...134...
Page 136: ...135...
Page 137: ...136...
Page 138: ...137...
Page 218: ...217 4 Attach tie rod and front wheel...
Page 225: ...224 DEALER PRE DELIVERY INSPECTION...