


3.1.1. Fix the two
φ
6 holes of the camshaft gear S/A.
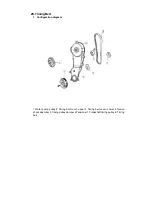
3.1.2. Turn the slave gear to the right, match the mark
hole on the slave gear with the mark on the
master gear, or align the marks on the slave
gear with the mark on the master gear; then fix
the slave gear with bolt.(Thread: M5; pitch: 0.8)
3.2.
When no using a special tool
Screw bolt m6 as the right figure, and then
insert a screwdriver between the bolt m6
and camshaft, and rotate driven-gear right
to match the mark on both of gears, or
keep the gear-top of 2 gears consistent,
and then fix driven-gear with bolt(M5
×
0.8).
Attention:
Do not damage the surface of
the camshaft.
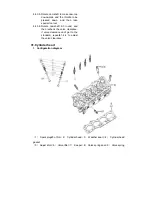
3.3.
Installation of the camshaft
Attention:
Size of the axial clearance of
the camshaft
3.3.1. Smear lubricating oil at the
camshaft gear section and the
cylinder cover axial diameter
section.
3.3.2. Fix the camshaft slave gear by
roughly adjusting on the cylinder
cover.
3.3.3. Install camshaft, the timing mark
must be aligned shown as the right
figure.
3.3.4. Smear lubricating oil on the
camshaft assembly, the gears and
the cylinder head axial diameter
section.
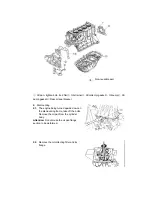
3.4.
Tighten the camshaft-bearing cap
shown as right figure.
3.5.
Remove the bolt for fixing the slave
gear of the camshaft assembly.
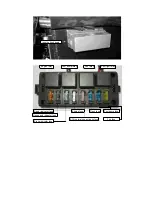
Fixer
Bolt
Timing mark
Air outlet camshaft gear
Air inlet camshaft gear
Fixer
Summary of Contents for JNSZ1100SVB
Page 6: ...Warranty policy...
Page 7: ......
Page 8: ......
Page 9: ......
Page 10: ......
Page 11: ......
Page 12: ......
Page 13: ......
Page 14: ......
Page 15: ......
Page 41: ...13 ENGINE WIRING DIAGRAM...
Page 96: ...95 46 ELECTRIC INJECTION SYSTE...
Page 97: ...96...
Page 98: ...97...
Page 99: ...98...
Page 100: ...99...
Page 101: ...100...
Page 102: ...101...
Page 103: ...102...
Page 104: ...103...
Page 105: ...104...
Page 106: ...105...
Page 107: ...106...
Page 108: ...107...
Page 109: ...108...
Page 110: ...109...
Page 111: ...110...
Page 112: ...111...
Page 113: ...112...
Page 114: ...113...
Page 115: ...114...
Page 116: ...115...
Page 117: ...116...
Page 118: ...117...
Page 119: ...118...
Page 120: ...119...
Page 121: ...120...
Page 122: ...121...
Page 123: ...122...
Page 124: ...123...
Page 125: ...124...
Page 126: ...125...
Page 127: ...126...
Page 128: ...127...
Page 129: ...128...
Page 130: ...129...
Page 131: ...130...
Page 132: ...131...
Page 133: ...132...
Page 134: ...133...
Page 135: ...134...
Page 136: ...135...
Page 137: ...136...
Page 138: ...137...
Page 218: ...217 4 Attach tie rod and front wheel...
Page 225: ...224 DEALER PRE DELIVERY INSPECTION...