


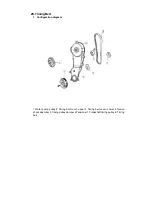


3.3.2. Turn the crankshaft for two circles
towards the engine rotating
direction, so that the camshaft
pulley and the crankshaft pulley
match the clockwise marks
respectively.
3.3.3. Use hands to press down for about
5mm. The force for pressing the
clockwise belt is about:
[
Reference
]
20
~
30 N
Notice:
When the deflection of the timing
belt fails to meet the specifications, the key is to adjust
the above-mentioned stretcher fastening bolt by
widening he spacing. tighten the S/A fixing bolt of the
stretcher with the specified torque of 25
±
3N.m
3.4.
Install the baffle of the crankshaft-timing pulley
[Attention]
Install the baffle towards the direction
shown in the right figure.
3.5.
Install the tensional vibration damper
(use SST)
3.5.1. When there is not a flying wheel,
3.5.1.1. Fix a part of the crankshaft pulley.
3.5.1.2. Pay attention not to make the gear
belt moving, tighten the bolt
according to the specified
torque :98.0
±
10N.m{10
±
1kgm}
Summary of Contents for JNSZ1100SVB
Page 6: ...Warranty policy...
Page 7: ......
Page 8: ......
Page 9: ......
Page 10: ......
Page 11: ......
Page 12: ......
Page 13: ......
Page 14: ......
Page 15: ......
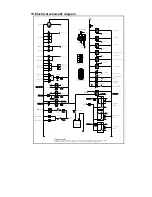
Page 41: ...13 ENGINE WIRING DIAGRAM...
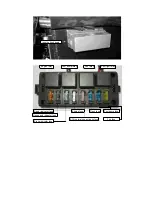
Page 96: ...95 46 ELECTRIC INJECTION SYSTE...
Page 97: ...96...
Page 98: ...97...
Page 99: ...98...
Page 100: ...99...
Page 101: ...100...
Page 102: ...101...
Page 103: ...102...
Page 104: ...103...
Page 105: ...104...
Page 106: ...105...
Page 107: ...106...
Page 108: ...107...
Page 109: ...108...
Page 110: ...109...
Page 111: ...110...
Page 112: ...111...
Page 113: ...112...
Page 114: ...113...
Page 115: ...114...
Page 116: ...115...
Page 117: ...116...
Page 118: ...117...
Page 119: ...118...
Page 120: ...119...
Page 121: ...120...
Page 122: ...121...
Page 123: ...122...
Page 124: ...123...
Page 125: ...124...
Page 126: ...125...
Page 127: ...126...
Page 128: ...127...
Page 129: ...128...
Page 130: ...129...
Page 131: ...130...
Page 132: ...131...
Page 133: ...132...
Page 134: ...133...
Page 135: ...134...
Page 136: ...135...
Page 137: ...136...
Page 138: ...137...
Page 218: ...217 4 Attach tie rod and front wheel...
Page 225: ...224 DEALER PRE DELIVERY INSPECTION...